
Sites on shared hosting often wobble when traffic spikes. You watch page loads slow down and visitor numbers fall.
VPS hosting gives you dedicated server resources, quicker page loads, and root access. In this guide, we share the Key Considerations When Migrating To VPS Hosting, from checking RAM and CPU cores to syncing files with your FTP client, setting up SSH access, and updating DNS records.
We break each step into clear, simple tasks. Read on.
Key Takeaways
- Assess server needs: count CPU cores, gigabytes of RAM, and disk space. Add a buffer (e.g., 20%) for traffic spikes and email accounts.
- Test compatibility: log in via SSH, run “sudo apt update,” upload PHP files, and run MySQL queries. Ping the new IP and confirm the A record in DNS.
- Secure your VPS: enable a firewall, set up daily malware scans, use SSH keys and two-factor authentication, and add a CDN like Cloudflare to block DDoS.
- Back up everything: use rsync or tar on your web root, export databases with mysqldump, move archives to Amazon S3, and verify with “tar t” or a wget pull.
- Plan downtime: schedule migration during off-peak hours, notify users 48 hours ahead, lower DNS TTL to 300 seconds two days before, and display a maintenance page.
Assess Resource Requirements
Assess your server resources before migration. Count CPU cores and gigabytes of RAM your site needs. Note disk space for files, images, database software and logs. Add buffer for traffic spikes and email accounts.
Compare that with shared hosting allotments. Choose VPS hosting for more memory, processing power, and storage. Test the operating system, secure shell and ftp access in a sandbox.
Use putty or command-line tools to check website performance. Ask your hosting provider for root access details, username and root password.
Estimate daily website traffic and peak requests per second. Boost CPU and RAM for complex apps, large databases, and online transactions. Factor in content delivery networks or a private cloud for global reach.
Plan database backups and security patching. Match your vps environment and cloud platform to software updates and technical support needs. Track the data centre location for latency, dns configuration and spam filtering.
Verify Compatibility with VPS Environment

Your website needs a trial in the new VPS environment. Test the VPS environment for compatibility with your website. Log in via SSH to your virtual private server. Run sudo apt update for all modules.
Upload your PHP files and run them. Check MySQL queries against your database backups. Look for failures in your scripts or code. Fix missing extensions fast. Try the WordPress dashboard.
Watch server performance in top. Note CPU and RAM use during script tests.
Web apps, scripts, and plugins must match the server environment. Align PHP builds, modules, and Nginx settings. Validate your content delivery network with live assets. Confirm domain name points at the new IP in your DNS zone.
Ping the VPS instance from localhost. Verify file access with chmod tests. Ask your hosting provider for full root access. Adjust the operating system and virtualization technology.
Log error files from /var/log to catch missing libraries.
Ensure Strong Security Measures
VPS hosting plans include a firewall that blocks unwanted traffic. Malware protection scans run each day. Regular software updates patch security holes. Admins set strong passwords for root and user accounts.
Enable SSH keys to stop password guessing. Automated backups save site files every 24 hours.
A content delivery network like Cloudflare stops DDoS attacks. Owners get root access and tweak security settings. Technical support teams help lock down open ports. Two-factor authentication strengthens login screens.
Regular site scans detect threats early and boost website security.
Create a Complete Backup of Your Website
You must back up all your site code and data. A full copy averts data loss during migration.
- Choose a backup tool like rsync or tar to copy every file from your web root. This step shields all static assets and PHP scripts before the move.
- Export your MySQL tables with mysqldump or your hosting provider’s control panel. That captures every entry and structure in your database backups for your virtual private server.
- Move archives to offsite storage such as Amazon S3 or a CDN endpoint. Storing copies elsewhere guards against disk crashes and server failures.
- Verify your archive with tar t or a wget pull test to confirm all files open without errors. This check catches archive glitches and boosts website security.
- Schedule snapshots with cron jobs or cloud provider API calls to capture fresh copies. That habit cuts the risk of data loss during website migration from shared hosting.
Test in a Staging Environment Before Migration
Testing in a staging environment cuts risk. Teams catch bugs before the real migration.
- Build a staging server on your cloud infrastructure with full root access to match your live virtual private server rather than a shared hosting plan.
- Clone all web files and mirror your operating systems and hypervisor in the vps environment.
- Restore MySQL database backups via a command line tool or phpMyAdmin to copy real data.
- Link a test subdomain in your dns configuration so you view the site as users will.
- Run load tests under simulated website traffic to check server performance and scale up thresholds.
- Scan for cyber threats and apply the latest security updates to patch vulnerabilities.
- Validate content delivery network (cdn) settings to optimize content distribution across the web.
- Log test outcomes and share them with your hosting provider or technical support staff.
Plan and Prepare for Downtime During Migration
Migration can pause your live site. You want to reduce downtime and data loss.
- Set migration schedule during off-peak hours, use analytics from your hosting provider to pick a slot with low website traffic.
- Notify your visitors and team at least 48 hours ahead, send emails or add a banner in your web browser to give them a heads-up.
- Create full database backups and file snapshots, use SSH and your control panel to store copies off-site and on your new vps hosting account.
- Deploy a simple maintenance page on your server, it keeps users in the loop and avoids more website downtime during the switch.
- Use hosting provider technical support and transfer tools, they help you move data securely, reducing risks of data loss during website migration.
- Lower DNS TTL to 300 seconds two days before cutover, update your DNS configuration after the switch to speed up propagation.
- Monitor server resources and website performance with a cloud computing monitoring service, watch CPU, memory, and I/O to catch issues fast.
Choose Between Managed and Unmanaged VPS
Picking the right VPS plan feels like choosing a road trip partner, you need the skill set, and you want an easy trip.
| Type | Pros | Cons | Key Tools | Best For |
|---|---|---|---|---|
| Managed VPS |
|
|
|
|
| Unmanaged VPS |
|
|
|
|
Optimize Server Configuration Post-Migration
Your VPS hosting setup needs quick tuning after you move it. You get root access on a virtual private server, so you can install and tweak every layer.
- Adjust web server settings to match your traffic, boost page load times, and handle spikes.
- Configure database server limits for memory and queries to keep response fast under load.
- Set up a cache engine for dynamic pages, cut server resource use, and speed up delivery.
- Integrate a CDN service to cache static files at edge nodes, shrink latency, and scale with traffic.
- Harden SSH access, switch to a nonstandard port, disable root login, and use key pairs.
- Update your operating system and core libraries to patch security flaws, and reboot after each release.
- Enable a firewall service, open only needed ports, and drop unwanted connections.
- Install an SSL certificate and force HTTPS, so you lock traffic and build trust.
- Deploy a server monitor tool to track CPU, RAM, and I/O, so you catch issues early.
Update DNS Settings to Point to the New Server
Open the DNS control panel at your domain name registrar. Edit the A record to use the IP address of the new VPS hosting plan. Save updates and watch for any errors in the dns configuration.
Wait up to 48 hours for full global propagation of website traffic to the new server. Verify the shift by pinging the domain and viewing live server logs. Adjust the TTL value to speed up future changes in server performance.
Monitor Performance and Security After Migration
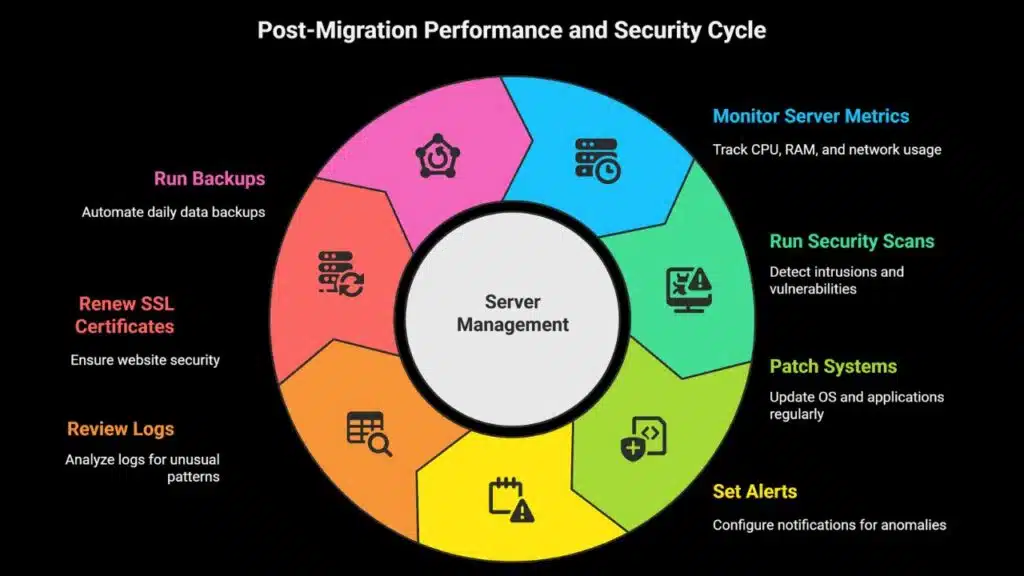
Log server metrics with a tool like New Relic or Nagios. Track CPU, RAM use, disk I/O, and network traffic to gauge server performance. Spot slowdowns in real time. Run security scans with intrusion detection tools such as Snort or Suricata.
Patch operating systems and applications every week. Use SSH keys to log in to your vps hosting server.
Set alerts for CPU spikes or strange login attempts. Call your hosting provider if you see odd patterns in logs. Keep a packet filter active and update rules to block new threats. Renew SSL certificates before they expire to keep website security tight.
Run backups daily with automated scripts and store them off site. Review logs in the SSH console after each scan.
Regularly Maintain and Update Your VPS
Your VPS hosting requires routine checks. Updates protect performance and website security.
- Schedule weekly software updates through your control panel to patch security vulnerabilities.
- Scan system logs daily to spot unusual activity or failed login attempts.
- Rotate root access credentials every 30 days to enforce strong password policies.
- Automate database backups after each patch to secure critical site data.
- Check server performance metrics to maintain fast website performance under high traffic.
- Clean temporary files and caches to free up dedicated resources on your virtual private server.
- Audit firewall rules after each update to close any new security gaps.
- Test new configurations in a staging environment to limit website downtime risks.
- Review user access rights on Linux or Windows Server to curb unauthorized changes.
- Apply security patches for your operating system, such as Ubuntu, CentOS, or Windows Server.
- Update SSL certificates before expiration to keep HTTPS connections safe for visitors.
- Contact technical support if you face errors or unexpected drops in server performance.
Utilize Migration Tools or Hosting Provider Support
Hosting firms often bundle migration scripts and control panels with their VPS plans. This setup speeds website migration and cuts downtime.
- A panel like cPanel automates file and database transfers, cutting downtime.
- Automated scripts simplify data moves and lower transfer errors.
- Tech staff guide you through a move from shared hosting to a virtual private server environment.
- Root access provides control over operating systems and critical software updates.
- A test environment lets you trial your website move before you change DNS records.
- Domain services or hosting agents handle DNS configuration for a quick switch.
- Experts check server resources post-launch to confirm dedicated resources fit your traffic.
- Managed VPS plans add technical support and a migration wizard for higher operational efficiency.
Communicate Changes to Your Users
Point users to a site announcement with website migration and vps hosting details. This list shows the VPS switch date, window length, and potential slowdowns. It names the hosting provider support team and shows estimated outage time.
Send live tweets or chat messages to note progress on file sync in the control panel. You add a quick note when DNS propagation hits each region, when server performance stabilizes, and when load balancer tests end.
Light jokes about coffee breaks ease tension.
Takeaways
These five checks set you up for a smooth VPS shift.
You size CPU, RAM and disk space.
Next, tweak server configurations, spin up a staging site to dodge a hair-pulling night.
Lock down access with firewalls and automated backups.
Plan a brief pause for your DNS configuration.
Watch site speed and uptime climb once you flip the switch.
FAQs
A VPS is like your own small island, not a big crowded beach. A virtual private server gives you dedicated resources. Shared web hosting splits CPU, memory, disk among users. Sites can slow when traffic peaks.
2. How does migrating to a virtual private server boost website performance and scalability?
Moving to a VPS boosts website performance, and lets you scale as you grow. You get more server resources, and you pick the operating system (OS) you like. It can handle more website traffic, you see. You also set DNS configuration to guide your visitors right.
3. What security checks should I do when moving to a virtual private server?
You must add website security tools, like firewalls and software updates. Plan database backups before website migration. Check your DNS configuration and manage server settings. A VPS can be safer than shared hosting if you follow strong rules.
4. Will my site face downtime during migration to a VPS?
Plan to cut website downtime. Move files and data migration bit by bit on a web-based console. Lower TTL at your domain name registrars before you switch. Then update DNS configuration. Call your hosting provider for technical support if things go sideways.
5. Can I manage my VPS or should I pick a managed VPS?
If you crave root access and custom server configurations, a self managed VPS works. If you want ease of use, pick a managed vps. They run software updates, handle database backups, and cover server management, so you focus on content.
6. How do I choose the right hosting provider for my VPS?
Pick a hosting provider by its server performance, price, and tech support. Look for virtualized hardware, dedicated servers, and clear server resources. Test the user-friendly dashboard. See if they rank in Google search results. Some local names, like mazaya business avenue, also sell domain name registrars.