Have you ever spent hours coding a new feature, only to have Git throw a wall of errors when you try to merge? You are certainly not the only one. Suddenly, your screen is filled with strange symbols and broken code. It is incredibly frustrating when you just want to ship your work. Git merge conflicts occur when two people change the exact same lines of code. Your version control system simply cannot figure out which changes to keep.
I am going to walk you through how to fix Git merge conflicts step by step. We will break down how to spot conflicts, understand their causes, and resolve them quickly.
Grab a cup of coffee, and let’s go through it together. I will show you everything you need to know.
What is a Git Merge Conflict?
A Git merge conflict happens when two branches alter the same lines in a file. Git cannot automatically decide which version to save. Your version control system detects this collision and pauses the merge process.
Code integration requires human judgment at this point, and Git marks the exact spot of the trouble with special symbols. These conflicts are a completely normal part of team collaboration, meaning two developers simply ended up modifying the same codebase location.
According to a 2026 report by Git AutoReview, US developers lose roughly $24,000 worth of productivity every year to idle pull requests, context switching, and merge conflicts. This is a massive hidden cost for any engineering team.
Code integration becomes much smoother once you realize conflicts are just Git asking for your help.
Why Do Merge Conflicts Happen?
Merge conflicts pop up when two developers work on the exact same code sections simultaneously. Git tracks every single line of code. When competing edits create a puzzle, Git stops and waits for your instructions.
There are a few very common scenarios that trigger these roadblocks in your repository:
- Two team members edit the same lines in different branches.
- One developer deletes a file while another modifies it.
- Structural shifts occur, like renaming a folder or a function.
- Long-running branches drift too far away from the main codebase.
A 2025 study from Aviator noted that if you do not rebase your long-lived branches constantly, “merge purgatory” becomes your default reality. Developers working on overlapping features without communicating often face these issues.
The staging area fills with competing versions, and your commit history shows divergent paths.

Merge conflicts are not failures; they are opportunities for your team to align on the best solution.
Types of Git Merge Conflicts
Git merge conflicts generally fall into three main categories. Each one requires a slightly different approach to fix.
Conflicts due to competing line changes
Competing line changes happen when two branches modify the same lines of code differently. For example, you might edit the header in index.html while a teammate changes the exact same header on their branch.
Git simply cannot figure out which version should win. This is the most common type of merge conflict you will face. The conflict markers appear right in your file. This shows you both versions side by side, so you can pick the winner.
Git stops the process and asks you to decide. This hands-on approach prevents bad merges from sneaking into your project because you must:
- Review the file comparison carefully.
- Understand what each branch tried to accomplish.
- Choose the correct code to keep manually.
Conflicts caused by deleted files
Line changes create tension, but deleted files bring a completely different challenge. Your teammate might delete a configuration file on one branch while you modify that same file on your branch.
Git gets confused very fast. It does not know whether to keep the file, remove it, or ask for your input. This type of conflict stops your merge dead in its tracks. Resolving deleted file conflicts requires you to check your repository and understand what happened.
If you decide to keep the file, you run git add on it. If you want to accept the deletion, you run git rm instead. Your staging area updates with your choice, and the merge continues.
Conflicts from structural changes
Structural changes occur when your code reorganizes itself through file renames or method refactoring. Modern IDEs like IntelliJ or VS Code often refactor entire directories in seconds.
Git struggles to track these massive shifts. The version control system usually sees them as mass deletions in one branch and mass additions in another.
You might move a function into a new file, while your teammate deletes that function on the main branch. The command line throws up conflict markers, and your repository looks like a broken puzzle.
These conflicts demand careful attention because they affect your entire code architecture. You cannot simply pick one side. You must examine your commit history and collaborate with teammates to make the right call.
How to Identify Merge Conflicts
Git shows you conflict markers when two branches change the same lines in a file. You can spot these markers right away. They look like <<<<<<<, =======, and >>>>>>> symbols scattered through your code.
Checking for conflict markers
Git marks conflicts with special symbols that stand out in your code. These markers show exactly where the disagreement happened. If you use a modern editor like VS Code, it often highlights your current changes in green and incoming changes in blue.
- Look for <<<<<<< to see the beginning of the conflict section from your current branch.
- Find the ======= line to divide your changes from the incoming changes.
- Locate the >>>>>>> marker to signal the end of the conflict.
- Study the code between these markers to understand what each branch offers.
Remove all three types of markers once you resolve the disagreement. Your file should contain only the final code.
Using Git status to locate conflicts
Git status serves as your first line of defense. This command reveals exactly which files contain conflicts that need your attention. Open your command line and type git status to see the current state of your system.
- Look for files labeled as “both modified” in the status output.
- Check for files showing “deleted by us” or “deleted by them” for structural conflicts.
- Pay attention to the red text, which makes unresolved files stand out.
- Read the status message carefully to catch helpful branch names and merge details.
Use the status output to prioritize your work. Tackle files with the most critical code changes first.
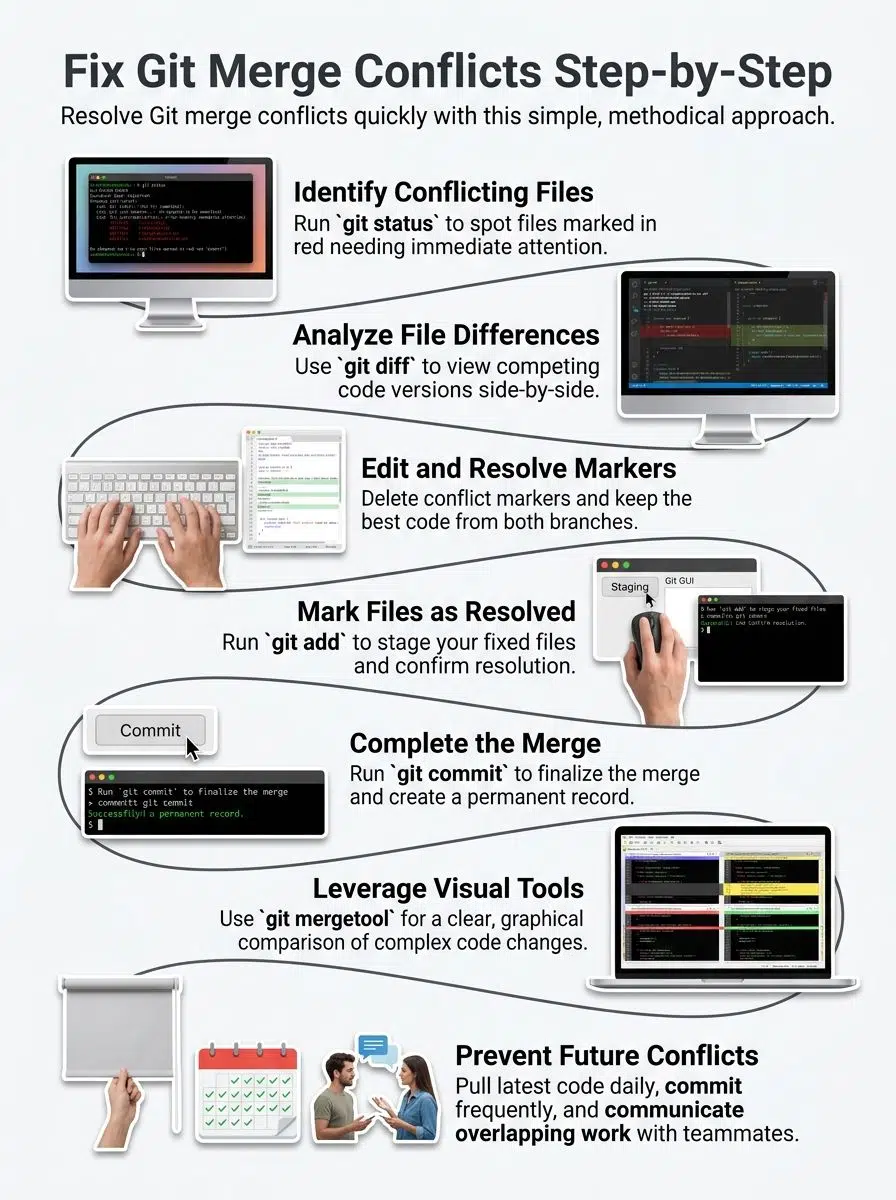
Step-by-Step Guide to Fix Git Merge Conflicts
Fixing these issues requires a methodical approach. You will work through each conflicting file and make specific decisions about which changes to keep.

Step 1: Identify conflicting files
Git tells you exactly which files have conflicts when you run a status check. Your command line shows red-colored file names that need your attention.
Type git status in your terminal to display the list of conflicting files. Look for items labeled as “both modified” or “deleted by us”. Make a list of all conflicting files on paper or in a text editor. Tracking them helps you stay organized.
Note which files have simple conflicts versus complex ones. Verify that you found every single conflicting file before moving forward.
Step 2: View and analyze differences
After spotting the files, you need to see what changes caused the problem. Viewing the differences helps you understand which version you want to keep. Open your text editor to view the conflicting file directly. Look for the conflict markers that Git inserted.
You can use specific commands to get a detailed breakdown:
- Use git diff to compare files side-by-side in the terminal.
- Run git diff –name-only to list just the files containing conflicts.
Take notes on the logic behind each change. This helps you make smart decisions about which code to preserve.
Step 3: Edit and resolve conflict markers
Now you must fix the actual markers in your files. This step requires you to choose between keeping, removing, or combining code.
Read the code between the markers carefully. A common mistake is blindly clicking “Accept Incoming Change” without reading the logic. Delete the conflict markers and the code you do not need. Keep only the version that makes sense for your repository.
Combine both code sections if necessary. Save your edited file after you finish resolving all markers. Check the file for syntax errors that might have occurred during your manual edits.
Step 4: Mark files as resolved
You have cleaned up the markers and made your decisions. Your staging area now needs to know these files are ready to go.
Here is how you confirm your fixes:
- Open your terminal and type git add followed by the filename.
- Run git status to verify the file no longer appears under “both modified”.
- Ensure the fixed files show up under “Changes to be committed”.
This process confirms your work is progressing correctly.
Step 5: Complete the merge process
After staging your changes, you are ready to finalize the merge operation. This last step integrates your branches into a single state. Verify your staging area contains all necessary files by running git status one last time.
Type git commit -m “Merge branch and resolve conflicts” to finalize the merge. This creates a permanent record in your commit history. Push your changes to the remote repository. Notify your team that the code integration finished without issues.
Useful Git Commands for Resolving Conflicts
Git gives you powerful tools to tackle these issues head-on. These commands cut through the confusion and get you back on track.
git status
The git status command shows you exactly what Git sees in your repository right now. It acts like a mirror for your staging area.
Git tells you which files have changes and which ones remain untracked. Your command line displays conflict markers next to files that need fixing. Running this command first saves you time. It narrows down your search and points you straight to the problem files.
git diff
The git diff command shows you exactly what changed between versions. It displays the line-by-line differences in your files. This tool highlights additions in green and deletions in red in most terminals. It makes spotting the problem areas very easy.
You can use it with specific file names to focus on just one conflicting file. This breaks down exactly where the disagreements live in your repository.
git mergetool
After you view the differences, you might want a more visual way to handle your conflicts. That is where git mergetool comes in handy.
This command launches a graphical interface showing both versions side by side. According to a 2026 Dev Community comparison, US developers heavily favor visual tools like GitKraken, Fork, and Sublime Merge for this exact task.
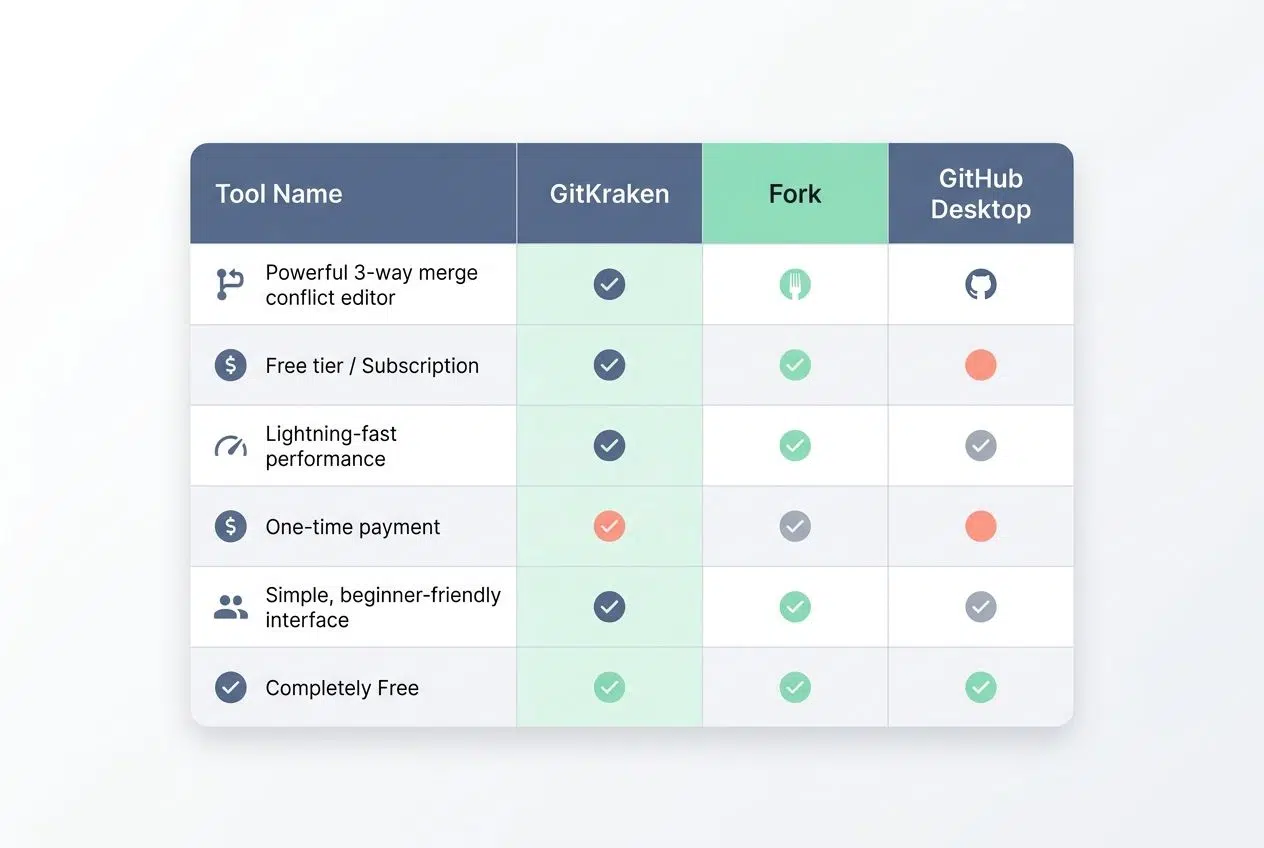
Here is a quick breakdown of popular GUI options:
| Tool Name | Best Feature | Price Model |
|---|---|---|
| GitKraken | Powerful 3-way merge conflict editor | Free tier / Subscription |
| Fork | Lightning-fast performance for power users | One-time payment |
| GitHub Desktop | Simple, beginner-friendly interface | Completely Free |
Running this command takes the guesswork out of the process. You pick which changes to keep, and the tool updates the staging area for you.
git add
You use git add to tell Git which files you want to include in your next commit. This moves your changes into the staging area. You can add specific files by typing git add filename.txt. You can also add all modified files at once with git add.
After you resolve the conflict markers, you must run git add on each fixed file. Git will not let you complete the merge process until you stage these files.
Best Practices for Avoiding Merge Conflicts
Keeping your branching strategy clean prevents most issues before they start. Communication stands as your strongest tool for avoiding headaches.
Many modern engineering teams are shifting their branching strategies to avoid these massive collisions. A 2025 analysis by Mergify highlighted that teams using Trunk-Based Development see significantly fewer severe conflicts compared to traditional, long-lived GitFlow branches.
By merging small chunks of code directly to the main branch daily, developers keep their changes atomic and easy to manage.
- Talk with your team about who works on what parts of the code.
- Pull the latest code from your repository daily to stay in sync.
- Commit your changes frequently with clear, descriptive messages.
- Use Continuous Integration tools like GitHub Actions to test code automatically.
Your staging area becomes a testing ground where you verify everything works. Teams that share their plans openly experience far fewer conflicts than those that work in isolation.
Final Thoughts
You now understand what merge conflicts are and how to fix Git merge conflicts step by step. They stop teams from working smoothly, but you have the exact tools to handle them. Identifying conflicting files, viewing differences, and editing markers are all straightforward tasks. These practical steps work in real projects every single day.
Learning to resolve these issues makes you a stronger programmer. Start using these methods today, and watch your collaboration improve immensely.
Frequently Asked Questions (FAQs) on Resolving Git Merge Conflicts
1. What causes a Git merge conflict, and how do I spot one?
A Git merge conflict happens when two branches modify the same lines in a file at the same time. Git can’t decide which changes to keep, so it pauses the merge. You’ll spot it right away because Git marks trouble spots with <<<<<<< HEAD, =======, and >>>>>>> symbols.
2. How can I fix a Git merge conflict step by step?
Open the conflicting file and find the sections between those marker symbols. Pick which changes to keep (or blend them together), delete all the markers, and save your work.
3. What should I do after fixing all my merge conflicts?
After you’ve cleaned up all the conflicts, run git add on each fixed file to stage them. Then wrap it up with a git commit to complete the merge.
4. Can tools help me solve Git merge conflicts faster?
Absolutely! Code editors like Visual Studio Code highlight conflicts with color-coded blocks and give you click-button options like “Accept Current Change” or “Accept Incoming Change.” It’s way faster than hunting through markers manually, and it takes the guesswork out of which version is which.