To learn how to digitize a paper planner without losing the habit, keep paper for daily planning and move only time-sensitive or reusable information into digital tools. Add appointments and deadlines to a calendar, place unfinished future tasks in one task manager, and scan only pages you may need again.
This hybrid approach preserves the visible, handwritten routine that already works while adding reminders, search, and a backup for important notes. Start with your current week rather than an archive. Use one digital home for each type of information, mark anything you transfer, and review the system once a week.
Keep the Habit
Do not start by scanning. Notice when and why you open the planner: with your first cup of tea, after opening your laptop, or before leaving work. Keep that cue.
Name the problem you want digital tools to solve. Missed appointments call for a calendar; unfinished work that disappears when you turn the page calls for a task manager. Lost notes may justify a scan archive. Do not buy or configure anything until you can name the friction.
Split the Work
A hybrid system needs a firm division of responsibility. Otherwise, every planning session begins with checking two incomplete versions of the same week.
- Digital calendar: Appointments, meetings, travel times, and fixed deadlines that need alerts or rescheduling.
- Digital task list: Project tasks, follow-ups, and other work that must survive beyond today.
- Scanned archive: Handwritten decisions, reusable notes, and records worth retrieving later.
Paper can remain the home of today’s priorities, rough thinking, and personal reflection. Use one primary home for each item. A deadline may also appear on today’s paper page, but the calendar remains the authoritative record.
How to Digitize a Paper Planner
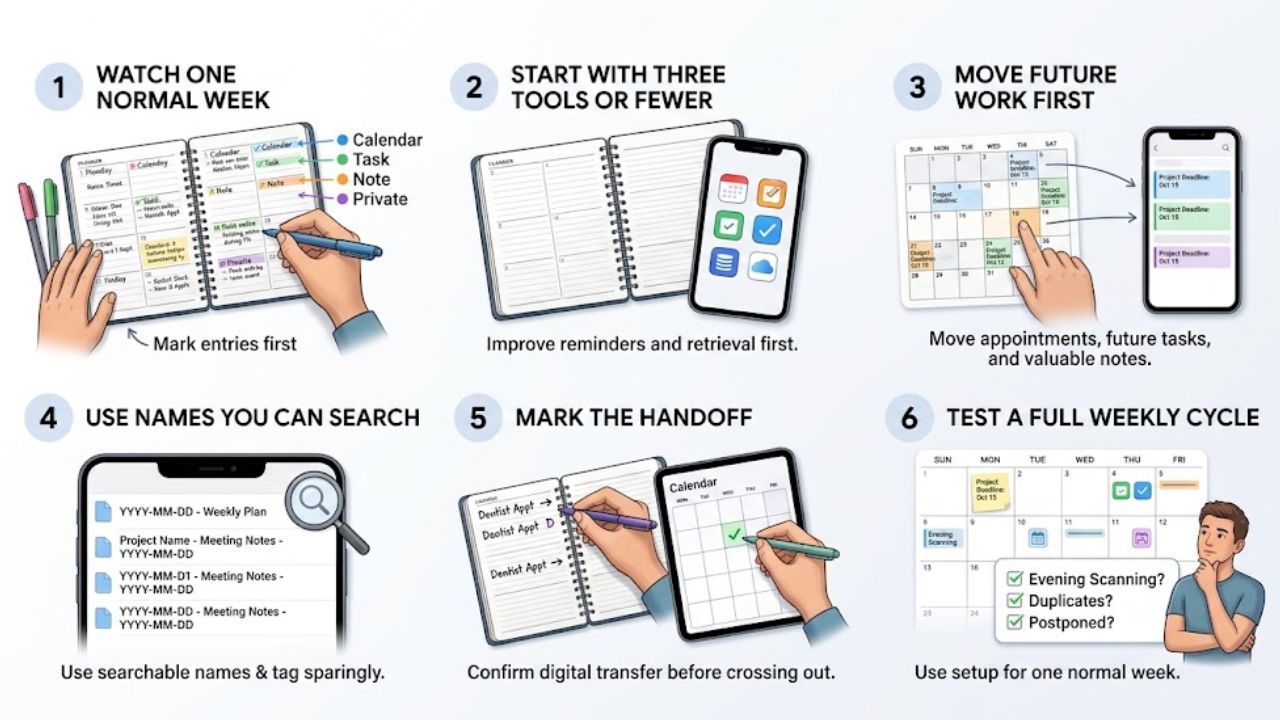
Start by deciding which planner entries need reminders, search, or backup. Move appointments, future tasks, and valuable notes into separate digital tools while keeping daily planning and reflection on paper.
1. Watch One Normal Week
Before deciding how to digitize a paper planner, use it normally for a week. Mark entries as calendar items, tasks, reference notes, or private writing. The pattern will show what needs a digital home.
Completed checklists and ordinary daily pages rarely need copies. A larger archive is not automatically more useful.
2. Start With Three Tools or Fewer
For most people, one calendar, one task manager, and one storage location are enough. Built-in apps may already cover all three roles.
The simplest answer to how to digitize a paper planner is to improve reminders and retrieval first. Every additional tool creates another place to check. Before paying for an app, confirm device support, export options, and which features require a paid plan.
3. Move Future Work First
When learning how to digitize a paper planner, start with upcoming appointments, renewals, deadlines, and unfinished tasks—not a box of old notebooks.
Past pages deserve attention when they contain a project decision, reusable lesson plan, important record, or hard-to-recreate reference. A finished planner that is safely stored can be left alone.
4. Use Names You Can Search
Document 47 tells you nothing. Use YYYY-MM-DD – Weekly Plan or Project Name – Meeting Notes – YYYY-MM-DD.
A year folder, followed by month or project folders where needed, is usually enough. Add tags only after a repeated retrieval problem appears. Otherwise, digitization becomes a filing project.
5. Mark the Handoff
Mark anything transferred with an arrow, dot, or the letter “D.” Confirm that it appears in the right calendar, list, or folder before crossing it out.
A date saved to the wrong day or calendar can look handled on paper while remaining effectively lost.
6. Test a Full Weekly Cycle
Use the setup through an ordinary week before replacing apps. Notice what you forget to check, duplicate, or postpone.
If evening scanning feels excessive, move it to the weekly review. Keep same-day jobs on paper rather than crowding the task manager. Change the handoff before changing the software.
Scan Cleanly
Anyone researching how to digitize a paper planner should treat each scan as a file they may need later. Use a flat surface and even light, hold the phone parallel to the page, and inspect the crop for shadows, blur, or cut-off dates.
Keep related pages in one multipage PDF. A week’s plans or one project’s notes belong together; unrelated material does not.
Apple currently supports document scanning through the Notes and Files apps on iPhone and iPad. Documents scanned into an iPhone note are saved there as PDFs. Google Drive’s Android and iOS apps can create searchable PDFs from scans, while its web interface does not currently provide the scanner.
OneNote desktop apps on Windows and Mac can copy recognized text from pictures. Microsoft warns that results depend on image quality and may not be available immediately. At the time of verification, OneNote for the web cannot perform the same action. Do not rely on instant OCR, and compare important names, dates, and numbers with the original page.
Set a Daily Handoff
The software matters less than the handoff when working out how to digitize a paper planner. Give transfers a fixed place in the day.
- Morning: Check the digital calendar and task list. Write a realistic set of priorities on paper.
- During the day: Capture quick notes on paper if that remains fastest. Put a new appointment directly into the digital calendar when possible.
- Evening: Transfer unfinished work that must remain active, then add the handoff mark.
- Weekly: Compare the planner with the calendar and task list. Scan worthwhile pages, remove duplicates, and delete tasks that are no longer relevant.
A teacher might keep lesson adjustments on paper while placing meetings and submission dates in a calendar. During the weekly review, only reusable ideas and records that can be stored appropriately need scanning.
Avoid Common Mistakes
The quickest way to complicate how to digitize a paper planner is to treat digitization as preservation of everything. Selective scanning creates a smaller archive that is easier to trust.
Watch for these problems:
- Maintaining complete task lists on both paper and digital platforms
- Turning on so many alerts that routine notifications become easy to dismiss
- Trusting OCR without checking names, dates, account numbers, or other exact details
- Discarding paper before confirming that every scan is readable and stored correctly
- Choosing an app without checking its export options
- Uploading confidential workplace, client, or student information to a personal account without authorization
Planner pages can contain addresses, financial notes, health details, and private reflections. Review sharing and synchronization settings, and follow workplace or school rules. Keep a separate exported copy if losing the archive would cause a real problem.
Final Thoughts
The practical answer to how to digitize a paper planner is to preserve the routine and digitize only what paper handles poorly. Start with the next seven days: enter fixed dates in one calendar, move future work to one task list, and create one folder for scans. Leave the old archive alone for now.
Use that small system for a week. If it helps you remember more without making planning feel heavier, you have enough to build on.
Frequently Asked Questions (FAQs)
Do You Need to Scan Every Page?
No. Any useful guide on how to digitize a paper planner should start with current commitments and unfinished work. Scan older pages only when they retain reference, administrative, or personal value. A digital copy of every crossed-out shopping list is storage, not organization.
Can OCR Convert Handwritten Pages Accurately?
Results vary with the software, page layout, image quality, and legibility. Treat extracted text as a draft. Check every deadline, name, phone number, and financial figure against the page.
What If You Change Planning Apps Later?
Check export options before committing. Standard files such as PDFs are easier to move than notes trapped inside a proprietary layout. Test the export with a few sample items before building a large archive. Portability is more useful than an impressive dashboard you cannot leave.