Search for chemistry experiments home, and you will find plenty of fizzing volcanoes, rainbow liquids, slime recipes, and dramatic “wow” projects. Some are useful. Some are mostly mess. A few are not something children should copy without a careful adult standing nearby. Good home chemistry should not feel like a dangerous lab squeezed onto a kitchen counter.
It should help kids notice real chemical ideas: acids and bases, gases, mixtures, separation, crystallization, oxidation, polymers, density, solubility, and chemical change. The best experiments use familiar materials, create visible results, and leave room for children to ask, “Why did that happen?”
That matters because chemistry can feel invisible. Molecules are too small to see. Reactions happen inside liquids, foods, metals, and mixtures. A child may not see atoms rearranging, but they can see cabbage juice change color, ink separate into hidden pigments, milk turn into a moldable solid, salt crystals appear from water, and apple slices brown at different speeds.
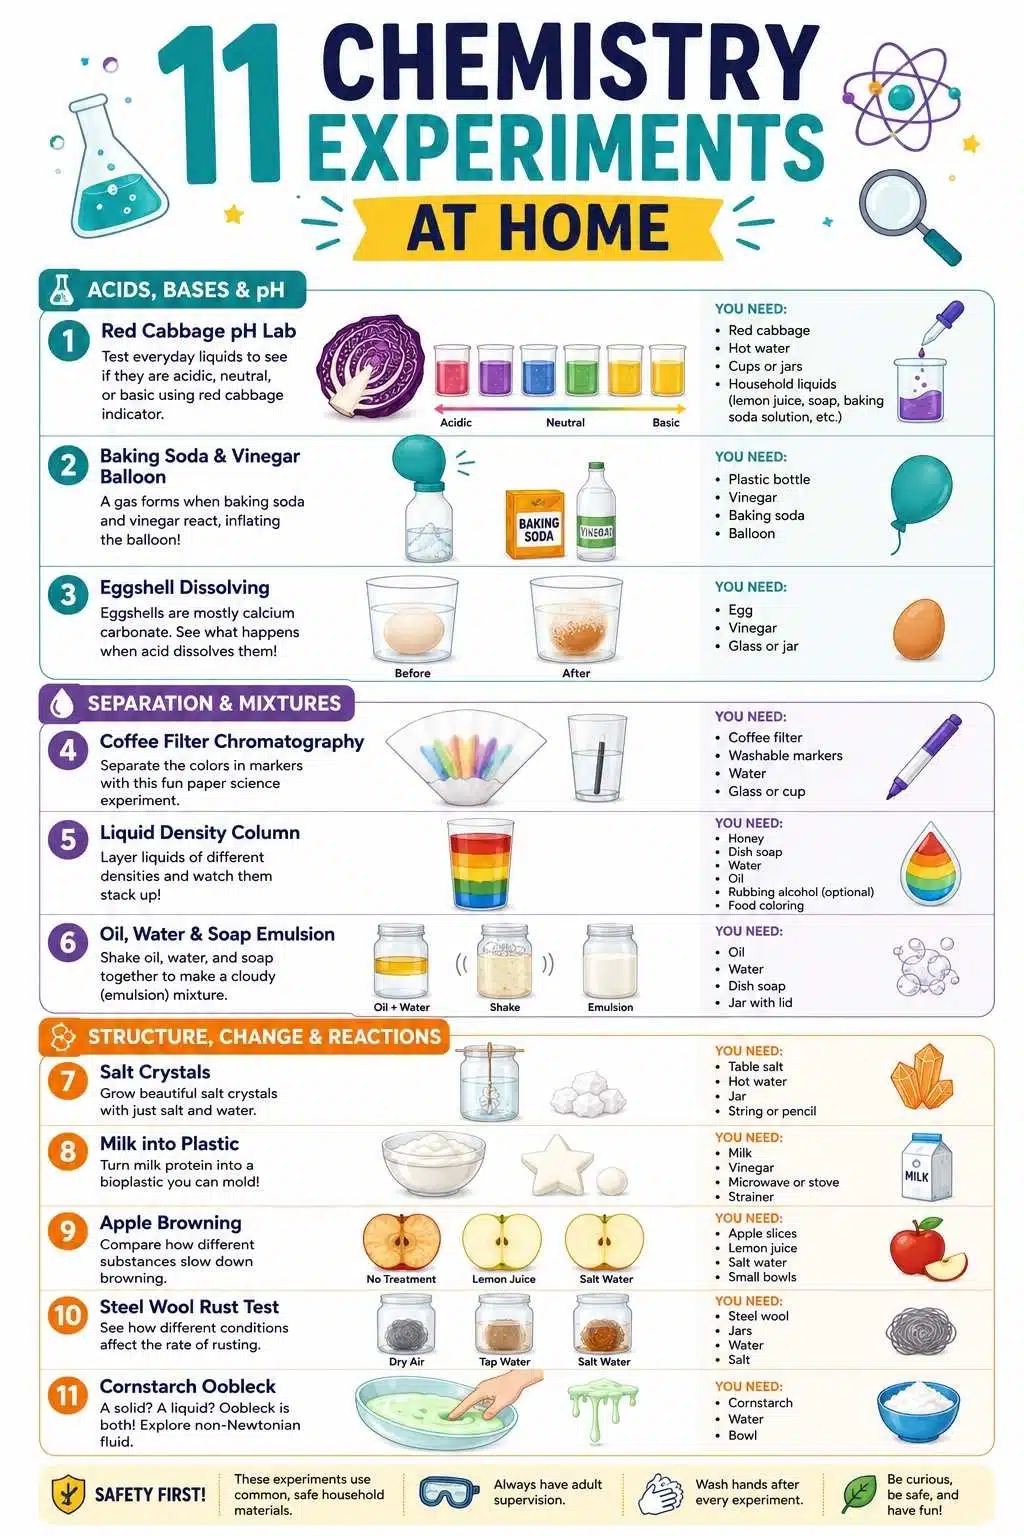
These 11 chemistry experiments at home are designed for parents, homeschoolers, teachers, and caregivers who want practical kitchen chemistry without risky shortcuts.
What Makes a Home Chemistry Experiment Safe and Worth Doing?
A safe chemistry experiment for children should use low-risk materials, simple quantities, open containers, adult supervision, and clear cleanup. It should never ask kids to mix household cleaners, heat unknown substances, smell fumes directly, seal gas-producing reactions inside hard containers, or taste experimental materials.
The word “safe” also needs a little honesty. Even kitchen ingredients can irritate eyes, stain surfaces, trigger allergies, or make a slippery mess. Vinegar can sting cuts. Food coloring can stain. Steel wool can scratch. Hot water can burn. A harmless-looking fizzy reaction can overflow onto a table. So the safest approach is not fear. It is structure.
Work on a washable surface. Use small amounts. Keep experiments away from food preparation areas once materials are mixed. Wash hands afterward. Use goggles when liquids may splash. Keep younger children from tasting anything. And if a child wants to “try mixing this with that,” pause first. That pause is chemistry, too.
11 Chemistry Experiments Home Learners Can Try
These activities are not ranked from best to worst. Each one teaches a different piece of chemistry. For younger children, the goal is noticing and describing changes. For older children, the goal is controlling variables, measuring results, and explaining why one setup behaved differently from another.
1. Red Cabbage pH Color Lab
Red cabbage is one of the best home chemistry tools because it turns invisible acid-base differences into visible color changes.
When red cabbage is soaked in hot water, it releases pigments called anthocyanins. Those pigments behave like a natural pH indicator. Add something acidic, such as lemon juice or vinegar, and the liquid shifts toward pink or red. Add something basic, such as a baking soda solution, and it shifts toward blue-green.
To do this at home, an adult can steep chopped red cabbage in hot water, cool the liquid, and pour small amounts into clear cups. Children can test lemon juice, vinegar, plain water, baking soda dissolved in water, and diluted dish soap. The important part is not making the brightest rainbow. It is asking kids to predict the color before each test.
This experiment works well because it teaches that chemicals do not have to look dangerous to have different properties. Lemon juice and baking soda both look simple, but they behave differently in the indicator.
Best for: Kids who enjoy color changes and observation.
What it teaches: Acids, bases, pH, indicators, prediction, and comparison.
Safety note: Do not test bleach, ammonia, toilet cleaner, drain cleaner, or random cleaning products. Keep this as kitchen chemistry using mild household materials only.
2. Baking Soda and Vinegar Balloon
The classic baking soda and vinegar reaction becomes more educational when kids trap the gas in a balloon instead of just watching foam spill over a cup.
Vinegar is acidic, and baking soda is a base. When they react, they form carbon dioxide gas. If you pour vinegar into a bottle, place baking soda inside a balloon, stretch the balloon over the bottle opening, and then lift the balloon so the baking soda falls in, the carbon dioxide inflates the balloon.
This is a simple way to show that gas is matter. Children cannot see carbon dioxide directly, but they can see it take up space.
Older kids can test different amounts of baking soda while keeping the vinegar amount the same. That turns the activity from a demonstration into a real experiment. They can measure balloon size with a soft measuring tape and compare results.
Best for: Young learners who need a visible reaction.
What it teaches: Acid-base reactions, carbon dioxide, gas volume, and variables.
Safety note: Use a soft balloon and an open bottle setup, not a sealed hard container. Never shake sealed bottles with gas-producing reactions.
3. Eggshell Dissolving Test
Eggshells are mostly calcium carbonate, which makes them a useful material for showing how acids react with carbonates.
Instead of using a whole raw egg, use clean eggshell pieces. Place one piece in vinegar, one in water, and one in lemon juice. Over time, the acid will react with the calcium carbonate in the shell and produce small bubbles of carbon dioxide. The shell in plain water should change much less.
This activity is slower than a fizzy volcano, which is exactly why it is valuable. Kids learn that chemical reactions do not all happen in one dramatic burst. Some take minutes, hours, or days.
Ask children to check the shells after 10 minutes, 1 hour, and 24 hours. They can draw what they see or describe texture changes. Older children can weigh dry shell pieces before and after, though that requires more careful drying and measuring.
Best for: Kids who can observe changes over time.
What it teaches: Acid-carbonate reactions, carbon dioxide bubbles, dissolving, and comparison.
Safety note: Use eggshell pieces instead of raw whole eggs for simpler cleanup and lower food-safety concerns.
4. Coffee Filter Chromatography
Black and brown markers often hide more colors than children expect. In paper chromatography, water travels up a strip of coffee filter paper by capillary action. As it moves, it carries marker pigments with it. Some pigments travel farther than others, so one dark ink mark can separate into blues, purples, greens, yellows, or reds.
Cut coffee filters into strips, draw a washable marker line near the bottom with pencil marking the start line, and place the very bottom of the strip in a small amount of water. The marker line should stay above the water level. As the water climbs, the colors separate.
This is a strong home chemistry activity because it shows that a mixture can look like one substance while containing several components. It also introduces separation science without needing lab equipment.
Best for: Kids who like color, art, and detective-style science.
What it teaches: Mixtures, pigments, solubility, capillary action, and separation.
Safety note: Use washable markers and water. Avoid permanent markers or alcohol solvents for young children.
5. Liquid Density Column
A density column looks like a magic trick, but it teaches a useful chemistry and physical science idea: not all liquids have the same density.
Choose a few household liquids such as honey, corn syrup, dish soap, colored water, and vegetable oil. Pour them slowly into a clear glass or jar, starting with the densest liquid and moving toward the least dense. If poured carefully, the liquids settle into layers.
This activity works best when kids first predict the order. Will oil sink or float? Will syrup stay below water? What happens if the jar is shaken?
The deeper lesson is that liquids can behave differently based on mass, volume, and how well they mix. Oil and water also introduce immiscibility, which means some liquids do not mix evenly.
Best for: Visual learners and younger STEM groups.
What it teaches: Density, layering, immiscible liquids, prediction, and observation.
Safety note: Keep the quantities small. Do not drink the liquids after the experiment, even if they started as food ingredients.
6. Oil, Water, and Soap Emulsion
Oil and water separate because their molecules do not interact in the same way. Dish soap changes the situation.
Fill a clear jar halfway with water, add a little vegetable oil, and shake. The liquids may look mixed for a moment, but they soon separate again. Then add a small amount of dish soap and shake gently. The mixture should look cloudier and stay mixed longer.
Dish soap contains surfactants. A surfactant molecule has one part that interacts well with water and another part that interacts better with oil or grease. That is why soap helps lift oil from dishes and hands.
This is kitchen chemistry children can connect to real life. Suddenly, “washing dishes” becomes molecular behavior.
Best for: Kids who ask why soap works.
What it teaches: Emulsions, surfactants, oil-water separation, and molecular attraction.
Safety note: Do not use strong detergents or cleaning products. A drop or two of ordinary dish soap is enough.
7. Salt Crystal Evaporation Dish
Crystals are chemistry that rewards patience. Stir salt into warm water until no more dissolves easily. Pour a shallow layer of the solution into a dish and leave it somewhere safe where it will not be spilled. As water evaporates, salt particles come back out of solution and arrange into crystal shapes.
Children often expect “nothing” to happen because the salt disappears when it dissolves. The crystal growth shows that dissolved does not mean gone.
This experiment also helps kids understand the difference between dissolving and melting. Salt dissolves when its particles spread through water. It has not turned into liquid salt. When the water leaves, the salt can appear again.
Best for: Patient observers and kids learning about solids and liquids.
What it teaches: Solubility, saturated solutions, evaporation, crystallization, and particle arrangement.
Safety note: Adults should handle warm water. Keep dishes away from pets and younger siblings.
8. Milk Plastic Experiment
Milk plastic, also called casein plastic, is one of the most memorable home chemistry kids can try because it turns a liquid food into a moldable solid.
Warm milk with adult help, then add vinegar. The acid changes the milk’s pH and causes casein proteins to clump into curds. Once strained and pressed with paper towels, the curds can be shaped and left to dry.
This is not modern plastic like the packaging around snacks or toys. It is a protein-based material. That distinction is useful because it helps children understand that “plastic” can describe moldable materials, not just one single substance.
Older children can compare different amounts of vinegar or different types of milk. They can ask which batch forms more curds, which dries harder, and which holds its shape better.
Best for: Kids ready for a slightly more involved kitchen chemistry project.
What it teaches: Proteins, acids, curdling, polymers, material change, and drying.
Safety note: An adult should heat the milk. Do not eat the curds after handling them as experiment material.
9. Apple Browning Test
Apple browning is chemistry children have probably seen before, which makes it a useful experiment.
Cut apple slices turn brown when compounds in the apple react with oxygen, helped by enzymes released when the apple cells are damaged. Lemon juice can slow browning because acidic conditions interfere with the enzyme activity.
Place apple slices on a plate and treat each one differently. Leave one plain, brush one with lemon juice, dip one in water, and sprinkle one lightly with saltwater if appropriate. Watch what happens over 15, 30, and 60 minutes.
This experiment teaches that chemistry is not only about bubbling reactions. Food changes are chemical changes, too.
Best for: Kitchen science, food science, and younger learners.
What it teaches: Oxidation, enzymes, acids, controls, and time-based observation.
Safety note: If the apples are part of an experiment, do not eat them afterward, especially after repeated handling.
10. Steel Wool Rust Test
Rust is a slow chemical reaction children can see. Steel wool contains iron. When iron reacts with oxygen and water, rust forms. Place one piece of steel wool in a dry cup, one in water, and one in salty water. Over time, children can compare which piece rusts fastest and what conditions seem to matter.
This activity is especially useful because it connects chemistry to real-world problems: rusty bikes, tools, railings, cars, bridges, and outdoor furniture.
Older children can extend the experiment by testing oil as a barrier or comparing plain water with saltwater. The key is to change only one thing at a time, or the results become confusing.
Best for: Older elementary learners and kids interested in real-world materials.
What it teaches: Oxidation, corrosion, oxygen, water, salt, and protective coatings.
Safety note: Steel wool can scratch skin and surfaces. Handle it gently, keep it away from flames and batteries, and wash hands afterward.
11. Cornstarch Oobleck
Oobleck is not a chemical reaction in the same way vinegar and baking soda are, but it is a powerful home chemistry and materials science activity.
Mix cornstarch and water until the mixture feels strange: solid when squeezed or hit quickly, but liquid when handled slowly. This happens because oobleck is a suspension and behaves as a non-Newtonian fluid. Its flow changes depending on the force applied.
Young children love this because it feels impossible. Older children can describe the difference between a solution and a suspension, compare different cornstarch-to-water ratios, and test how the mixture behaves under slow and fast pressure.
This is one of the safest chemistry experiments home learners can do, but it is also one of the messiest.
Best for: Sensory learners, younger children, and materials science introductions.
What it teaches: Suspensions, viscosity, non-Newtonian fluids, force, and material behavior.
Safety note: Do not pour oobleck down the drain. Let it dry or scrape it into the trash.
Quick Overview: 11 Chemistry Experiments at Home
| Experiment | Main Chemistry Idea | Best Age Range |
| Red Cabbage pH Color Lab | Acids, bases, indicators | Ages 6+ |
| Baking Soda and Vinegar Balloon | Gas formation and acid-base reactions | Ages 5+ |
| Eggshell Dissolving Test | Acid-carbonate reaction | Ages 6+ |
| Coffee Filter Chromatography | Separating mixtures | Ages 7+ |
| Liquid Density Column | Density and liquid layering | Ages 6+ |
| Oil, Water, and Soap Emulsion | Surfactants and emulsions | Ages 7+ |
| Salt Crystal Evaporation Dish | Solubility and crystallization | Ages 6+ |
| Milk Plastic Experiment | Proteins, acids, and polymers | Ages 8+ |
| Apple Browning Test | Oxidation and enzymes | Ages 6+ |
| Steel Wool Rust Test | Oxidation and corrosion | Ages 8+ |
| Cornstarch Oobleck | Suspensions and non-Newtonian fluids | Ages 4+ |
Best Chemistry Experiments by Age
| Age Group | Best Experiments |
| Ages 4-5 | Oobleck, apple browning, simple vinegar and baking soda observation |
| Ages 6-7 | Red cabbage pH lab, density column, eggshell dissolving, salt crystals |
| Ages 8-10 | Chromatography, milk plastic, rust test, soap emulsion |
| Ages 11+ | Controlled variable testing, measurement-based comparisons, longer observation projects |
Younger children should focus on describing what they see: color change, bubbles, layers, clumps, crystals, or texture. Older children can start asking better experimental questions. Which liquid produces the strongest cabbage color change? Which marker separates into the most pigments? Does saltwater speed rust? Does lemon juice slow apple browning better than plain water?
That shift from “watch this happen” to “test this question” is where home chemistry becomes much more valuable.
A Simple Safety Setup for Home Chemistry Kids
A safe chemistry setup does not need to look like a professional lab. It needs to be organized.
Use a tray or washable mat under the experiment. Put materials in small cups before starting. Keep paper towels nearby. Use goggles if liquids may splash. Make sure children know that experiment materials are not snacks. Keep cleaning products out of reach and out of the activity area. Label cups if more than one clear liquid is being used.
The most important household rule is simple: do not mix cleaners. Chemistry experiments for kids should not involve bleach, ammonia, drain cleaner, toilet cleaner, rubbing alcohol, strong acids, strong bases, or mystery bottles from under the sink.
Kitchen chemistry should stay in the kitchen ingredient category: vinegar, baking soda, salt, sugar, lemon juice, cabbage juice, milk, oil, cornstarch, water, food coloring, coffee filters, apples, and similar low-risk materials.
How to Make These Experiments More Educational
The easiest upgrade is to ask children for a prediction before anything happens.
Before adding vinegar to baking soda, ask what they think will happen to the balloon. Before dipping paper into water, ask whether black ink is really only black. Before placing apple slices on a plate, ask which one will brown fastest. Before pouring liquids into a jar, ask which one will sink.
After the experiment, ask children to explain the result in one sentence. They do not need perfect chemistry vocabulary. “The gas filled the balloon,” “the ink had more colors inside it,” and “the lemon slowed the brown color” are excellent starting explanations.
For older children, add measurement. Record time, amount, color, height, mass, or number of bubbles. A simple notebook turns kitchen chemistry from entertainment into evidence.
Common Mistakes to Avoid
- Choosing drama over learning. A huge foam eruption may entertain children, but if they cannot explain what changed, the experiment has not taught much.
- Repeating the same acid-base reaction in different costumes. A volcano, fizzy potion, and baking soda rocket may all teach the same basic idea. One good carbon dioxide experiment is enough before moving to chromatography, crystals, oxidation, or polymers.
- Using unsafe substitutions. Concentrated hydrogen peroxide is not the same as the mild drugstore version. Permanent marker chromatography is not the same as washable marker chromatography. Cleaning vinegar is not the same as food-grade vinegar. Bleach is not a science toy.
- Skipping cleanup rules. Chemistry feels less stressful when children know exactly where liquids, solids, and messy mixtures go afterward.
- Giving children answers too early. Let them notice first. A child who says, “The oil keeps coming back to the top,” is already thinking chemically.
Wrapping Up
The best chemistry experiments home learners can try are not the loudest or messiest ones. They are the ones that make invisible changes visible.
Red cabbage shows acids and bases. A balloon shows carbon dioxide gas. Eggshells show acid reacting with minerals. Coffee filters separate hidden pigments. Density columns reveal liquid layers. Soap shows why oil and water can be forced to mix. Salt crystals show particles returning from solution. Milk plastic turns protein into a moldable material. Apple slices show oxidation. Steel wool shows corrosion. Oobleck shows that materials can behave in surprising ways.
That is enough chemistry for a strong start. Keep the materials simple, keep the supervision close, and keep asking one question after every result: “What changed, and why?”
Frequently Asked Questions About Chemistry Experiments Home Learners Can Try
1. What are safe chemistry experiments kids can do at home?
Safe chemistry experiments kids can do at home include red cabbage pH testing, baking soda and vinegar balloon inflation, coffee filter chromatography, salt crystal growing, apple browning tests, density columns, milk plastic, and cornstarch oobleck. Adults should still supervise, especially when using hot water, vinegar, glass containers, or messy materials.
2. What kitchen chemistry materials are best for kids?
The best kitchen chemistry materials for kids include vinegar, baking soda, lemon juice, red cabbage, salt, sugar, milk, oil, water, cornstarch, apples, coffee filters, washable markers, and food coloring. These materials can teach acids, bases, gases, mixtures, crystals, oxidation, density, and polymers without needing advanced lab chemicals.
3. Are vinegar and baking soda experiments safe?
Vinegar and baking soda experiments are generally low-risk when used in small amounts with adult supervision. The reaction produces carbon dioxide gas, which can inflate balloons or create fizz. Children should not seal the reaction inside hard containers because gas pressure can build up.
4. What chemistry experiments should kids avoid at home?
Kids should avoid experiments involving bleach, ammonia, drain cleaner, toilet cleaner, strong acids, strong bases, concentrated hydrogen peroxide, flames, unknown powders, or mixed cleaning products. They should also avoid internet “hacks” that create fumes, pressure, or heat without clear safety guidance.
5. What is the easiest chemistry experiment for young kids?
Cornstarch oobleck is one of the easiest chemistry-related experiments for young kids because it uses only cornstarch and water. Apple browning and simple baking soda-vinegar fizzing are also good beginner activities, as long as an adult controls the setup and cleanup.
6. How can parents make home chemistry more educational?
Parents can make home chemistry more educational by asking children to predict results, observe carefully, compare one variable at a time, and explain what changed. A simple science notebook helps children record colors, times, textures, bubbles, layers, and other evidence.