Editing an existing photo with generative AI should be simple. You upload an image, explain what needs to change, and expect the software to leave everything else alone.
That is rarely what happens.
A basic request to replace a background can alter the subject’s face. Changing a shirt can distort the neck, shoulders, or body proportions. Removing an object can leave behind blurry textures, repeated patterns, or strange patches that immediately expose the edit.
The problem is not always the editing model. In many cases, the prompt gives the software too much freedom.
Most people describe what they want the final image to look like but forget to explain what must remain unchanged. That missing boundary is exactly where generative editing tools begin improvising.
I created these eight image editing prompts around a simple principle: make the intended change clear, define how the new element should behave, and protect the parts of the original image that should not be regenerated.
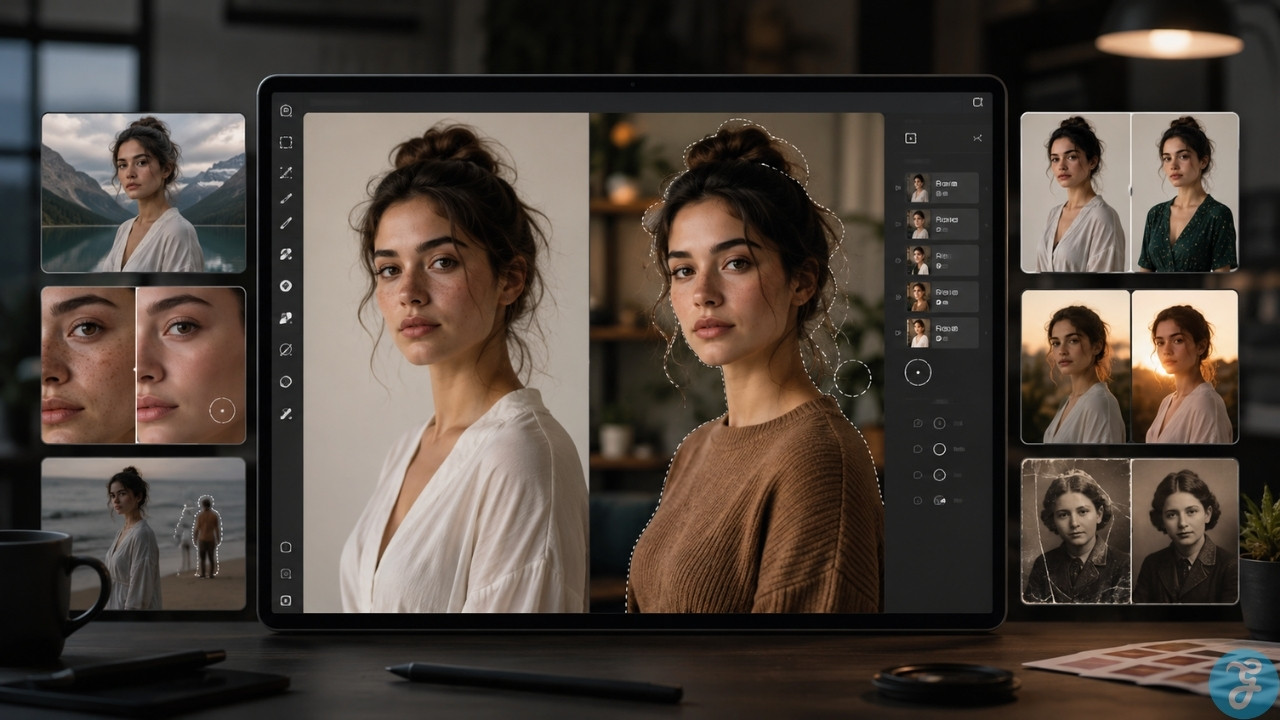
These prompts cover background replacement, professional headshots, clothing edits, product photography, vintage photo repair, cinematic grading, object removal, and seasonal landscape transformations.
The Core Structure of a Functional Editing Command
Words such as “photorealistic,” “beautiful,” or “hyper-detailed” may sound useful, but they do not give an editing model enough practical direction.
A functional command needs four things:
- The action the software must perform
- The exact part of the image being edited
- The appearance, material, lighting, or texture of the replacement
- A preservation boundary explaining what must remain untouched
The preservation boundary is the part most people leave out.
Generative tools do not automatically understand that the face, pose, body shape, clothing, product dimensions, or architectural lines are important. Unless those elements are protected in the command, the model may reinterpret them while producing the edit.
The image manipulation prompts I use here follow a clear structure:
Change this specific element, replace it with this clearly described result, and preserve these original details exactly.
That structure gives the software less room to make destructive decisions.
8 Image Editing Prompts for Clearer, More Controlled Results
The following photo editing AI prompts are designed to solve common editing problems without unnecessarily regenerating the entire image.
1. Swapping Backgrounds Without Ruining the Lighting
Background replacement often looks artificial because the software changes the environment without properly integrating the subject into it.
The original person may still carry the shadow direction, reflections, or color spill of the previous setting. The result looks less like a real photograph and more like a subject pasted onto a new background.
A good background-editing prompt must do more than name the new location. It should define the light direction, background depth, ambient shadows, and the parts of the subject that must remain unchanged.
Prompt: “Remove the original background and replace it with a modern minimalist office environment. Apply soft natural daylight originating from the left side of the frame, introduce a slight background bokeh blur, and match the ambient shadows to the subject for a realistic look. Keep the subject, pose, and original outfit completely identical.”
The final sentence is essential. Without it, the software may treat the subject as part of the redesign rather than the protected center of the image.
The instruction to match ambient shadows also helps prevent the flat, cutout appearance common in poor background replacements.
2. Upgrading a Casual Photo Into a Studio Headshot
Turning a casual photograph into a professional headshot requires restraint.
The goal is not to create a different person. It is to improve the background, lighting, and presentation while protecting the facial features that make the subject recognizable.
Many generic portrait prompts overcorrect the image. They sharpen the jaw, reshape the eyes, change the smile, smooth the skin until it looks artificial, or produce a completely different facial expression.
This prompt places strict limits on those changes.
Prompt: “Convert this photo into a professional corporate headshot. Replace the background with a soft gradient off-white studio backdrop. Add even, soft Rembrandt lighting from the front and slightly above. Reduce harsh shadows under the chin and eyes while gently smoothing skin without losing natural pore texture. Make the expression appear confident and approachable, but do not change the actual smile or eye shape.”
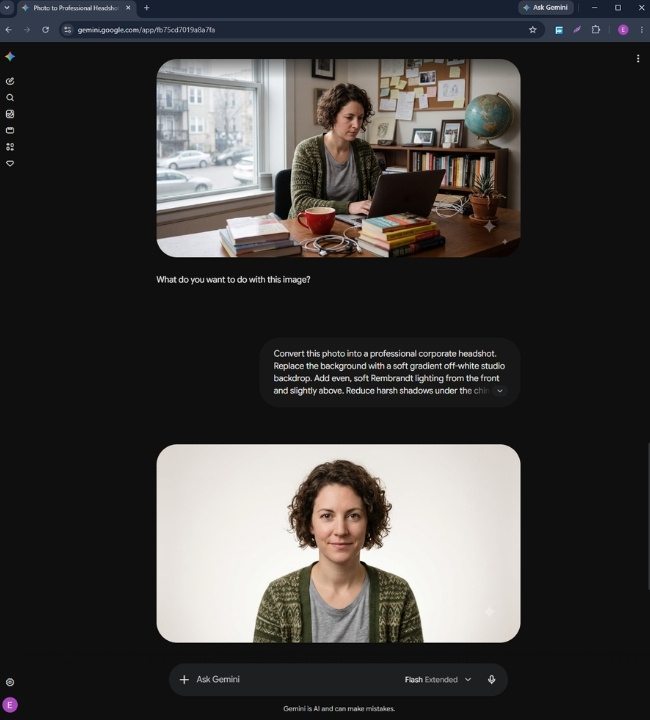
The prompt allows the model to improve the presentation without redesigning the person.
“Gently smoothing skin without losing natural pore texture” is much more useful than simply asking for flawless skin. The second version often produces a plastic-looking face because it gives the model no realistic texture boundary.
3. Cleaning Up Commercial Product Photos
Commercial product editing requires accuracy more than creativity. A product image can look polished without changing the actual shape, dimensions, branding, or construction of the item. That distinction matters because an overly aggressive edit can misrepresent what the customer will receive.
The command should therefore focus on three areas: isolating the product, cleaning its surface, and adding enough depth to keep it visually grounded.
| Step | Specific Command | Intended Result |
| 1. Isolation | Remove the entire background and replace it with pure white. Center the product within the frame. | Creates a clean, balanced catalog presentation. |
| 2. Change | Remove visible dust, fingerprints, minor scratches, and unnatural glare reflections from the product surface. | Produces a cleaner and more polished exterior without changing the product itself. |
| 3. Depth | Add a very faint, soft contact shadow directly beneath the base of the product. | Grounds the product and prevents it from appearing to float. |
The contact shadow should remain subtle. A heavy drop shadow can make a clean catalog image look artificial, while removing the shadow completely may disconnect the product from the surface beneath it.
For sensitive commercial work, I would also add a clear preservation command:
“Preserve the exact product dimensions, proportions, surface materials, label placement, printed text, logo design, and color accuracy.”
That additional boundary reduces the risk of the AI “improving” the product by changing its proportions, rewriting label text, modifying the branding, or inventing details that do not exist.
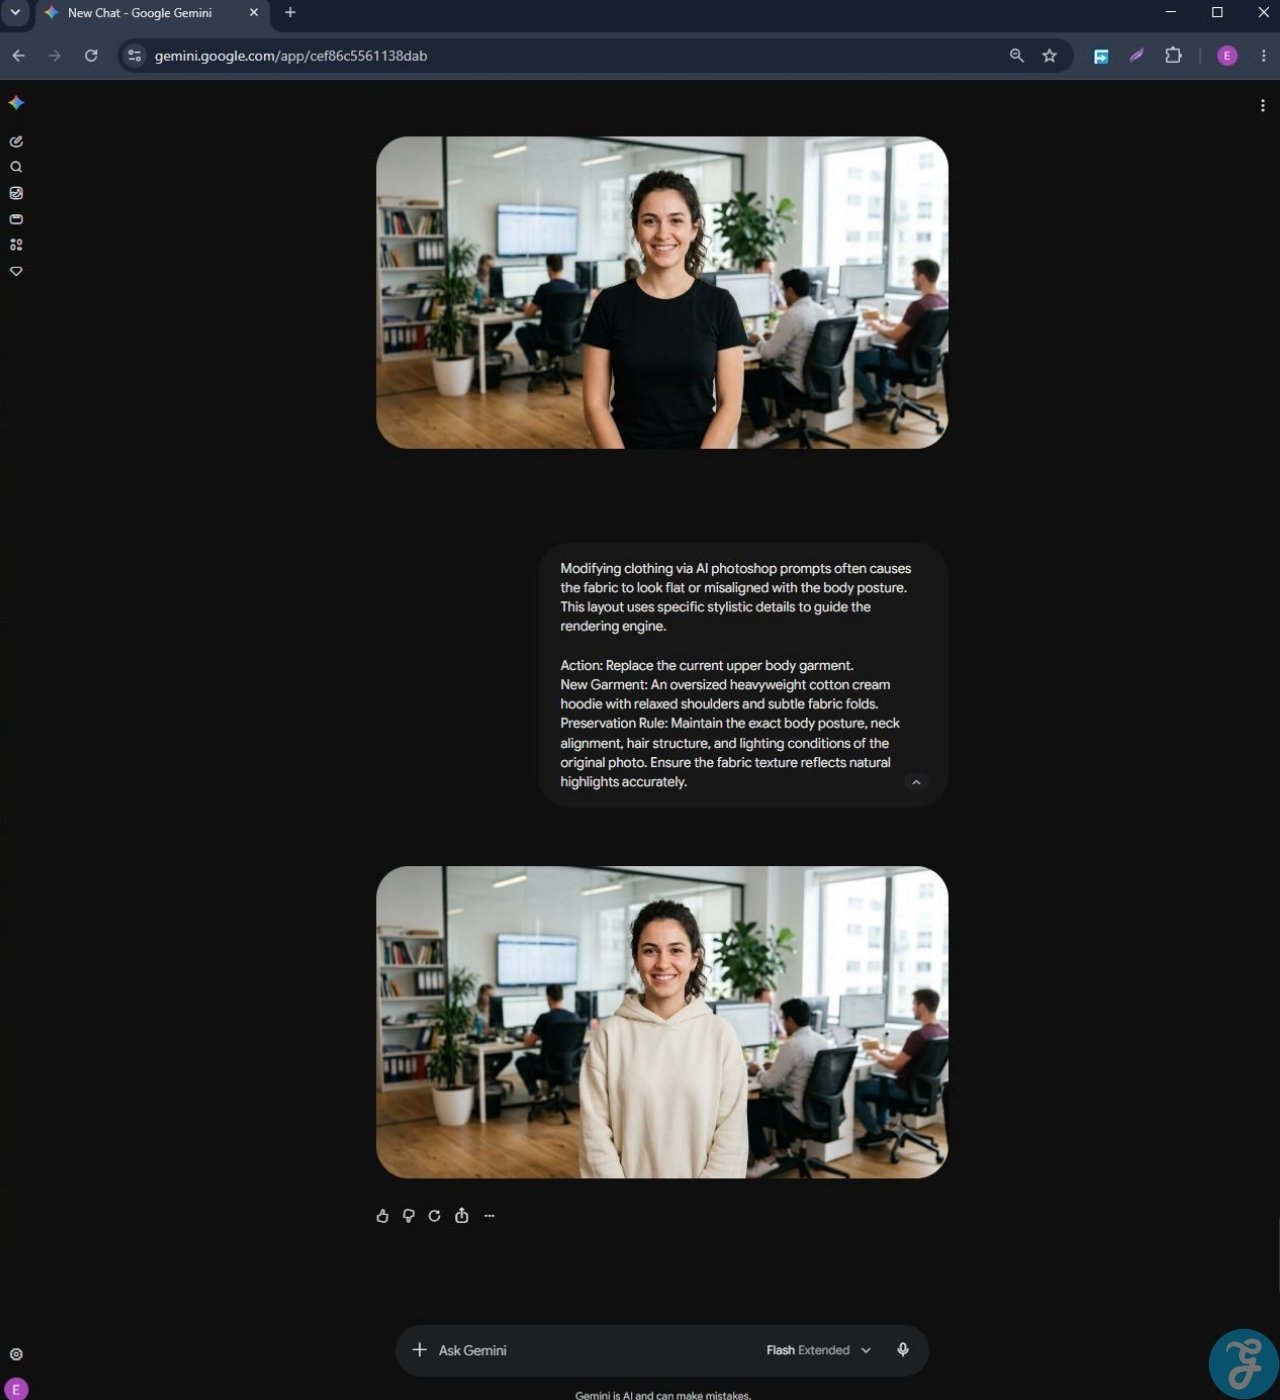
4. Precision Outfit Alteration
Clothing replacement is one of the easiest ways to expose the weaknesses of generative editing.
A tool may successfully change the garment but also alter the shoulders, neck, hair, posture, or body proportions. Fabric can appear painted onto the body because the prompt fails to describe how the material should fold and react to light.
For clothing edits, I prefer separating the command into three clear parts:
Action: Replace the current upper body garment.
New Garment: An oversized heavyweight cotton cream hoodie with relaxed shoulders and subtle fabric folds.
Preservation Rule: Maintain the exact body posture, neck alignment, hair structure, and lighting conditions of the original photo. Ensure the fabric texture reflects natural highlights accurately.
This format works well for AI photoshop prompts because each instruction has a defined purpose.
The action identifies the editable region. The new garment description controls the material, color, fit, and silhouette. The preservation rule prevents the software from altering the person while generating the new clothing.
The final instruction about natural highlights is also important. Fabric needs to respond to the original lighting conditions. Without that detail, the hoodie may look flat or disconnected from the rest of the image.
5. Vintage Photo Restoration
Vintage prints often contain scratches, folds, tears, fading, dust, or missing sections. Those defects should be repaired, but the original photographic character should remain intact.
A poor restoration prompt may remove the damage while also eliminating the film grain, changing facial details, increasing color saturation, or applying modern beauty-retouching effects.
Prompt: “Repair the physical damage on this vintage photo by removing surface scratches, creases, and tears. Rebuild missing details naturally. Preserve the original film grain, contrast range, sepia color balance, and period aesthetic. Do not apply modern smoothing filters or artificial color saturation.”
The preservation instructions are what make this a restoration prompt rather than a general image-enhancement prompt.
Film grain, restrained contrast, and an aged color balance are not necessarily defects. They are part of the visual identity of the original photograph.
Removing every sign of age can leave the image technically cleaner but historically less believable.
6. Applying Cinematic Color Grading
Cinematic grading should change the atmosphere of an image, not the underlying structure of the subject.
Generic requests for “cinematic lighting” often generate unpredictable results. The software may introduce random lens flares, crush the shadows, oversaturate the skin, or reshape parts of the face while trying to create a more dramatic composition.
A stronger prompt defines the color placement, light direction, contrast, focal point, and preservation rules.
Prompt: “Apply a dramatic dual tone cinematic studio lighting setup over the subject. Use cool deep teal accents on the left side and warm golden highlights on the right side of the face to create a high contrast editorial mood. Maintain natural skin textures, keep the focus sharp on the eyes, and preserve the original hair style and dark clothing line exactly.”
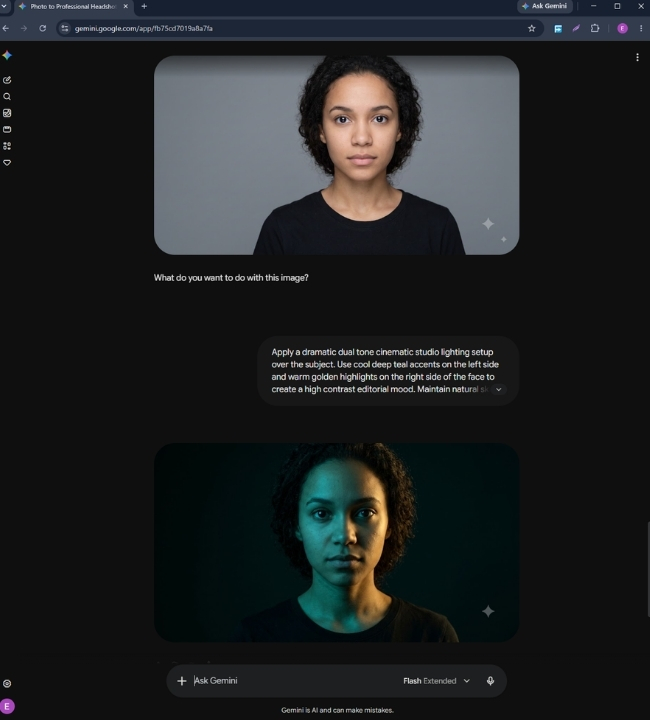
This command gives the software a clear lighting map.
The teal and gold tones have defined positions rather than being applied randomly across the image. The eyes remain the focal point, while the hair and clothing are protected from unnecessary regeneration.
It also avoids the vague instruction to make the subject “look cinematic,” which can mean almost anything to a generative model.
7. Removing Distracting Objects From the Frame
Object removal is not only about deleting something. The real challenge is reconstructing what should appear behind it.
When an unwanted person, vehicle, sign, or piece of furniture is removed, the software must rebuild the missing background. If the command only says “remove the object,” the model may fill the space with blurry color, inconsistent geometry, duplicated textures, or repeated patterns.
The replacement material must be described as carefully as the object being removed.
The Protocol: “Instruct the tool to remove the stray pedestrian on the far right edge of the frame. Reconstruct the natural brick wall and continuing sidewalk pattern behind them, ensuring the mortar lines match cleanly without repeating patterns or visible blur distortion.”
This prompt identifies both the removal target and the reconstruction target.
The instruction about mortar lines matters because structured surfaces expose editing errors quickly. A small inconsistency in a brick wall, tile floor, fence, railing, or window pattern can make the entire manipulation obvious.
For other images, the reconstruction instruction should match the missing environment. Grass should continue with natural variation. Wood grain should follow the existing direction. Architectural lines should remain straight and properly aligned.
8. Seasonal Landscape Transformation
Changing the season of a landscape requires more than recoloring the trees.
Seasonal changes affect vegetation, sky conditions, light softness, atmospheric haze, ground texture, and the overall color temperature of the scene. Editing only the foliage usually creates an inconsistent image.
Autumn trees under harsh summer lighting will not look convincing. Snow added to a warm green landscape will appear decorative rather than naturally integrated.
Prompt: “Change the season in this landscape photo from late summer to late autumn. Convert the green canopy foliage into a mixture of deep rust red, burnt orange, and golden amber tones. Introduce an overcast sky condition with soft diffused lighting, add light morning mist along the valley floor, and keep the structural lines of the mountain peak and foreground wooden cabin completely unchanged.”
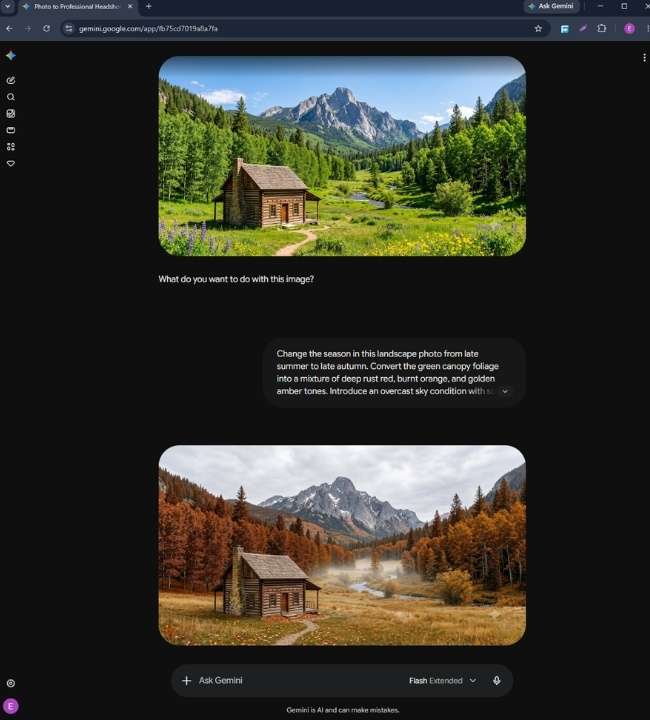
This prompt changes the vegetation and atmosphere together.
It also protects the landscape’s defining structures. The mountain peak and cabin should not move, bend, expand, or receive newly invented architectural features simply because the surrounding season has changed.
Why Preservation Rules Matter More Than Decorative Language
The strongest image editing prompts are not always the most poetic or descriptive. They are the ones that clearly divide the image into editable and protected areas.
A phrase such as “make this look stunning and photorealistic” provides no editing boundary. The software is free to alter almost anything in pursuit of that result.
A better instruction explains:
- What should change
- Where the change should happen
- How the new element should interact with the existing light
- Which shapes, textures, identities, and structural details must remain untouched
Preservation language is especially important when the image contains faces, hands, branded products, architecture, printed text, or identifiable clothing.
These elements are highly sensitive to unintended regeneration.
Practical Risks in Real Production Workflows
Even well-written photo editing AI prompts cannot remove every production risk.
Generative platforms update their rendering models regularly. A prompt that produces a clean result under one model version may behave differently after an update. The tool may begin interpreting materials, faces, lighting, or preservation instructions in a new way.
That makes visual review essential.
Never assume that a previously reliable command will produce an identical result forever. Check facial identity, hand structure, product proportions, logos, text, repeating patterns, shadows, reflections, and edge quality after every important edit.
Privacy is another serious issue.
Some public or free tools may store uploaded images or use submitted content to improve their models, depending on their terms and settings. That can create problems when working with:
- Private family photographs
- Unreleased products
- Proprietary prototypes
- Client-owned photography
- Confidential business materials
- Images containing personal or identifying information
For sensitive assets, locally installed software or a platform with explicit data-isolation guarantees is generally the safer choice.
The convenience of an online editor should not outweigh the privacy obligations attached to the image.
How to Adapt These Image Manipulation Prompts
These prompts are not limited to the exact examples shown above. Their structure can be adapted to other editing tasks.
Start by identifying the smallest possible editing target. Do not ask the model to reinterpret the entire image when only one section needs attention.
Then describe the replacement using practical visual details:
- Material
- Color
- Fit or shape
- Light direction
- Shadow softness
- Texture behavior
- Depth of field
- Environmental reflections
Finish with a direct preservation rule.
For example: Preserve the exact facial geometry, expression, hairstyle, pose, body proportions, camera angle, and original lighting direction.
For a product image, the preservation rule may be: Preserve the exact product shape, scale, label text, branding, material finish, and color accuracy.
For an architectural image: Keep all structural lines, window positions, wall dimensions, roof geometry, and camera perspective unchanged.
This approach makes AI photoshop prompts more controlled because the software is told both what it may change and what it must protect.
Better Image Editing Starts With Better Boundaries
Generative editing tools are capable of producing convincing results, but they need tighter direction than most users provide.
The goal is not to fill the prompt with decorative adjectives. It is to explain the edit with enough precision that the software knows where its creative freedom begins and where it must stop.
The eight image editing prompts I created are built around that distinction. Each one identifies the intended adjustment, defines how the new element should behave, and protects the parts of the original image that give it identity and structure.
That is the difference between asking AI to recreate an image and directing it to edit one.
Frequently Asked Questions (FAQs) About Image Editing Prompts
Why does the AI keep changing my face when I only asked to edit my shirt?
Most generative fill tools operate by redrawing the entire selected bounding box rather than just the specific object. If your selection brush clips a portion of your chin or neck, the model attempts to synthesize a completely new jawline based on its training data. To prevent this, use high precision masking paths and explicitly close your instructions with a phrase demanding the preservation of original facial geometry.
How do I prevent my edited photos from looking flat or animated?
Flat outputs occur when a prompt lacks descriptive lighting directions, causing the software to default to uniform ambient illumination. You can solve this by specifying a definitive light source direction, such as side lighting or low angle golden hour sun. Adding explicit instructions to preserve natural skin pores, fabric folds, and native camera film grain blocks the engine from applying heavy digital smoothing.
Can these text prompts be used across any photo editing software?
The core instructional phrasing works universally, but the technical execution varies depending on whether the platform uses open weights or hosted systems. Tools built directly into professional canvas design suites require shorter, action oriented text blocks because they already have spatial awareness of the layer. General conversational chat models require the full four part formula since they process the image as a singular flat canvas.
What should I do if the background replacement looks pasted on?
This visual error is caused by a failure in edge illumination matching, meaning the subject still carries the color reflection of the old environment. You can fix this by adding a secondary prompt instructing the engine to generate a soft rim light around the silhouette of the subject that matches the color temperature of the new background. Including a request for a shallow depth of field will naturally blur the background, hiding minor edge imperfections.