A popular trend that is most definitely here to stay, the herringbone tile pattern creates a sense of energy and movement in any application or design scheme. This tile pattern has grown steadily in popularity over recent years becoming a staple in the world of interior design thanks to its ability to create a sense of direction in a design scheme while also adding a unique and decorative feature element. Our guide runs through the top tips on how to create the perfect herringbone tile layout in your next project, whether you are renovating your kitchen and bathroom tiles or building an entirely new home!
What are Herringbone Tiles?
A traditional herringbone tile pattern uses simple rectangular shaped tiles (often referred to as subway tiles) that are laid at a 45-degree angle with each tile being interlocked with the next in the design, forming a sort of ‘fish bone’ style. Unlike the chevron tile layout, the tiles themselves do not feature angled edges and instead make use of the traditional rectangular shape of a subway tile to form the interlocking pattern. This tile layout forms rows of pyramid style shapes, with the angles of each tile in the pattern creating an arrow style look.
Where can I use Herringbone Tiles?
Herringbone tiles can be used just about anywhere! These stylish tiles can be used as a decorative flooring solution throughout the home, as a timeless feature wall design in the bathroom, a unique kitchen splashback tile option or even as an outdoor feature with herringbone tiles around pool areas being an emerging trend for outdoor design schemes.
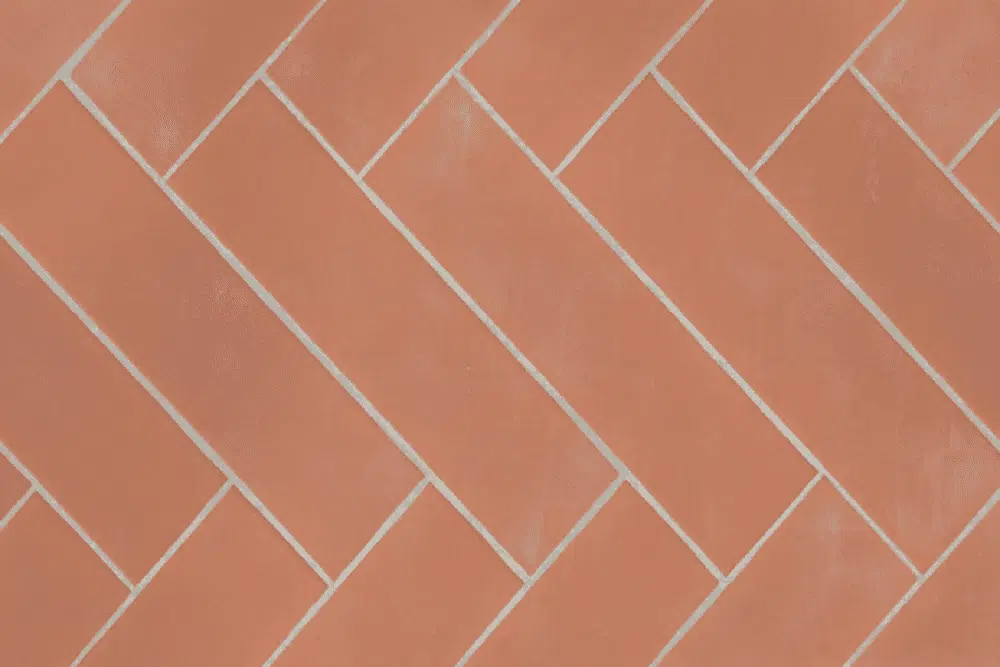
Caption: Terracotta subway tiles can be used to create a warm and earthy look in the home. These tiles can usually be used as either a wall or floor finish thanks to the impressive durability and longevity of the tile’s material.
It is always important to note however that although you can achieve this stylish tile layout in just about any application throughout the home, not all tile materials will be suitable in all areas. Ceramic tiles for example are often softer and lighter than other options like porcelain or natural stone tiles, making them a better fit for wall applications only. Decoratively etched or hyper-glossy tiles too are often restricted to wall use only whereas smooth, thick and durable porcelain tiles, most concrete tiles and natural stone tiles can usually be used as a floor finish. It is always recommended that you communicate your intended application and style preferences with your Interior Designer or Tile Consultant when it comes to selecting tiles; your design professional will be able to recommend the best materials that will meet your needs and expectations.
How to Lay Herringbone Tiles: Tips and Techniques
Laying herringbone tiles take a precise hand to ensure a high-quality finish. If you have selected to use herringbone tiles in your next project, spending a little extra time carefully planning their layout is crucial in ensuring the perfect outcome. You will also need to ensure your Tiler is well informed of your preferences, including where to start the pattern, which direction the pattern should run and of course your selected tiles, their specific colour and finish as well as your preferred grout type and colour.
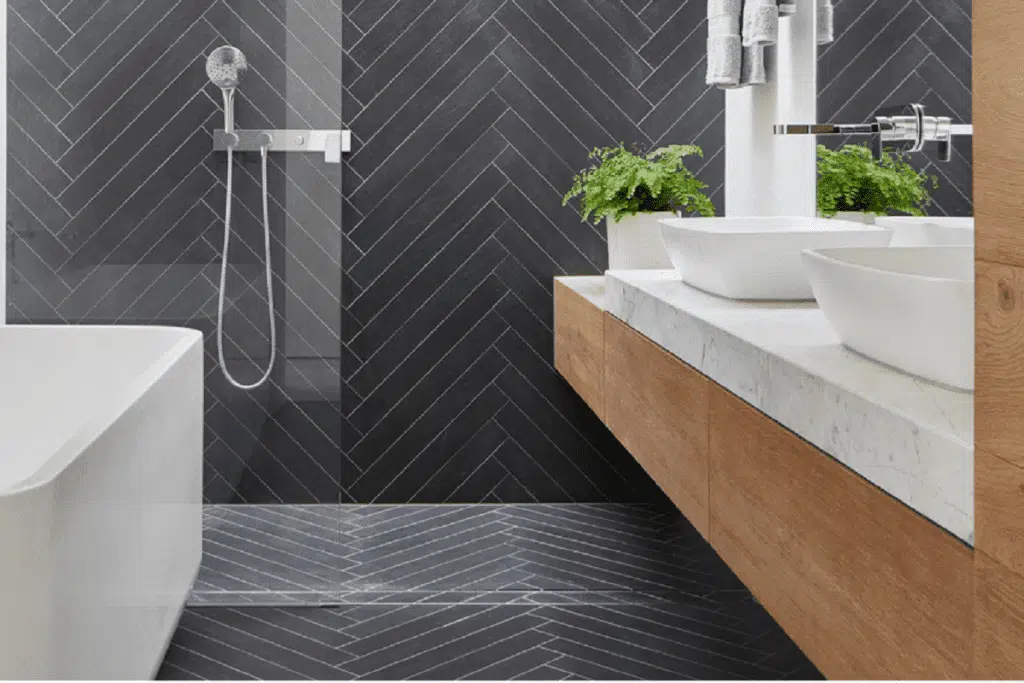
Caption: Elongated subway tiles are used in this contemporary styled bathroom design scheme along with the floors and running up the shower wall to create an elegant and timeless feature element. The pattern begins in the central point of the room and is laid outwards towards the edges of the space to achieve a balanced and symmetrical look in the tiling layout.
The best way to ensure all your bases are covered when it comes to planning a smooth and hassle-free renovation or new home build is to hire a qualified Interior Designer who will offer expert advice on all of these finer details while ensuring all of the required information for your trades is included in their documentation and drawings. This process ensures that all planning is well taken care of in advance and all parties involved have a thorough understanding of your own style preferences.
As a general rule of thumb, herringbone tiles are best laid starting from the centre of the area being tiled and moving outwards towards the edges of the space. This applies to both walls and floors tiled using this unique layout or pattern and ensure a well-balanced and symmetrical look in your final design scheme. The only cuts in the tiles that may be required are along the edges of the area being tiled, once again ensuring an even and balanced final outcome.
Creating a Feature with Herringbone Tiles
As you can see, herringbone tiles can be used in just about any area of the home, from indoor applications to outdoor settings and even pool areas. Depending on the overall style of your design scheme you can incorporate herringbone tiles to perfectly complement your aesthetic. Scandinavian interior design schemes for example are focused on incorporating natural textures and neutral tones to create a warm and serene atmosphere. Crisp white herringbone tiles can be used in this style of the interior however, you will want to limit their use to selected feature areas in order to avoid your design scheme looking too cluttered. You will also want to use a grout colour that will not be in contrast with the tile’s colour so as not to create too much of a bold feature of the pattern, once again creating a clutter-free look. In more contemporary design schemes, however, you have the option of incorporating bolder colours and harsher contrasts to create a dynamic feature in the home.
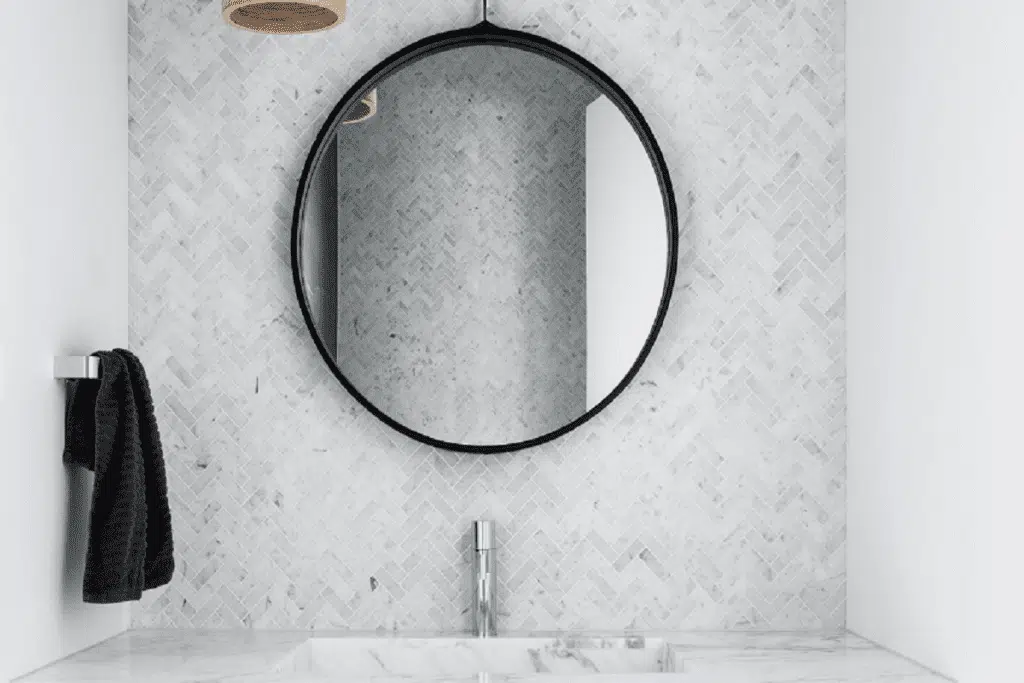
Caption: Create a stylish yet discreet feature element in your design scheme by using a grout colour that matches the tile’s main colour. This technique offers a wonderful pattern and texture in the space without creating making the grout colour the main focal point. These luxurious marble herringbone tiles are paired with a crisp white grout to create a timeless bathroom feature wall.
When selecting your new herringbone tiles, it is important to select materials that are best suited to your intended applications and take the time to carefully plan their layout in order to achieve the perfect look. Herringbone tiles offer a timeless choice for the home that can be used in an endless range of applications from indoor to outdoor spaces. This classic tile layout creates a stunning, timeless pattern in the home for a classic look that will truly stand the test of time!