

Many web makers still update sites by hand and face errors. GitHub Actions can run CI workflows on your GitHub repository and push your code to a production environment or to GitHub Pages.
You will learn to write a YAML file, use actions/checkout@v3, run npm install, and send your site live from the main branch. Keep reading.
Key Takeaways
- You start by forking or creating a GitHub repo, cloning it locally, switching to main, copying your site files, running npm install, then committing (git add, git commit -m) and pushing. Finally, add SSH keys under Settings > Secrets.
- In .github/workflows, create a deploy.yml that triggers on push to main, pull_request, and workflow_dispatch. Define a job on ubuntu-latest that uses actions/checkout@v3 and actions/setup-node@v3 (node-version: 16).
- Store SSH_PRIVATE_KEY, SSH_USER, SSH_HOST, SSH_REPO_PATH, and GITHUB_TOKEN as repository Secrets or in Environments. Apply protection rules and require approvals for the production environment.
- Add steps for dependency install (npm install or bundle install) and build (npm run build). Deploy your output via scp or rsync using SSH keys, or push to the gh-pages branch with the GitHub Pages action and secrets.GITHUB_TOKEN.
- Use concurrency: group: production and cancel-in-progress: true to prevent overlapping runs. Monitor all workflow runs, inspect logs, and approve production jobs in the Actions tab.
How do I create a GitHub repository and upload my website code?

You need a repo before you run GitHub Actions. Use a fork or start fresh.
- Log into your GitHub account and click New repository in the top right. Choose a name that matches your site and hit Create repository.
- Visit the author’s sample code repository and click Fork. Pick your account. This creates a copy for your project.
- Open a terminal and run git clone with the repo URL. Switch to the main branch with git checkout main. Confirm actions/checkout@v3 can pull your code later.
- Copy your website files into the local folder. Run npm install if you use Node.js or a static site generator. Commit with git add, git commit -m, and git push.
- Go to Settings, select Actions, then click Secrets. Add SSH credentials under New repository secret. Paste your key and save.
- Use secrets.github_token or your SSH key in the workflow YAML. This lets GitHub Actions handle continuous integration and continuous delivery.
Setting up your workflow file in the. github/workflows directory
Your YAML file lives in .github/workflows, guiding each step like a recipe card for GitHub Actions. Add actions/checkout@v3, run the JS runtime setup, drop in secrets.github_token, and watch CI/CD deploy your site.
How do I create and configure the workflow file?
GitHub Actions runs tasks on each push. A yaml file in .github/workflows ties jobs together.
- Open GitHub and click the Actions tab. Kick the deployment tires with a new workflow.
- Add a yaml file named deploy.yml inside .github/workflows. Use the .yml extension.
- Set on: push event for the main branch. This yaml file triggers continuous deployment.
- Define a job runpool and select ubuntu-latest or a docker container. This job hosts your build.
- Insert actions/checkout@v3 to fetch your source code. It links to your main branch.
- Use actions/setup-node@v3 with node-version 16. Run npm install to load libraries.
- Store SSH_PRIVATE_KEY, SSH_USER, SSH_HOST, SSH_REPO_PATH as GitHub secrets. Call them secrets.github_token for CI security.
- Write steps to run npm run build with a static site generator. Deploy via SSH scp or rsync to the production environment.
How do I define the trigger event for my GitHub Actions workflow?
Open the workflow yaml file in .github/workflows to configure GitHub Actions. Specify trigger events under the on key. You can list push, pull_request, or workflow_dispatch. The push event targets the main branch by setting branches: [main].
A commit to the repo kicks off a continuous integration run.
Add workflow_dispatch to let you run the pipeline from the Actions interface. Pull requests can also start the automated pipeline on merge. Include actions/checkout to fetch your code.
A production environment can block runs on non main branches.
How do I configure deployment environment variables and secrets?
GitHub Actions stores env vars and secrets. You need tight control over deployment keys.
- Access the Actions tab in your repo. Pick Secrets and variables to open GitHub secrets.
- Click New repository secret. Add SSH credentials under a name like SSH_KEY.
- Navigate to Environments in the repo settings. Create a production environment then add each secret.
- Set deployment protection rules. Limit access to secrets for specified environments only.
- Add required reviewers to the environment. Require approval for jobs to proceed before secrets run.
- Reference secrets.github_token, SSH_KEY, and other env vars in your YAML file. Use them for authentication in continuous integration and continuous deployment workflows.
How do I check out repository code within a GitHub Actions workflow?
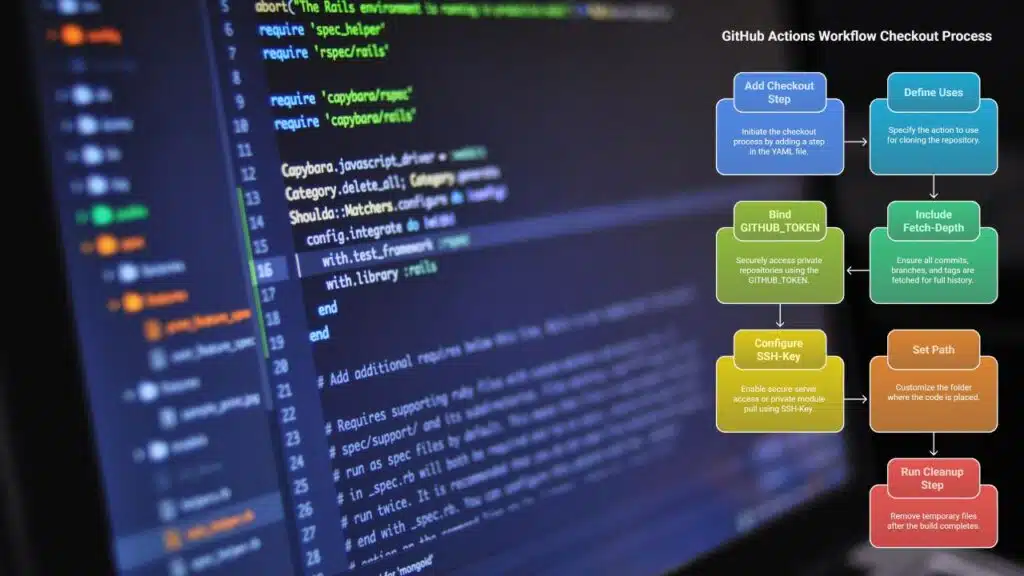
We fetch code with a checkout step. This brings your source to the runner.
- Add a checkout step in your yaml file under .github/workflows to start the process.
- Define uses: actions/checkout@v3 to clone the repository onto the virtual machine.
- Include with: fetch-depth: 0 to pull all commits, branches, and tags for full history.
- Bind GITHUB_TOKEN from secrets.github_token so private repos unlock without extra steps.
- Configure ssh-key from github secrets to enable secure server access or private module pull.
- Set path if you need a custom folder for your code instead of the default workspace.
- Run a cleanup step with a simple script to remove temp files after the build completes.
How do I install necessary dependencies for my website in the workflow?
You need to add dependency steps to your YAML file. These steps let GitHub Actions install packages before your build.
- Use actions/checkout@v3 to fetch code from your GitHub repository for continuous integration. This action pulls your source into the runner.
- Add actions/setup-node@v3 with node-version input to set up the Node.js runtime. This prepares npm install and other scripts.
- Run npm install to download modules listed in package.json from the npm registry. It loads packages for your static site generator.
- Invoke npm run build to create files via your chosen static site generator. Build output goes into the public or dist folder.
- Include bundle install if a Ruby gem manager handles your Jekyll or other generators. This step fetches gems defined in Gemfile.
- Place the value from secrets.github_token into your YAML file as a deployment token. GitHub Actions reads that token from your repository secrets.
How do I deploy my website to the specified environment using GitHub Actions?
This step moves your build to the live server. It makes sure your site serves real traffic.
- Define a deploy job and tag it with environment: production or staging to match your target VM.
- Add a concurrency block under the job in your GitHub workflows YAML file with group: production and cancel-in-progress: true to stop extra runs.
- Use the actions/checkout@v3 action to pull code from your main branch and set up source control for the deployment.
- Call actions/setup-node@v3 to install node.js then run npm install and npm run build to create your static site.
- Copy build files to your server with an scp command like scp -r ./public/ user@host:/var/www using SSH keys from GitHub secrets.
- Use continuous deployment to GitHub Pages by adding the GitHub Pages action or zip the output and push it to the gh-pages branch using secrets.GITHUB_TOKEN.
- Check the Actions tab to monitor workflow runs, inspect logs, and view your deployment history after each push.
Takeaways
You can push code updates and watch the site go live. A CI/CD workflow builds, checks and deploys your Jekyll site to an Ubuntu VM with SSH keys. GitHub Actions triggers on a push to main and runs npm install, npm run build and rsync.
It cuts manual steps and keeps your site fresh. You now own a smooth deploy flow that boosts your code quality and saves time.
FAQs
1. What are GitHub Actions?
GitHub Actions helps you automate tasks in your git repository. It runs continuous integration. It can build code, run tests, and move files to your production environment. You set it up in a yaml file.
2. How do I start continuous integration in a workflow?
To start CI, make a yaml file under .github/workflows. Add a checkout step, a setup platform step. Next, run package install and build run. It flips the switch, and your code gets tested.
3. How do I enable continuous deployment?
For continuous deployment, add a step to push your build to your project site or container. Use the main branch for live code. It is as easy as pressing play.
4. How do I secure my repo token?
To hide secrets, open github secrets in your repo settings. Add your repo token there. Then use that token in your workflow. Your keys stay under lock and key.
5. How can I catch bugs in my runs?
Visit the actions tab and open a run. Check the logs line by line. You can rerun a job or add debug steps. It turns bug hunts into a breeze, and speeds your development cycle.
6. Can I use these workflows for any software product?
Yes, you can test JS apps, build a container, or run a static site generator. They fit every stage of the software development lifecycle.