
WordPress powers over 40% of websites worldwide, making it the most popular content management system (CMS) on the internet. From personal blogs to large-scale e-commerce platforms, WordPress offers an easy-to-use and highly customizable solution for building websites.
However, to get started, you need to install WordPress on your hosting account. This is a necessary first step to bringing your website to life.
While installing WordPress might seem like a daunting task to beginners, there are multiple simple methods you can use to get it up and running.
Whether you want a quick one-click setup or prefer a more hands-on approach, this guide will provide you with 7 simple ways to install WordPress on your hosting account, ensuring that you have a smooth, stress-free installation process.
Let’s dive into the details!
What is WordPress and Why Install It?
WordPress is a free and open-source content management system (CMS) that allows anyone to create and manage a website without needing advanced technical skills.
WordPress offers an intuitive user interface, a vast library of themes and plugins, and unmatched flexibility, which makes it the perfect solution for everyone from beginners to experienced developers.
Once you’ve chosen a hosting provider, installing WordPress is the next step in bringing your website to life. Hosting your WordPress site on a reliable server ensures that it’s accessible to visitors around the clock. The installation process, however, can be overwhelming if you’re unfamiliar with it. Fortunately, there are several simple ways to install WordPress on your hosting account, each catering to different levels of expertise.
Why Choosing the Right Hosting for WordPress Matters
Before we jump into the installation methods, it’s important to note that choosing the right hosting plan is critical for a smooth WordPress experience. The type of hosting you select influences your site’s speed, security, and uptime, all of which are vital to your website’s success.
There are several types of hosting services available:
- Shared Hosting: Most affordable, ideal for beginners. However, performance may suffer with high traffic.
- VPS (Virtual Private Server) Hosting: Offers more power and flexibility, better for growing sites.
- Dedicated Hosting: Best for large businesses or high-traffic sites, but it’s more expensive.
- Managed WordPress Hosting: A specialized hosting environment tailored for WordPress, providing automatic updates, security, and performance optimization.
Key factors to consider:
- Speed and Performance: Choose hosts that offer fast load times and optimal server configurations for WordPress.
- Uptime Guarantee: Ensure the hosting provider offers a high uptime guarantee (99.9% or better).
- Security: Ensure your host provides SSL certificates, firewalls, and daily backups for WordPress sites.
- Support: 24/7 support is essential, especially if you encounter installation or maintenance issues.
Method 1: One-Click WordPress Installation via cPanel
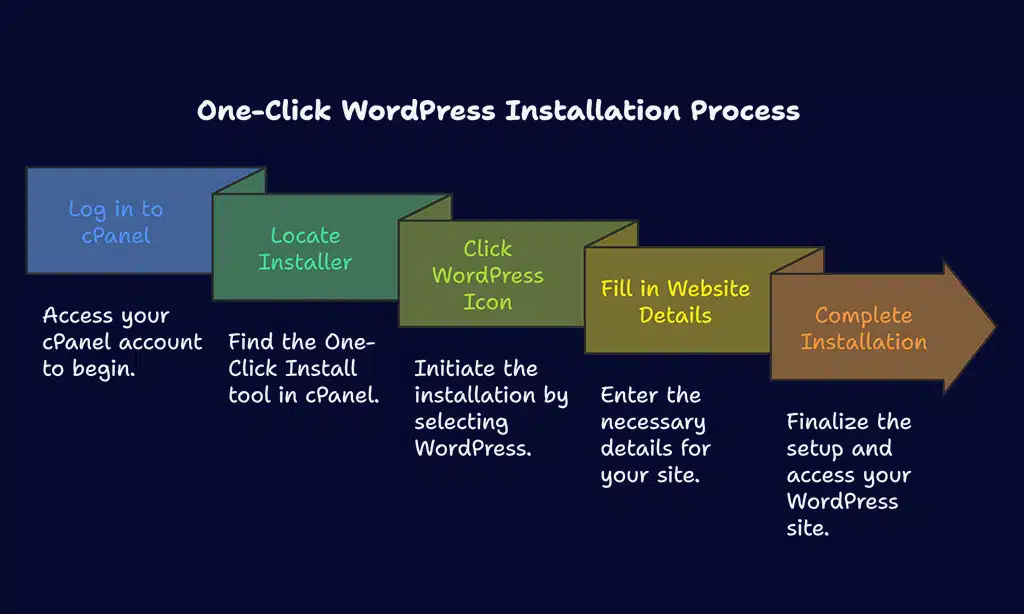
cPanel is a popular web hosting control panel that provides a graphical interface to manage various aspects of your hosting account, such as file management, email setup, and database creation. Many hosting providers include cPanel as part of their hosting package because of its user-friendly interface. One of the standout features of cPanel is the One-Click Install option, which simplifies the process of installing WordPress.
With this feature, you don’t need to worry about downloading files, setting up databases, or configuring server settings manually. The One-Click Install process does all of that for you, allowing you to install WordPress in just a few steps.
Step-by-Step Guide to One-Click WordPress Installation
| Step | Action |
| Step 1 | Log in to your cPanel account (typically yourdomain.com/cpanel). |
| Step 2 | Locate the One-Click Install or WordPress Installer under the “Software” section (tools like Softaculous or QuickInstall). |
| Step 3 | Click on the WordPress icon to start the installation process. |
| Step 4 | Fill in your website details (site name, admin username, password, email address). |
| Step 5 | Click “Install.” The installation will complete within a few minutes. Once done, you can access your new WordPress site! |
Advantages:
- Ease of use: No need to handle any technical configurations.
- Quick setup: Install WordPress in a matter of minutes.
- Beginner-friendly: Ideal for users with limited technical knowledge.
Method 2: Installing WordPress via FTP
FTP (File Transfer Protocol) is a method for transferring files between your local computer and a hosting server. If you prefer a more hands-on approach to installing WordPress, or if you’re using a host that doesn’t provide One-Click Install, installing via FTP is a great option.
FTP installation is beneficial when you want more control over the WordPress setup or if you’re installing WordPress on a remote server with no direct control panel access.
Using FTP, you can manually upload WordPress files to your hosting account and configure the database and settings manually.
Step-by-Step Guide to Installing WordPress Using FTP
| Step | Action |
| Step 1 | Download the latest version of WordPress from wordpress.org. |
| Step 2 | Install an FTP client (e.g., FileZilla) and enter your hosting FTP credentials (provided by your host). |
| Step 3 | Connect to your server via FTP and upload the WordPress files to your hosting account. |
| Step 4 | Create a new MySQL database in cPanel (go to “Databases” > “MySQL Databases”) and note the database name, username, and password. |
| Step 5 | Open the wp-config-sample.php file in a text editor, update the database credentials, and save it as wp-config.php. |
| Step 6 | Visit your domain (e.g., yourdomain.com/wp-admin/install.php) to complete the WordPress installation. |
Pros:
- More control: You control where WordPress is installed.
- Ideal for custom configurations: Perfect for users who want to manually configure their WordPress setup.
- No One-Click Install option: Useful for hosts that don’t provide One-Click Install.
Method 3: Installing WordPress Using a Managed Hosting Provider
Managed WordPress hosting is a specialized hosting environment designed for WordPress websites. With this type of hosting, the provider takes care of all the technical aspects, such as automatic updates, security patches, backups, and performance optimization.
Managed WordPress hosting providers, such as WP Engine, SiteGround, and Kinsta, provide a hassle-free experience and allow users to focus on their content rather than technical maintenance.
Simple Installation Steps with Managed WordPress Hosting
| Step | Action |
| Step 1 | Sign up with a managed WordPress hosting provider (e.g., WP Engine, Kinsta). |
| Step 2 | Once your account is set up, the host will typically install WordPress automatically. |
| Step 3 | Log into your WordPress dashboard using the provided admin credentials. |
| Step 4 | Begin customizing your site, such as installing themes, adding plugins, and configuring settings. |
Benefits:
- Zero hassle: WordPress is installed for you automatically.
- Optimized for performance: The hosting environment is tailored to run WordPress at peak efficiency.
- Advanced support: Managed hosts offer 24/7 support, especially for WordPress-specific issues.
Method 4: Installing WordPress with Softaculous in cPanel
Softaculous is an auto-installer tool available in many cPanel-based hosting accounts. It offers a streamlined way to install WordPress with just a few clicks. With Softaculous, you don’t have to worry about manually uploading files or configuring databases—everything is done for you in a matter of minutes.
Softaculous also supports other popular CMSs and applications, but it’s particularly convenient for installing WordPress.
Step-by-Step Guide to Installing WordPress with Softaculous
| Step | Action |
| Step 1 | Log into your cPanel account and find Softaculous under the “Software” section. |
| Step 2 | Click on the WordPress icon. Softaculous will open the installation interface. |
| Step 3 | Fill in the installation details (site name, admin username, password, etc.). |
| Step 4 | Click “Install.” Softaculous will automatically install WordPress on your site. |
Advantages:
- Quick and easy: Install WordPress with minimal configuration.
- No manual steps: Softaculous automates database creation and file uploading.
- User-friendly: Ideal for those with limited technical knowledge.
Method 5: Installing WordPress Manually (Advanced)
Manual installation is ideal for more advanced users or those who want total control over their WordPress installation. This method allows you to customize each step of the process and configure your site exactly as you want it. Manual installation is also helpful when installing WordPress on custom servers, VPS, or remote hosts with no One-Click Install options.
Step-by-Step Guide to Manual WordPress Installation
| Step | Action |
| Step 1 | Download the latest version of WordPress from wordpress.org. |
| Step 2 | Upload the WordPress files to your hosting account via FTP or cPanel. |
| Step 3 | Create a MySQL database and user from cPanel’s “Databases” section. |
| Step 4 | Open the wp-config-sample.php file and enter the database credentials. Rename it to wp-config.php. |
| Step 5 | Visit your domain (e.g., yourdomain.com/wp-admin/install.php) to finish the installation. |
Pros:
- Full control: Perfect for users who want full flexibility over their setup.
- Customization: Allows advanced users to tweak and configure WordPress settings.
Method 6: Using WP-CLI for WordPress Installation
WP-CLI is a command-line interface for managing WordPress installations. It allows you to install, update, and configure WordPress using simple terminal commands. WP-CLI is ideal for developers or advanced users who prefer working in the command line and want a faster installation process without using a GUI.
Step-by-Step Guide to Installing WordPress Using WP-CLI
| Step | Action |
| Step 1 | Install WP-CLI on your server. |
| Step 2 | Run the following command to download WordPress: wp core download. |
| Step 3 | Create a wp-config.php file: wp config create –dbname=your_db_name –dbuser=your_db_user –dbpass=your_db_password. |
| Step 4 | Run the command: wp core install –url=yourdomain.com –title=”Your Site Title” –admin_user=admin –admin_password=yourpassword –admin_email=youremail@example.com. |
Advantages:
- Faster installation: Command-line interface allows you to complete the installation in seconds.
- Perfect for developers: Ideal for users familiar with terminal commands and working on multiple sites.
Method 7: Installing WordPress Using Local Development Environments
A local development environment is a software setup that mimics a live server on your local machine. This setup allows you to install and configure WordPress on your computer before launching it to the live server.
Tools like XAMPP, WampServer, Local by Flywheel, and MAMP allow you to create a local server environment. By setting up WordPress locally, you can develop, test, and design your site in a safe environment before going live.
Why Use a Local Development Environment?
Setting up WordPress locally has several advantages:
- Testing and Development: You can try out different themes, plugins, or changes without affecting your live website.
- Faster Development: Working on your computer is faster than uploading files to a server repeatedly.
- No Need for Internet: You can work offline, which is useful when you don’t have access to the internet or have slow connections.
Once you’ve designed your site on your local machine, you can then migrate it to a live server when you’re ready to launch.
Step-by-Step Guide to Installing WordPress Locally
| Step | Action |
| Step 1 | Download and install a local server environment such as XAMPP, WampServer, or MAMP. |
| Step 2 | Start the local server environment and make sure the Apache and MySQL services are running. |
| Step 3 | Download the latest version of WordPress from wordpress.org. |
| Step 4 | Extract the WordPress files into the htdocs (XAMPP) or www (WampServer/MAMP) folder. |
| Step 5 | Create a new MySQL database through the local server’s phpMyAdmin interface. |
| Step 6 | Open your browser and go to http://localhost/your-folder-name/ to begin the WordPress installation. |
| Step 7 | Follow the WordPress setup prompts (site name, admin username, password, etc.) to complete the installation. |
Advantages of Installing WordPress Locally
- Control over Development: You can work offline and avoid internet-related limitations.
- Safe Testing: Try out plugins, themes, and updates without worrying about breaking your live site.
- Learning Environment: Great for beginners to learn WordPress without impacting a live site.
Migrating from Local Environment to Live Server
Once you’ve completed your WordPress development locally, it’s time to move it to your live server. The process involves exporting your database, uploading files to the live server, and ensuring that the URL and settings are properly configured. You can use plugins like All-in-One WP Migration or Duplicator to help with this process.
Wrap Up
Now that we’ve explored 7 simple ways to install WordPress on your hosting account, you should have a good understanding of which method works best for you. Whether you’re a beginner looking for a one-click solution or an advanced user who prefers a more hands-on approach, there’s a method tailored to your needs.
Troubleshooting Common Installation Issues
Common issues during WordPress installation include database connection errors, file permission issues, and incomplete installations. Here’s how to troubleshoot:
- Database Connection Errors: Check that your database credentials in the wp-config.php file are correct.
- File Permission Issues: Ensure that files and directories have the proper read/write permissions.
- Incomplete Installation: Double-check that all files were uploaded and that the installation process was fully completed.
By selecting the right installation method and understanding troubleshooting techniques, you’ll be well on your way to running a successful WordPress website. Happy installing!