Have you ever tried installing a new program, only to watch everything fall apart? Your screen fills with error messages. Suddenly, your package manager completely refuses to cooperate. You just hit a wall called broken dependencies in Ubuntu and Linux. It is incredibly frustrating. I have been there, and I know exactly how annoying it feels when your work comes to a halt.
Here is the secret: broken dependencies in Ubuntu/Linux happen to almost every single Linux user eventually. Your system packages rely on other packages to function properly, similar to how a car requires an engine. When these connections break, your machine gets stuck.
The good news is that you can fix this problem without needing an advanced computer science degree. Grab your favorite drink, and we will walk through the exact steps together. I am going to show you everything you need to know to get your system running perfectly again.
Identifying Broken Dependencies
Your system actually tries to help you by sending error messages. You just need to spot these problems fast before they snowball into a much bigger headache.
Common error messages
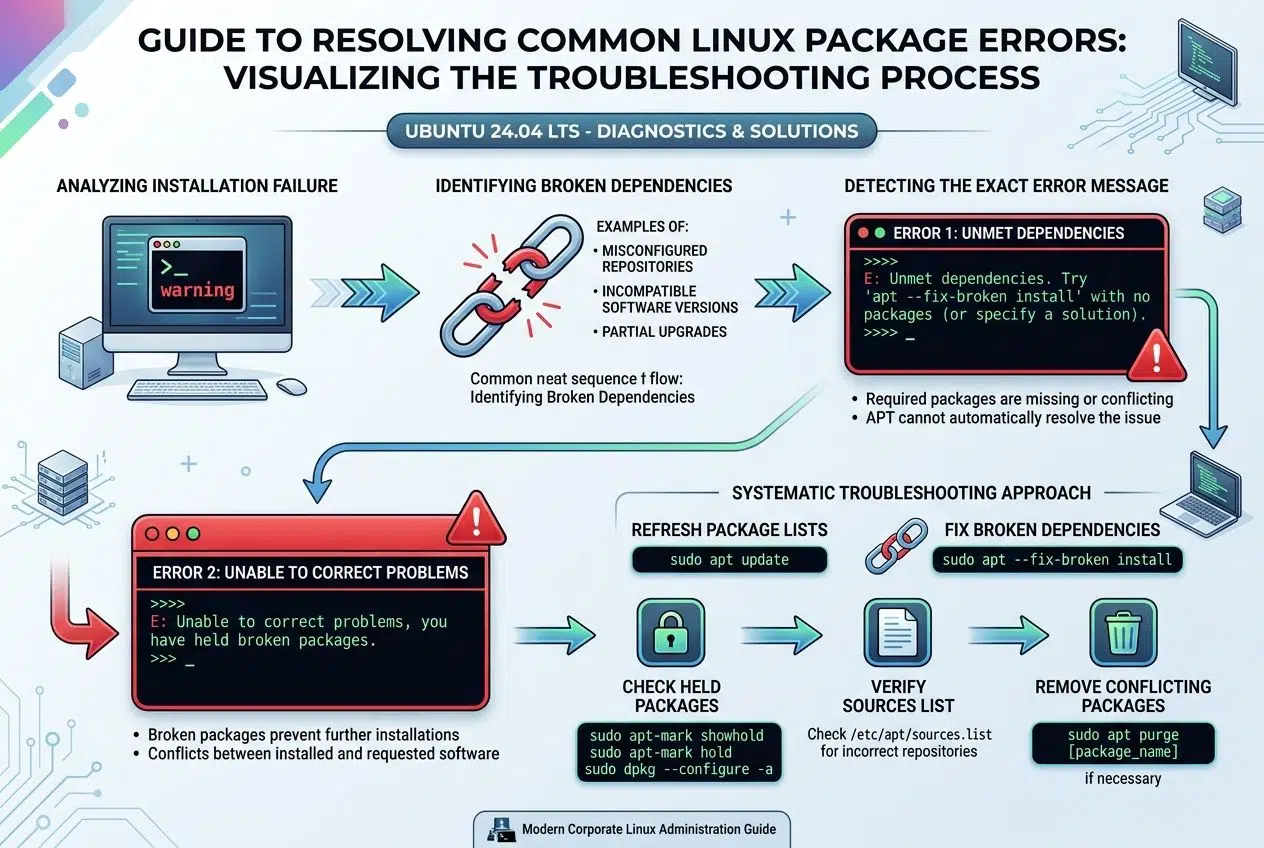
A standard installation, like the highly popular Ubuntu 24.04 LTS, handles tens of thousands of software packages. When they conflict, your terminal throws very specific errors at you. Learning to read them is your first step to a quick fix.
- “E: Unable to correct problems, you have held broken packages” appears when APT cannot resolve conflicting software requirements. This means your system has packages that depend on versions that do not exist or clash with installed software.
- “E: Unmet dependencies” pops up when a package needs another file that is not installed on your machine. APT stops the process to protect your system. Installing the missing dependency often solves this issue right away.
- “dpkg: error processing package” indicates that the DPKG tool hit a major roadblock. The system cannot complete the configuration of that software. This message always includes the package name, giving you a clear target to investigate.
- “E: The following packages have unmet dependencies” lists multiple files that lack required components. Your system cannot satisfy all the rules at once. Breaking your installation into smaller, individual steps sometimes resolves this.
- “Package is in a very bad, inconsistent state” means the package manager detected serious file corruption. The system cannot repair this through a normal update. You must purge and reinstall the problematic software immediately.
- “E: Could not get lock /var/lib/apt/lists/lock” shows that another process is actively using the package manager. Waiting for the background update to finish usually solves this problem.
- “Sub-process /usr/bin/dpkg returned an error code” signals a deep problem during the installation process. Reconfiguring your packages or clearing the cache frequently resolves this specific error.
Checking for broken packages
Now that you understand the common warnings, it is time to dig deeper. Finding the actual damage requires running a few quick terminal commands.
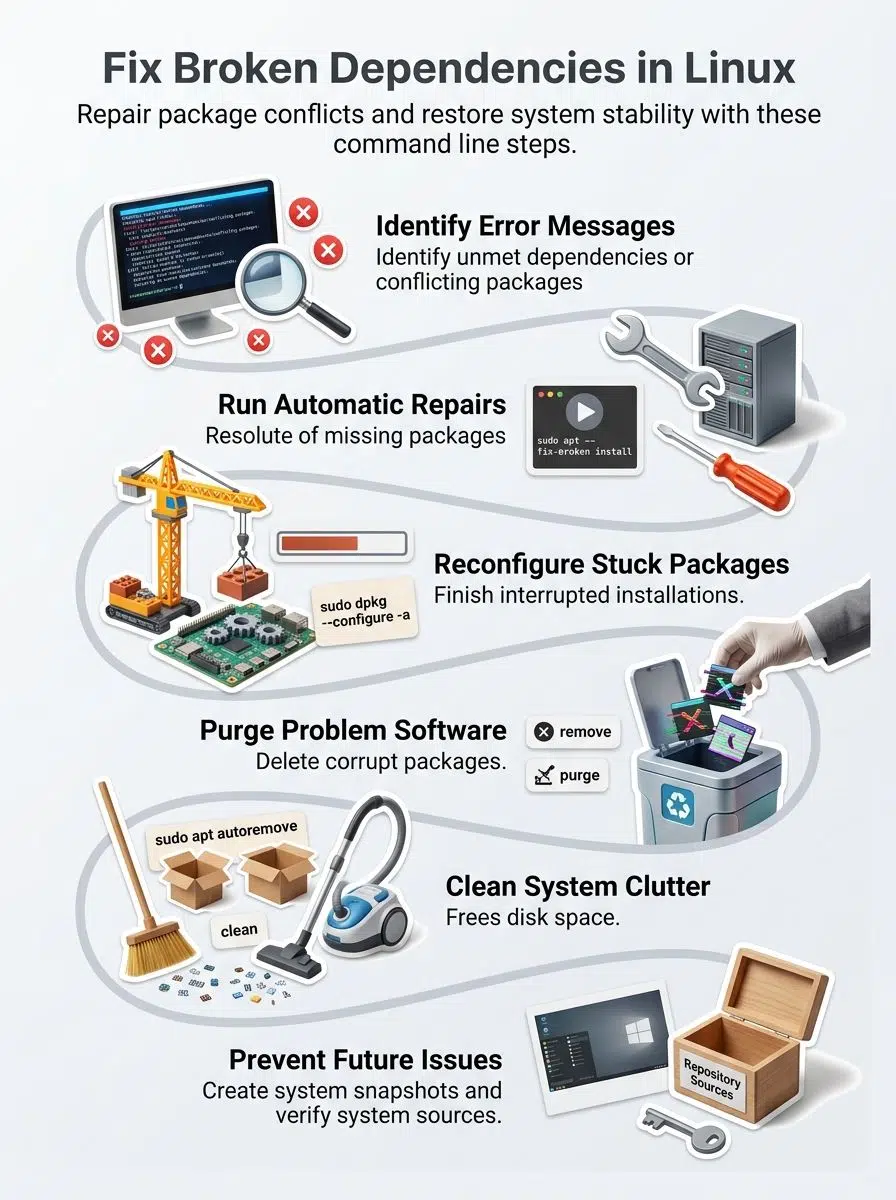
- Open your terminal and type sudo apt check. This scans your entire system for broken package dependencies that need your immediate attention.
- Run sudo apt –fix-broken install. This lets your package manager automatically repair most installation errors in one clean sweep.
- Use sudo dpkg –configure -a. This forces the system to reconfigure pending packages that failed to install properly during your last update.
- Execute sudo apt autoremove. This deletes unused background packages that might cause conflicts with your current software.
- Type sudo apt clean. This empties out old package cache files that frequently trigger resolution issues.
- Run sudo apt autoclean. This smart command deletes only outdated package versions, speeding up your command line operations.
- Check sudo apt full-upgrade. This completely updates your packages and fixes dependency issues stemming from older software files.
- Use sudo dpkg -l | grep “^rc”. This specific string helps you find hidden configuration files left behind from previous removal attempts.
- Run sudo apt install -f. This forces a strict dependency resolution and finishes any partially installed applications.
- Type sudo apt list –upgradable. This shows you exactly which programs have newer versions available that might solve your current headache.
Fixing Broken Dependencies Using APT
APT, or Advanced Package Tool, is your main line of defense for a healthy system. This powerful utility sorts out software conflicts faster than you can blink.
Run `sudo apt –fix-broken install`
Think of this command as your primary repair toolkit. It tackles unmet dependencies head-on and gets your package management back on track.
- Open your terminal and type sudo apt –fix-broken install to start the automated resolution process immediately.
- Watch as your system scans all broken files and identifies exactly which installations failed.
- The command actively attempts to complete partially installed software by downloading the missing pieces.
- It addresses configuration issues by restoring stuck packages to a working state.
- Unmet dependencies get resolved because APT calculates the exact versions needed for your software to function.
- You will see detailed terminal output showing what it is fixing and any potential conflicts it encounters.
- The system safely removes problematic packages that simply cannot be fixed.
- After completion, your screen displays a summary of all the repairs made.
- Run sudo apt update immediately afterward, to refresh your repository information.
- Verify the repair worked by attempting to install a small, simple new program.
- If errors persist, the output logs will guide your next troubleshooting steps.
- This command works beautifully across all Ubuntu versions and Debian-based Linux distributions.
Update and upgrade your system
After you fix broken files, your system craves fresh updates. System updates keep your software repository current and block new installation errors.
Pro Tip: For enterprise or daily-driver machines, I highly recommend sticking to Long Term Support releases, like Ubuntu 24.04 LTS “Noble Numbat.” Because it receives guaranteed security updates until April 2029, you avoid the unstable dependencies common in short-term experimental releases.
- Type sudo apt update to refresh your lists from all enabled software repositories.
- Run sudo apt upgrade to install the newest versions of packages you already own.
- Use sudo apt full-upgrade if you need a thorough update that safely removes obsolete dependencies.
- Check your command line output carefully for any lingering configuration issues.
- Install pending updates multiple times if necessary, as some packages require sequential installation.
- Verify the process by typing sudo apt check to catch anything that slipped through the cracks.
- Clean up your local cache with sudo apt clean to free up hard drive space.
- Run sudo apt autoremove to delete unused packages that are no longer required by any application.
- Reboot your computer to finalize the core system changes.
Resolving Issues with DPKG
If APT is your daily driver, DPKG is the mechanic under the hood. It works at a much lower level to give you direct control.
Reconfigure pending packages
Sometimes installations just freeze halfway through, leaving your system in absolute limbo. Reconfiguring them brings your machine back to life.
- Type sudo dpkg –configure -a to force the system to finish what it started.
- This tells DPKG to complete the process for packages that stalled during a previous update.
- Your terminal will display real-time feedback about the recovery process.
- After it finishes, run sudo apt check to confirm the problems are gone.
- If a specific package refuses to cooperate, target it directly using sudo dpkg –configure package-name.
- The process usually takes a few minutes, depending on your processor speed.
- Once DPKG finishes, run sudo apt –fix-broken install to sweep up any leftover issues.
- Your package management system now has a clean slate for future updates.
- If you see new error messages, write them down so you can research that exact file.
- Advanced users can also use sudo apt install -f to accomplish a very similar result.
Remove problematic packages
Sometimes software just conflicts, and you have to remove it to restore stability.
- List all installed packages by typing apt list –installed and scan for the culprit.
- Use sudo apt remove package-name to delete the specific troublemaker.
- Run sudo apt autoremove right after to delete any leftover dependent files.
- Try sudo apt purge package-name if you want to eliminate the package and its hidden configuration files entirely.
- Check for partially installed items with sudo dpkg –configure -a.
- Execute sudo apt clean to remove cached files that might cause a future conflict.
- Search for stubborn residual files using sudo find /etc -name “*.dpkg-*” and delete them manually.
- Install an alternative package manager like aptitude for slightly smarter dependency handling.
- Force a removal with sudo dpkg –remove –force-all package-name only as an absolute last resort.
- Verify your fix by running sudo apt check.
Fix partially installed packages
Partially installed software creates a massive roadblock. APT provides tools to clear this jam fast.
Pro Tip: A very common cause for a blocked DPKG is an automatic background update. Many users on Linux forums note that the unattended-upgrades process causes the dreaded “Could not get lock” error. You can find the exact process locking your system by typing ps aux | grep -i apt. Once you spot the background process, simply wait a few minutes for it to finish naturally.
- Run sudo dpkg –configure -a to reconfigure pending files.
- Type sudo apt –fix-broken install to let the system analyze and fix incomplete setups.
- Execute sudo apt -f install as a quick shortcut to correct dependencies.
- Run sudo apt clean to remove interference from the cache.
- Use sudo apt autoclean to delete old versions and free up space.
- Try sudo dpkg –remove –force-remove-reinstreq package-name to forcefully remove a completely broken file.
- Reinstall the package freshly with sudo apt install package-name.
- Check your repository settings in /etc/apt/sources.list to verify your links are active.
- Run sudo apt update followed by an upgrade.
- Execute sudo apt install -f again if you still see unmet requirements.
- Remove residual files with sudo apt purge package-name.
- Verify system stability by running a final sudo apt check.
Cleaning Up System Files
Your computer collects a ton of junk files over time. Clearing out this digital clutter makes everything run faster.
Remove unused packages
Unused packages eat up storage space and slow things down. Removing them keeps your Ubuntu installation lean.
- Type sudo apt autoremove to delete packages that nothing else needs.
- Run sudo apt autoclean to remove cached files that APT no longer uses.
- Check what you have installed by running apt list –installed.
- Identify orphaned packages safely with sudo apt autoremove –dry-run first to see what will happen without actually deleting anything.
- Use sudo apt remove package-name to uninstall specific apps you never open.
- Type sudo apt purge package-name to completely scrub the app and its settings.
- Install the Synaptic package manager for a friendly visual interface.
- Search for “Installed (local or obsolete)” in Synaptic to spot broken software.
- Mark files for removal in Synaptic by right-clicking them, then clicking “Apply”.
- Clean your cache entirely with sudo apt clean.
- Review the results by running sudo apt check.
Clean package cache
Your package cache grows larger every single time you update software.
Pro Tip: If you prefer a visual tool over typing terminal commands, BleachBit is a fantastic, free graphical cleaner for Linux. The latest version fully supports Ubuntu 20.04 through 24.04. Just a quick warning: always click the “Preview” button in BleachBit before you click “Clean” so you do not accidentally delete an important performance cache.

- Type sudo apt clean to remove all cached files completely.
- Run sudo apt autoclean if you want to keep the latest versions for faster reinstallation.
- Check your cache size by entering du -sh /var/cache/apt/archives.
- Execute sudo apt clean all for a thorough purge.
- Use apt-get clean as an older alternative command.
Clear the partial directory with sudo rm -rf /var/cache/apt/archives/partial/*. - Combine cleaning commands like sudo apt clean && sudo apt autoremove for fast maintenance.
- Schedule regular cache cleaning by adding the command to your automated cron jobs.
- Monitor your disk usage afterward with df -h.
- Remember that cleaning the cache does not uninstall your actual applications.
Remove residual configuration files
Leftover configuration files still lurk in your system after a basic uninstall.
- Type sudo apt purge package-name to remove an app and its hidden settings at the exact same time.
- Use sudo apt autoremove to eliminate orphaned files automatically.
- Search your home directory by running find ~/.config -type f -name “*package-name*” to locate leftover settings.
- Remove directories manually with sudo rm -rf /etc/package-name.
- Check the /etc directory using ls -la /etc/ to spot old application folders.
- Delete residual files from the home directory with sudo find /home -name “.package-name*” -type f -delete.
- Run sudo apt clean to finish the maintenance cycle.
- Use dpkg –list | grep “^rc” to find files marked for removal but not yet fully purged.
- Execute sudo apt install -f to fix any errors resulting from an incomplete deletion.
- Verify your stability by running a quick update and upgrade.
Advanced Recovery Methods
When standard tricks fail, you need to bring out the heavy tools to force a fix.
Force dependency resolution
Stubborn installation roadblocks require a forced resolution.
Pro Tip: If standard APT refuses to cooperate, try installing the Aptitude tool. You can type sudo aptitude -f install package-name. Aptitude is highly respected among veteran users because it is much smarter at calculating conflict resolutions and will offer you multiple safe choices before breaking anything.
- Use the –fix-broken flag to tackle unmet dependencies automatically.
- Type sudo apt –fix-broken install and let the tool work without manual intervention.
- Add the -y flag to automatically answer yes to prompts and speed up the process.
- Run sudo apt install -f to finish incomplete package setups.
- Execute sudo dpkg –configure -a to reconfigure anything stuck midway through.
- Try sudo apt install –no-install-recommends package-name to bypass extra suggested files that might trigger a crash.
- Force the removal of a bad file using sudo apt remove –force-yes package-name, but use this carefully.
- Combine commands like sudo apt clean && sudo apt autoremove to purge unneeded complications.
- Check your repository settings in /etc/apt/sources.list to confirm your servers are online.
- Reinstall corrupted packages from scratch using sudo apt install –reinstall package-name.
Downgrade problematic packages
Downgrading fixes conflicts when a brand-new update accidentally breaks your system.
- Identify the problem package by checking your system logs.
- Open your terminal and search for the available older versions of that software.
- Use the package manager to access these older files from your official repository.
- Run the specific downgrade command featuring the exact version number you want.
- Confirm the action when the system asks to remove the newer, broken version.
- Let the installation complete without interrupting your terminal.
- Verify that the downgrade worked by running a system check.
- Test the affected software to make sure it opens and runs perfectly.
- Pin the package so automatic updates do not immediately break it again tomorrow.
- Document the working version number for your own future reference.
- Check your logs to confirm no new errors popped up.
- Run a standard system update to grab security patches for your other applications.
Reinstall essential packages
Your machine sometimes needs a totally fresh start with its core foundations.
- Focus on core foundational files like build-essential, linux-headers, and base-files.
- Back up your current package list before making any major changes.
- Type the reinstall command for the specific item showing errors in your logs.
- Use the reinstall flag to grab a fresh copy without deleting your personal configuration settings.
- Install build-essential if you plan to compile programs directly from source code.
- Grab linux-headers so your system can communicate flawlessly with your hardware.
- Reinstall base-files to restore fundamental data that might have gotten corrupted.
- Check your package manager after each reinstall to verify success.
- Handle any new pop-up errors by reading the terminal output carefully.
- Test your computer by running a simple software installation command.
- Clean the cache to remove old, corrupted downloads taking up space.
- Autoremove unused items to free up system memory.
- Verify your terminal runs properly to confirm the core functionality is completely restored.
Preventing Future Dependency Issues
Smart maintenance today prevents massive headaches tomorrow. Keep your system clean to stop errors before they start.
Check repositories and sources
Your repository settings act as the master list of where your system downloads applications. If these server links are bad, you will experience installation errors instantly. Here is how to keep your sources functional.
- Open your terminal and type sudo nano /etc/apt/sources.list to view your active links.
- Look for outdated repository addresses that might point to dead US server mirrors.
- Delete any lines that heavily reference outdated, unsupported Ubuntu versions.
- Disable third-party repositories that frequently clash with official packages.
- Run sudo apt update after making any text changes to verify your new links work perfectly.
Create snapshots before updates
Snapshots act like a magical undo button for your computer. Before you run a major system update, you should always take a snapshot. If a broken dependency wrecks your installation, you simply roll back to this saved point in minutes.
I highly recommend a free, widely used tool called Timeshift for this exact purpose. It works similarly to Apple’s Time Machine but is built perfectly for Linux.
- System-Level Focus: Timeshift only backs up critical system files, ignoring your personal photos or documents, which makes the recovery process incredibly fast.
- Flexible Formats: It comfortably supports RSYNC for standard drives, and BTRFS if your setup uses advanced filesystem-level snapshots.
- Automatic Scheduling: You can easily set it to run daily or weekly background backups, so you never forget.
- Easy Restoration: If your machine crashes completely, you can launch Timeshift directly from your GRUB boot menu to restore a working state.
Use package management best practices
Snapshots provide a great safety net, but practicing good digital hygiene prevents issues from occurring in the first place. You want to stick to a few core habits that stop broken dependencies in their tracks.
“Good package management is like changing the oil in your car. It takes five minutes, but it prevents your whole engine from locking up entirely.”
- Only install applications from trusted software repositories that your specific Linux distribution officially supports.
- Run system updates regularly in smaller batches so you can spot exactly which file causes an error.
- Always review what dependent files will be removed before you approve an uninstallation prompt.
- Take the time to learn the correct APT terminal commands for your specific setup.
The Bottom Line
Fixing broken dependencies in Ubuntu and Linux requires a little patience. However, the payoff is absolutely huge. Your machine will run smoother, faster, and much more reliably once you tackle these errors. Simple terminal commands like sudo apt –fix-broken install will solve the vast majority of your problems. If things get messy, DPKG gives you the deep control you need.
Start with the easiest fixes first. Once you understand how your software repository handles updates, these challenges simply disappear. Keep your system healthy through smart, regular maintenance.
Create Timeshift snapshots before major updates to give yourself an instant safety net. Clean your cache frequently, and remove unused files that clutter your drive. Take action today. Your Ubuntu setup will thank you with years of trouble-free performance.
Frequently Asked Questions (FAQs) on Broken Dependencies In Ubuntu/Linux
1. What are broken dependencies in Ubuntu or Linux?
Broken dependencies happen when a package needs certain files or libraries to work, but those pieces are missing or have mismatched versions. According to Ubuntu’s package management system, APT (Advanced Package Tool), this usually occurs when installations get interrupted or when you mix packages from different sources.
2. How can I fix broken dependencies using the terminal?
Open your terminal and type sudo apt-get update, then run sudo apt-get install -f. The -f flag stands for “fix-broken” and automatically resolves most dependency issues for you.
3. Why do these dependency problems pop up in Ubuntu/Linux?
They typically show up after installing software from third-party PPAs (Personal Package Archives) or mixing packages from different Ubuntu versions. Interrupted updates or power failures during installation can also leave your system half-configured.
4. Can I avoid broken dependencies in the future?
Stick with Ubuntu’s official repositories whenever you can, since they’re tested for compatibility. If you need third-party software, use established PPAs with solid community ratings and verify they support your specific Ubuntu version. Running sudo apt update regularly keeps your package lists current and helps prevent conflicts.