
Building web apps feels impossible when you juggle front-end code, back-end servers, and databases all at once. You write JavaScript for your website, then switch gears to handle server logic, and suddenly, you are managing two completely different spaces. Most developers get stuck here, spinning their wheels between tools and frameworks that do not talk to each other smoothly.
Here is the secret. Next.js lets you solve How To Build A Full-Stack App With Next.js using one language and one framework. In 2026, about 68% of JavaScript developers report using Next.js. Companies like Netflix, TikTok, and Hulu already trust it to power their applications. It cuts Fullstack Application Development time in half and keeps everything in one place.
I am going to walk you through every step to create a complete full-stack application. You will learn how to set up your project, design your front-end, build API routes, connect a database, add user login features, and launch your app online.
By the end, you will have a working application ready for real users. Ready to stop switching between tools?
Setting Up Your Development Tools
You need the right tools to start building your full-stack app. Let’s get your computer ready to code with Next.js.
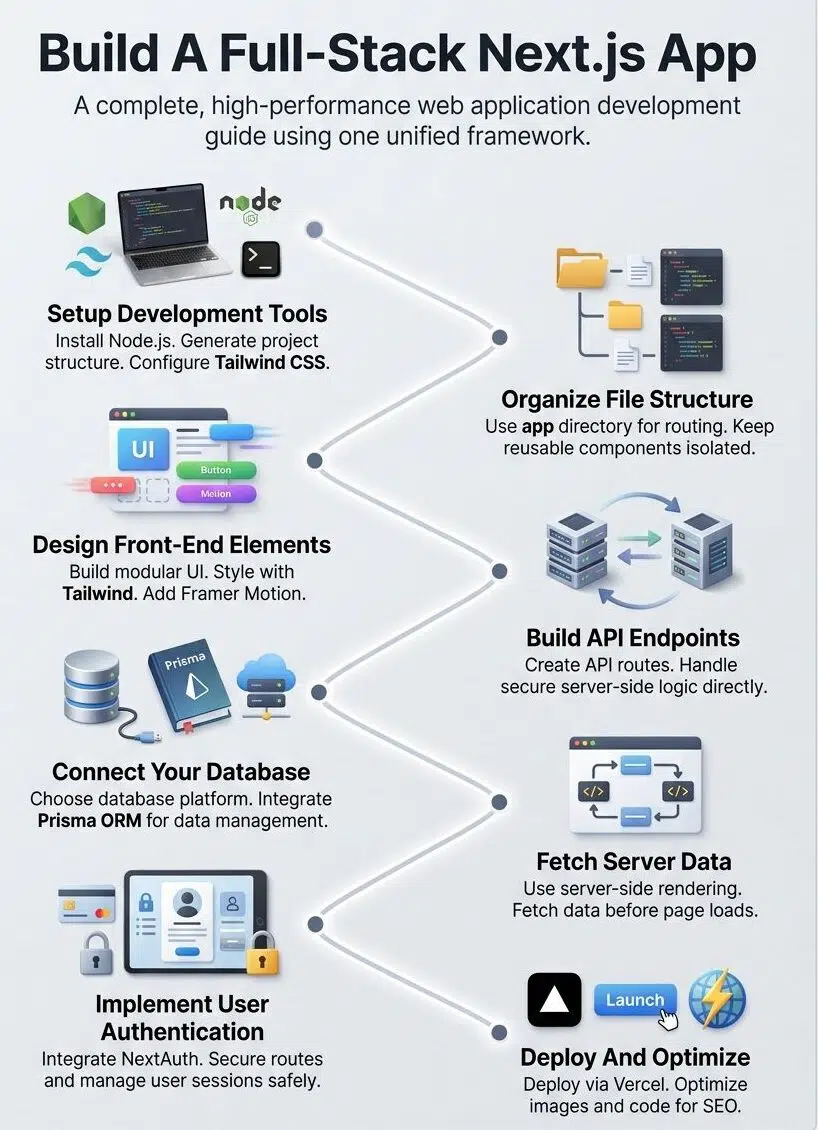
Installing Node.js and npm
Node.js and npm form the foundation for any JavaScript development project. Getting these tools installed on your computer opens the door to building modern web applications.
- Head to the official Node.js website and locate the download page for your operating system.
- Select the Long Term Support (LTS) version, like Node.js 24 “Krypton” released in early 2026, for maximum stability.
- Open the downloaded installer file and follow the setup wizard instructions.
- Open your terminal and type node -v to verify the installation worked.
- Run npm -v in the same terminal window to check that your package manager is ready.
A quick tip I always share with my team is to use a tool called Node Version Manager (NVM) instead of downloading directly from the site. Many seasoned developers use NVM because it lets you switch between different Node versions on your computer with a single command, saving you from major headaches later on.
Creating a New Next.js Project
Starting your first Next.js project is simpler than you might think. You will have a working application running in just a few minutes with the right commands.
- Open your terminal and navigate to the folder where you want to store your project.
- Run the command npx create-next-app@latest my-app to generate your new codebase.
- Select “Yes” for Tailwind CSS and the modern App Router when the setup wizard asks for your preferences.
- Navigate into your new directory by typing cd my-app in your terminal.
- Start your local development server by running npm run dev.
A 2026 report from the State of JS showed that configuration complexity is the top frustration for developers today. Thankfully, the create-next-app command handles all the heavy lifting, setting up your bundler and configuration automatically so you skip the messy setup phase entirely.
Organizing Your Next. js Application
A solid file structure makes your project easier to maintain and scale as it grows. Next.js gives you powerful tools to organize your code in ways that actually make sense for your app.
Managing Files and Directories
Your Next.js project needs solid organization from day one. Create a clear folder structure that separates your concerns.
Most developers organize their work with a “components” folder for reusable pieces and a “lib” folder for helper functions. This structure makes your full-stack application easier to navigate as it grows. You will find bugs faster, and your teammates will never get lost in the codebase.
The modern App Router changed how developers think about file organization. You put your layout files at the top level, then nest page files deeper as your application routing gets more complex.
Your API integration endpoints go right inside the “api” folder within “app”, keeping backend logic separate from frontend code.
Organizing your files logically saves you hours of searching through your code, making frontend and backend development feel completely unified.
Understanding the “app” Directory and Routing
Next.js uses the “app” directory to handle your web development structure. This folder becomes the absolute backbone of your full-stack application.
Let’s explore how the routing system benefits your project:
- Files placed in folders automatically become pages, eliminating manual configuration.
- Nested routing allows you to create complex layouts intuitively.
- React Server Components keep your JavaScript bundles small by running logic on the server.
- Dynamic routes handle changing data using simple bracket notation.
This setup cuts down on confusion and lets you organize your frontend code in a highly visual way. This architecture makes software engineering much cleaner for your entire team.
Designing the Front-End
Your front-end makes or breaks the user experience, so you will want to craft interfaces that feel smooth and responsive. You will build components that work across your app and style them with modern tools.
Building Reusable Components
Components form the backbone of your frontend development. Think of them as building blocks that you stack together to create your entire interface.
You write a component once, then reuse it across multiple pages and sections of your application. This modular approach saves you incredible amounts of time and keeps your code perfectly clean.

A button component handles all the styling and behavior in one specific place. When you need to update that button later, you change it once, and every single instance updates automatically.
Instead of building everything from scratch, many developers in 2026 use pre-built libraries like shadcn/ui. This tool gives you access to beautifully designed components that you copy directly into your project, saving weeks of design work.
Props let you customize each instance without rewriting code. A card component might accept different titles, images, and descriptions through props, adapting easily to fit various contexts.
Implementing Styling with CSS Modules or Tailwind CSS
Styling your Next.js application shapes exactly how users experience your web development project. CSS Modules give you scoped styles, which means your class names stay local to each component.
Tailwind CSS takes a different approach by offering utility classes you apply directly in your markup. Both methods work wonderfully for modern web applications.
CSS Modules fit well if you prefer traditional stylesheets. Tailwind CSS speeds up development incredibly with pre-built utilities that handle spacing, colors, and responsive design natively. As of early 2026, Tailwind CSS is integrated directly into the Next.js installer because it is the overwhelming favorite among developers.
Start with whichever approach feels natural, test it on a small section of your application, and expand once you see what works best for your workflow.
Adding Animations and Page Transitions
Animations bring your web development project to life beautifully. Next.js works seamlessly with Framer Motion, a JavaScript library that makes smooth animations incredibly simple.
You can add fade-in effects when pages load, slide transitions between routes, or satisfying bounce effects on your buttons. These visual touches make your full-stack application feel highly polished.
Here are a few easy ways to enhance your interface:
- Use fade-ins to introduce text softly.
- Add hover states that shift color or scale up slightly to guide users.
- Implement slide transitions to make navigating between pages feel seamless.
- Overlay a loading screen with a custom design during heavy data fetches.
These small details separate basic web applications from ones that feel intentional and fully crafted.
Developing API Routes
Your app needs a strong backend, and Next.js makes building API routes completely straightforward. You will create endpoints that handle data natively.
Setting Up API Endpoints
API endpoints form the backbone of your full-stack application, connecting your front-end directly to your back-end logic. Next.js makes creating these endpoints simple through its built-in API routing.
- Create a new file route.js inside the app/api/users directory to set up your endpoint path.
- Export functions named after HTTP methods, such as export async function GET(request).
- Write server-side logic inside these functions to query your database securely.
- Return responses using the native Response object, formatting your data as JSON.
- Handle multiple request types by exporting POST DELETE from the same file.
With the modern App Router, these API endpoints are technically called “Route Handlers.” They use the standard Web Request and Response APIs, meaning you do not have to learn Next.js-specific syntax just to send data back and forth.
Managing Server-Side Logic
Your API routes handle all the server-side logic that powers your full-stack application. These routes process requests from your frontend, talk to your database, and send back the required data.
You write these routes as JavaScript functions, and Next.js turns them into actual endpoints automatically. This setup keeps your sensitive code totally safe on the server.
Your server routes act as a secure vault. They validate user input, check permissions, and run complex calculations completely hidden from the browser.
You can connect to your database, call other external services, and manage complex operations without exposing your backend secrets. This architecture keeps your web development exceptionally clean.
Integrating Your Database
Your app needs a solid database to store and manage all that user data. You will connect your database to your Next.js backend through an ORM, which makes talking to your database much simpler than writing raw queries.
Choosing the Right Database
Picking a database is like choosing the foundation for your house; get it wrong, and everything else crumbles. Here is what matters most when making this critical decision:
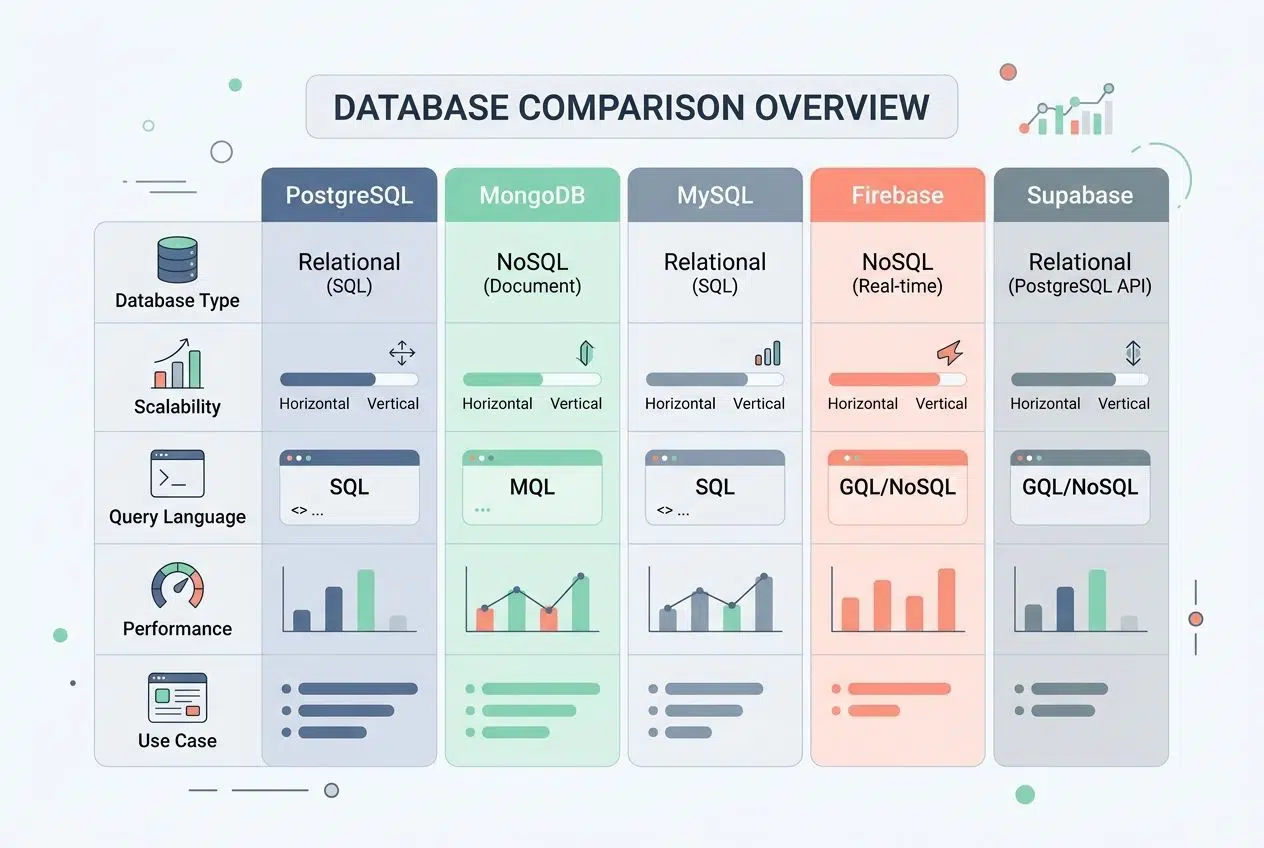
| Database Type | Best For | Key Considerations |
|---|---|---|
| PostgreSQL | Complex queries, relational data, enterprise apps | Free and open-source. Handles structured data well. Scales vertically. Works great with Prisma ORM. |
| MongoDB | Flexible schemas, rapid prototyping, and document storage | NoSQL option. Stores data as JSON-like documents. Perfect when your schema changes frequently. Scales horizontally. |
| MySQL | Traditional web apps, shared hosting environments | Widely supported and affordable. Simpler than PostgreSQL. Good for straightforward relational needs. |
| Firebase / Firestore | Real-time apps, startups, rapid deployment | Managed service by Google. No server maintenance required. Built-in authentication. Costs scale with usage. |
| Supabase | Open-source Firebase alternative, PostgreSQL-backed | Uses PostgreSQL underneath. Includes real-time capabilities. Offers authentication out of the box. |
Scale matters tremendously. PostgreSQL and MongoDB both handle massive growth, but completely differently. PostgreSQL scales up, while MongoDB scales out.
Cost impacts your bottom line directly. Firebase charges per read and write operation, while PostgreSQL hosting through services like Render costs a simple flat monthly fee.
Configuring Prisma or Another ORM
Once you pick your database, you need to set up an Object-Relational Mapper (ORM) to talk to it. An ORM acts as your database translator.
- Install your ORM package into your project using your terminal.
- Update your .env.local file with your secure database connection string.
- Define your data models to tell your ORM exactly what your database tables look like.
- Run a migration command to push your schema directly to the actual database.
In 2026, the two biggest ORM options for Next.js are Prisma and Drizzle. Prisma offers an incredible developer experience with its custom schema files.
Drizzle, however, is a newer favorite because its query engine only adds about 50KB to your project size, compared to Prisma’s 10MB overhead. This makes Drizzle exceptionally fast for serverless environments. Test your queries in your API endpoints to make sure they work correctly before moving forward.
Implementing Server-Side Rendering (SSR)
Server-side rendering pulls data straight from your server before the page reaches your browser. This makes your app significantly faster and search engines much happier.
Fetching Data on the Server-Side
Next.js gives you powerful tools to grab data on the server side before your page ever reaches a user. This approach works wonderfully because it happens entirely behind the scenes.
You pull data from your database or external APIs right in your component, then send the finished HTML to the client. Your frontend gets the information it needs without making extra sluggish requests.
With modern Next.js App Router features, you no longer need special functions to do this. You simply make your main React component an async function and use the native fetch API directly inside it to pull your data.
This drastically cuts down on loading time and makes your web development process incredibly smooth. Your architecture becomes much cleaner because the backend handles the heavy lifting while the frontend simply focuses on displaying the final results.
Utilizing getServerSideProps and getStaticProps
Server-side rendering in Next.js historically relied on specific data fetching methods. These two older functions, getServerSideProps and getStaticProps, formed the backbone of the previous Pages Router.
- getServerSideProps runs on every single request your server receives, perfect for highly dynamic data.
- Static generation with getStaticProps builds your pages at build time, so your application loads lightning fast.
- Props returned from these functions flow directly into your page component easily.
- Incremental Static Regeneration (ISR) combines the benefits of both approaches by serving cached pages while updating them smoothly in the background.
If you are upgrading an older app to the modern App Router in 2026, you will replace getServerSideProps with a standard server-side fetch request that sets the cache: ‘no-store’ option. This achieves the exact same real-time data fetching but with much simpler code.
Adding User Authentication
You need to protect your app from unwanted visitors, and authentication does exactly that. Adding login systems keeps your users completely secure.
Setting Up NextAuth for Authentication
NextAuth makes adding user authentication to your full-stack application simple and straightforward. This popular library handles the complex backend work effortlessly.
- Install the authentication package to your project dependencies via your terminal.
- Create a configuration file to set up your authentication endpoints securely.
- Configure your authentication providers, specifying services like Google or GitHub.
- Set up environment variables to safely store sensitive provider credentials.
NextAuth has officially rebranded to Auth.js to support more frameworks beyond Next.js. However, if you are looking for an even faster setup, many teams in 2026 prefer a hosted service like Clerk.
Clerk provides drop-in UI components that let you build a fully working sign-in page and user dashboard in under five minutes. Test your authentication flow carefully by signing in with different providers to verify everything works securely.
Handling Session State
Session state tracks who logged in and keeps them securely logged in across your app. Your full-stack application needs to know if a user is still active and what specific permissions they hold.
NextAuth stores this information in a highly secure way, keeping hackers away from user data. You set up session callbacks to control exactly what data you save about each user.
Managing session state properly ensures your users have a seamless experience while your backend data remains locked down and secure.
Your API integration pulls this session info to protect private routes and specific endpoints. If a session expires naturally, your application routing simply sends users back to the login page automatically.
Preparing for Deployment and Optimization
You have built something great, so now you need to ship it to the world and make sure it runs exceptionally fast. Let’s cover how you deploy your Next.js app properly.
Deploying Your App with Vercel
Deploying your full-stack application to Vercel makes launching your web development project incredibly straightforward. Vercel specializes in hosting Next.js applications flawlessly.
- Create a Vercel account and authorize it to access your connected code repository.
- Import your Next.js project into the Vercel dashboard seamlessly.
- Configure your environment variables before deployment, including all database connection strings.
- Set up automatic deployments so that every code push triggers a fresh, new build.
- Enable edge functions to run server-side logic closer to your active users.
Deploying on Vercel gives you access to Vercel Edge Functions, which execute your code in data centers globally. This means an API request from a user in California is processed locally, rather than traveling across the country, cutting response times down to mere milliseconds.
Optimizing Performance and SEO
Your Next.js application absolutely needs speed to succeed online. Google ranks fast websites higher, so performance matters deeply for your SEO strategy.
You can use the built-in Next.js Image component to load pictures much faster and smaller. Code splitting happens automatically, keeping your JavaScript files wonderfully lean.
Add descriptive meta tags to your pages so search engines fully understand what you offer. Test your application routing on real mobile devices to catch hidden performance issues early on.
To speed up your development workflow, Next.js now uses Turbopack by default for local development. This Rust-based bundler updates your screen up to ten times faster than older tools when you save a file.
Final Thoughts on How To Build A Full-Stack App With Next.js
You have learned how to set up Next.js, organize your project structure, build reusable components, and create API routes successfully. You also know how to connect databases and deploy your application to production.
Building a full-stack app with Next.js gives you real, tangible power because one JavaScript framework handles both your front-end and back-end needs effortlessly. Start small with a simple project, then confidently add more features as you grow comfortable with the tools.
The community offers tons of amazing tutorials, open-source examples, and documentation you can learn from right now. How to Build A Full-Stack App With Next.js is a question you have fully answered for yourself today.
Take action right now, build something cool, and watch how Next.js transforms the way you create modern web applications entirely.
Frequently Asked Questions (FAQs) on How to Build A Full-Stack App With Next.js
1. What do I need before starting to build a full-stack app with Next.js?
You’ll need Node.js 18 or higher installed, a code editor like VS Code, and some basic JavaScript knowledge. Understanding how front-end and back-end systems work together helps, too.
2. How does Next.js help in building both the front and back ends?
Next.js includes API Routes that let you write both user-facing pages and server-side code in the same project. Just drop a file in your api folder, and it becomes a working backend endpoint.
3. Can I connect my Next.js app to a database?
Absolutely! Prisma makes database connections super simple for PostgreSQL, MongoDB, and other popular databases. Install the package, add your connection details, and start building.
4. Is it hard to deploy a full-stack app made with Next.js?
Nope! Vercel can deploy your Next.js app in under a minute after you connect your GitHub repository. Push your code and watch it go live automatically.