Have you ever felt frustrated because your code works perfectly on your computer, but it breaks the moment someone else tries to run it? You are definitely not alone. I have been there, and developers everywhere face this exact same headache. Different computers have different software, different versions, and different settings. What works for you might fail for your teammate. This problem costs teams precious time, money, and plenty of stress.
Docker solves this problem by putting your application inside a container. A container is just like a standard shipping box that holds everything your app needs to run. According to the 2025 Stack Overflow Developer Survey, a massive 71.1 percent of developers now use Docker in their daily work.
Consider this your ultimate Docker for developers guide. You will learn exactly what containers are and why they matter so much.
I am going to walk you through the exact steps I use, and I think you will be surprised at how easy it can be. So, grab a cup of coffee, and let’s go through it together.
Understanding Docker Basics
Now that you grasp why Docker matters for modern development, let us explore what actually makes it work. Docker uses containerization to package your application with all its dependencies into one neat bundle.
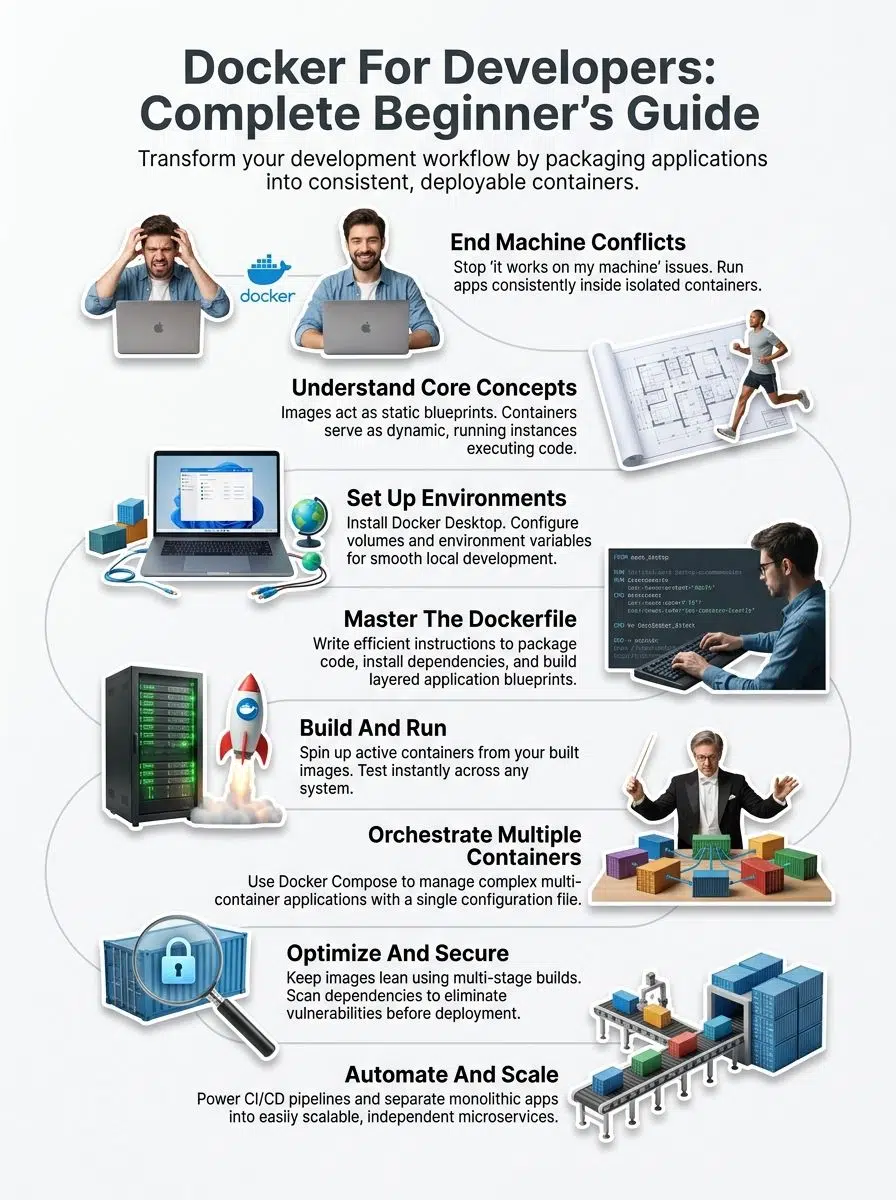
This bundle is called a container. It runs the exact same way on your laptop, your coworker’s computer, or a cloud server.
“Think of a container like shipping a product in a standardized steel box. The contents stay protected and consistent no matter where that box travels.”
Containers are lightweight and incredibly fast. They share the host operating system’s kernel, making them far more efficient than traditional virtual machines. You get the speed of running code directly on your machine alongside the isolation that keeps different projects from clashing.
Docker images serve as the blueprints for these containers. An image contains your application code, libraries, runtime, and configuration, all frozen in time. Containers are the actual running instances of those images. You can start multiple containers from a single image, and each one operates completely independently.
The containerization approach solves a massive problem in software development. The classic “it works on my machine” syndrome simply disappears.
DevOps teams love Docker because deployment becomes predictable and automation becomes straightforward. Whether you are building microservices or preparing cloud computing infrastructure, Docker provides the foundation that makes everything else possible. The environment stays consistent from development right through to production.
Setting Up Docker For Developers: A Beginner’s Complete Guide
Getting Docker up and running on your machine takes just a few minutes. You will open doors to a whole new development workflow. Your system needs the right setup to run containers smoothly. We will walk through the installation steps and configuration choices that matter most.
Installing Docker
Docker installation sets you up for containerization success. You will get your development environment ready to build and run applications in isolated containers. For US-based users, it is important to note recent licensing changes. The 2025 Docker Subscription Service Agreement states that Docker Desktop is only free for small businesses with fewer than 250 employees and less than $10 million in annual US revenue. Larger teams must pay a per-user subscription fee.
If you prefer a completely free alternative, I highly recommend looking into Podman. It is an open-source tool backed by Red Hat that uses the exact same commands. If you are on a Mac, OrbStack is another fantastic option. It starts up in just 2 seconds and uses about 1.1GB of RAM, compared to Docker Desktop’s heavier 3.2GB footprint.
Here is how you get started with the standard setup:
- Visit the official Docker website and download the Docker Desktop application for Windows, Mac, or Linux.
- Run the downloaded installer file and follow the simple on-screen prompts.
- Accept the standard license agreement and choose your preferred installation settings.
- Allow the installer to make necessary system changes so the engine can function.
- Verify your installation by opening a terminal and typing docker –version.
- Test your setup immediately by running the command docker run hello-world.
Configuring Your Development Environment
Now that you have your tools installed, the real work begins. Your configuration choices will shape how smoothly your team collaborates and deploys applications.
- Create a .env file in your project root directory to securely store sensitive data like API keys.
- Configure volume mounts to link your local project folders directly with live container directories.
- Establish proper port mappings, like linking port 8080 on your host machine to port 3000 inside the container.
- Set strict resource limits for CPU and memory so one hungry application does not crash your system.
- Choose a base image carefully to match your exact application needs and security requirements.
- Add Docker to your system PATH for quick access from any terminal folder.
Understanding Core Docker Concepts
Docker works with two main building blocks that you need to grasp clearly. Those blocks are images and containers. Think of an image as a detailed architectural blueprint. The container is the actual house you build from that exact blueprint.
Comparing Containers and Images
Containers and images form the backbone of how this technology operates. Yet, they serve completely different purposes in your daily workflow.
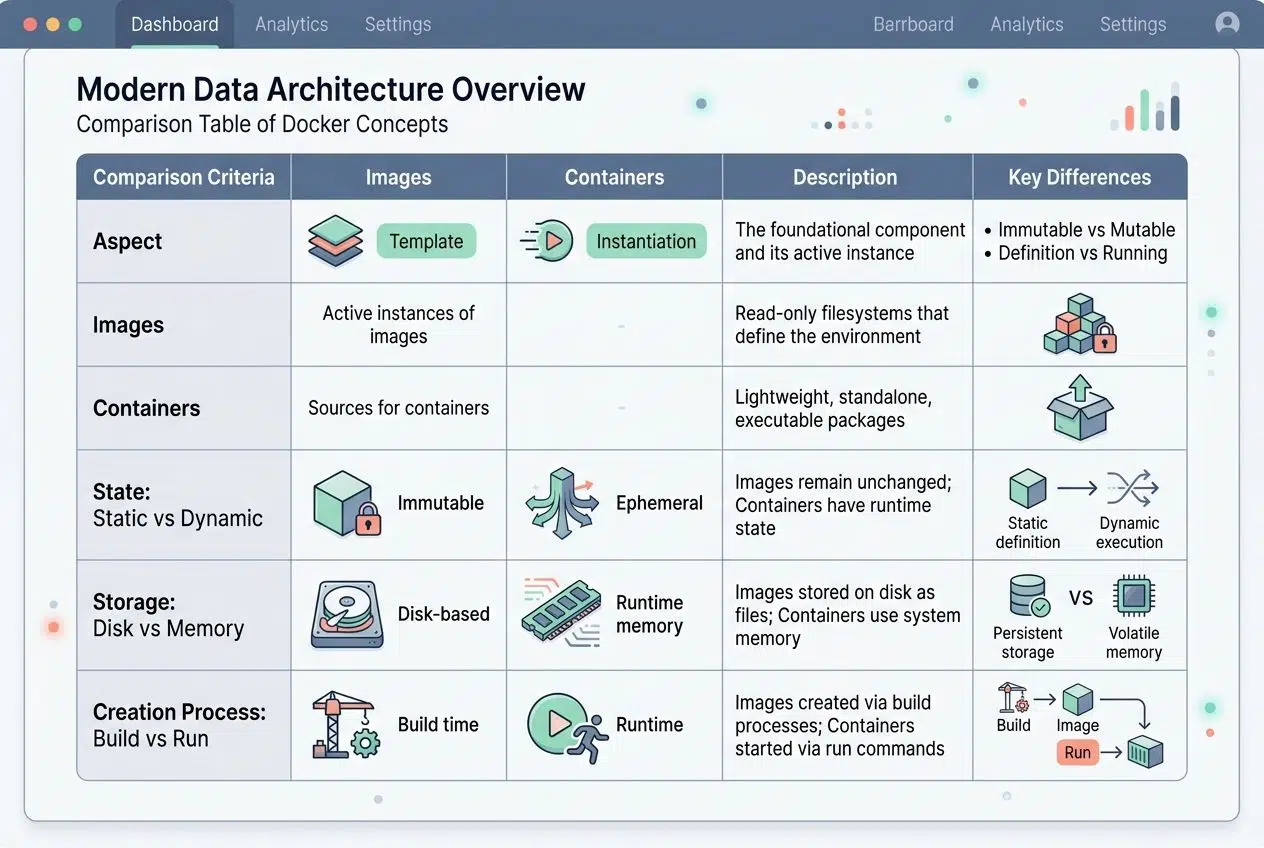
| Aspect | Images | Containers |
|---|---|---|
| Definition | Images are read-only templates that contain everything your application needs. | Containers are live instances created from images that actually execute your code. |
| State | Images remain completely static and unchanging once built. | Containers are dynamic and can change while running. |
| Storage | Images sit safely on your disk until you need them. | Containers run in memory with their own isolated file systems. |
| Creation Process | You build images using simple Dockerfile instructions. | You launch containers by executing the run command. |
| Reusability | One image spawns hundreds of containers to save resources. | Each container is temporary unless committed back to a new image. |
This distinction matters because you build once and run many times. Creating a single image lets you spin up hundreds of identical containers from it. If your application needs updates, you just modify the image. You rebuild it, and all future containers get those improvements automatically.
Your existing containers stay frozen in their original state unless you restart them from the newly updated image. Developers appreciate this separation because it brings absolute consistency to the table. Every container launched from the same image runs identically across all environments.
Mastering Dockerfile Fundamentals
A Dockerfile acts as your custom recipe for building images. You write specific instructions in this plain text file. These instructions tell Docker exactly how to package your application.
Each line in a Dockerfile represents a unique layer. Docker stacks these distinct layers to create your final application image. You always start with a base image, like Node.js or Ubuntu.
I highly recommend using Alpine Linux for your base image whenever possible. A standard Ubuntu base image takes up about 75 to 80 megabytes. An Alpine base image is a tiny 5 megabytes. This massive size difference makes your downloads lightning fast and saves significant server costs.
Think of it like writing a cooking recipe. You list your ingredients and your steps in a logical order:
- The FROM command pulls your chosen base image.
- The RUN command executes essential installation tasks and updates.
- The COPY command moves your local code files into the image.
- The CMD command specifies what happens when your container actually launches.
Getting these fundamentals right saves you massive amounts of time. You should order your commands strategically. Put things that change less often at the very top of the file. Put things that change frequently, like your application code, at the bottom. This approach speeds up your deployment process because Docker caches the unchanged layers.
Building and Running Applications with Docker
You take your code and package it into a secure image. Then, you spin up active containers from that blueprint. Your app runs exactly the same way everywhere.
Creating Docker Images
Docker images serve as the strong foundation for all your containerized applications. They hold everything your app needs to run successfully and reliably.
- Create a fresh Dockerfile to hold all your specific environment instructions.
- Use the FROM command to officially set your starting operating system.
- Execute the COPY command to seamlessly transfer your source code.
- Expose necessary network ports using the EXPOSE command.
- Define the standard startup behavior with the ENTRYPOINT instruction.
- Run docker build -t my-app:1.0. to process the file and create your image.
Running Docker Containers
You start a container from an image to bring your application to life. This isolated environment process takes just seconds. You completely control everything about how your container behaves.
- Pull an updated image from a public registry like Docker Hub.
- Use a command like docker run -d -p 8080:80 nginx to launch your web application.
- Assign a custom, readable name to your container so you can identify it easily.
- Mount volumes to share active files between your host system and the container.
- Attach to the container’s active logs to quickly troubleshoot any startup problems.
- Stop the container gracefully when finished to prevent data corruption.
Orchestrating Multiple Containers
Running multiple containers at once gets incredibly messy. You need tools that manage them all together seamlessly. Docker Compose and smart network setups let you control dozens of containers like one smooth operation.
Utilizing Docker Compose
Docker Compose lets you manage multiple containers at the exact same time. Instead of running each container separately, you write a single configuration file. This file securely handles all your services, networks, and storage volumes.
This file is called docker-compose.yml. It acts like a master blueprint for your entire application stack. You can define a MongoDB database container, an Express web application, and a React frontend all in one single place.
A docker-compose.yml file allows you to define:
- Your primary web application containers.
- Your backend database services.
- The specific internal networks that securely link them together.
Then, you simply run the command docker-compose up. Docker automatically spins up all those containers together exactly as you specified. This approach saves you from typing out long, complex terminal commands repeatedly. It also keeps your development environment perfectly consistent across your entire engineering team.
Network Configuration Between Containers
Containers talk to each other through digital networks. This fast communication is key to building solid, reliable applications. Your containers need secure bridges to share data.
Docker creates these network bridges automatically. You can also set up custom networks to control exactly which containers chat with one another. Each container gets its own internal IP address so your services can find each other without breaking a sweat.
“A well-configured container network acts like a private, secure highway system. Traffic flows only where you explicitly allow it.”
Port mapping lets your containers expose services to the outside world. It also lets you keep sensitive databases hidden safely inside your internal network. Setting up these networks properly means your microservices stay clean and organized.
Best Practices for Using Docker in Development
You will want to keep your images lean and mean. Bloated containers slow down your entire workflow and waste precious storage space. Smart security practices protect your applications from malicious attacks.
Optimizing Docker Image Sizes
Large images severely slow down your deployment process. They also inflate your cloud computing costs very quickly.
“A smaller Docker image is a faster, more secure Docker image. Every megabyte counts when you scale your application.”
Always start by using smaller base images. As I mentioned earlier, an Alpine Linux image weighs around 5 megabytes. A standard Ubuntu image clocks in closer to 80 megabytes. That is a massive difference when you are pulling images multiple times a day.
Multi-stage builds are another incredibly powerful secret. They let you compile your code in one temporary stage, then copy only the final application into a fresh image. This specific technique cuts image sizes dramatically.
You should also remove unnecessary files and old dependencies from your setup. Each layer in your Dockerfile adds permanent weight, so always combine your terminal commands where possible.
Enhancing Container Security
Security matters deeply when you run containers in your development environment. You should always scan your images for vulnerabilities before you deploy them to a live production server.
I highly recommend following these core security rules:
- Use powerful open-source vulnerability scanners like Trivy or Snyk.
- Set up a private container registry with strict authentication rules.
- Run your containers with the least privileges needed, completely avoiding root access.
- Store your API keys and database passwords safely in secure environment variables.
Trivy, built by Aqua Security, is incredibly fast and integrates perfectly into your automated pipelines. It will catch outdated packages and critical flaws before they become a massive headache.
Advanced Use Cases
Docker powers modern automation pipelines by streamlining testing and deployment workflows. You can also split your large applications into tiny microservices, running each piece completely independently.
Using Docker for CI/CD Pipelines
Continuous integration and continuous deployment pipelines move much faster with containerization. Your code gets tested in the exact same environment every single time.

“Automation is the secret weapon of high-performing teams. A solid pipeline turns deployment from a stressful event into a boring, routine task.”
GitHub Actions is currently the most popular CI/CD tool. It is actively used by around 33 percent of professional organizations in 2026. It lives directly inside your repository, making it incredibly easy to trigger automated tests whenever you push new code.
Your CI/CD pipelines automatically pull code from your repository and build pristine images. They run your unit tests strictly inside those containers and push the working versions directly to production. The entire complex process happens in minutes instead of days.
Leveraging Docker for Microservices
Docker truly transforms how you build and structure your microservices. You break your massive application into small, independent services. Each individual service runs comfortably in its own isolated container.
Microservices offer distinct advantages:
- Each service scales completely independently based on actual user demand.
- Teams can comfortably use different programming languages for different services.
- Code updates happen seamlessly without taking down the entire application.
You containerize each piece with its own unique dependencies and configuration files. Docker makes this architectural separation beautifully clean.
As your microservices architecture grows, you will eventually need powerful orchestration. Docker Compose handles smaller, local setups perfectly. When you move to large cloud infrastructures, tools like Kubernetes take over to manage hundreds of containers automatically.
The Bottom Line
Containerization has completely changed how developers build and deploy modern applications. You now have the exact tools needed to streamline your workflow and ship excellent code much faster.
Using containers completely eliminates the frustrating compatibility problems that plague software teams. Cloud computing becomes simple when your applications run consistently across every single system.
Automation handles all the repetitive setup tasks. This frees you up to focus on writing great code instead of wrestling with broken configurations. I hope you found value in the Docker for developers guide. Your journey with containerization is truly just beginning.
Take what you have learned here today. Apply it directly to your very next project, and watch your daily development process transform into something incredibly reliable.
Frequently Asked Questions (FAQs) on Docker for Developers Guide
1. What is Docker, and why should developers care?
Docker is a platform that packages your code with all its dependencies into containers, so it runs identically everywhere. Over 20 million developers use Docker because it eliminates the “works on my machine” problem that wastes hours of debugging time.
2. How does Docker make development easier for beginners?
Docker lets you spin up entire development environments in minutes instead of spending hours installing and configuring software. You can use Docker Compose to define your whole project setup in one simple file, making it easy to share with teammates or run on any machine.
3. Can I use Docker if I’m new to programming?
Yes, you can! Docker Desktop provides a user-friendly interface that makes working with containers straightforward, even if you’re just starting out. Many coding bootcamps and beginner tutorials now include Docker from day one because it actually simplifies the learning process.
4. Do I need special hardware or an expensive computer to run Docker?
Not at all! Docker runs smoothly on most modern computers with at least 4GB of RAM and a dual-core processor. If your laptop can handle everyday development tasks like running VS Code or a web browser, it can handle Docker just fine.