
Have you ever stared blankly at your screen while your Docker containers refuse to start? You see those cryptic error messages, your team is waiting, and you have no idea what went wrong. This happens to developers all the time, and it is frustrating.
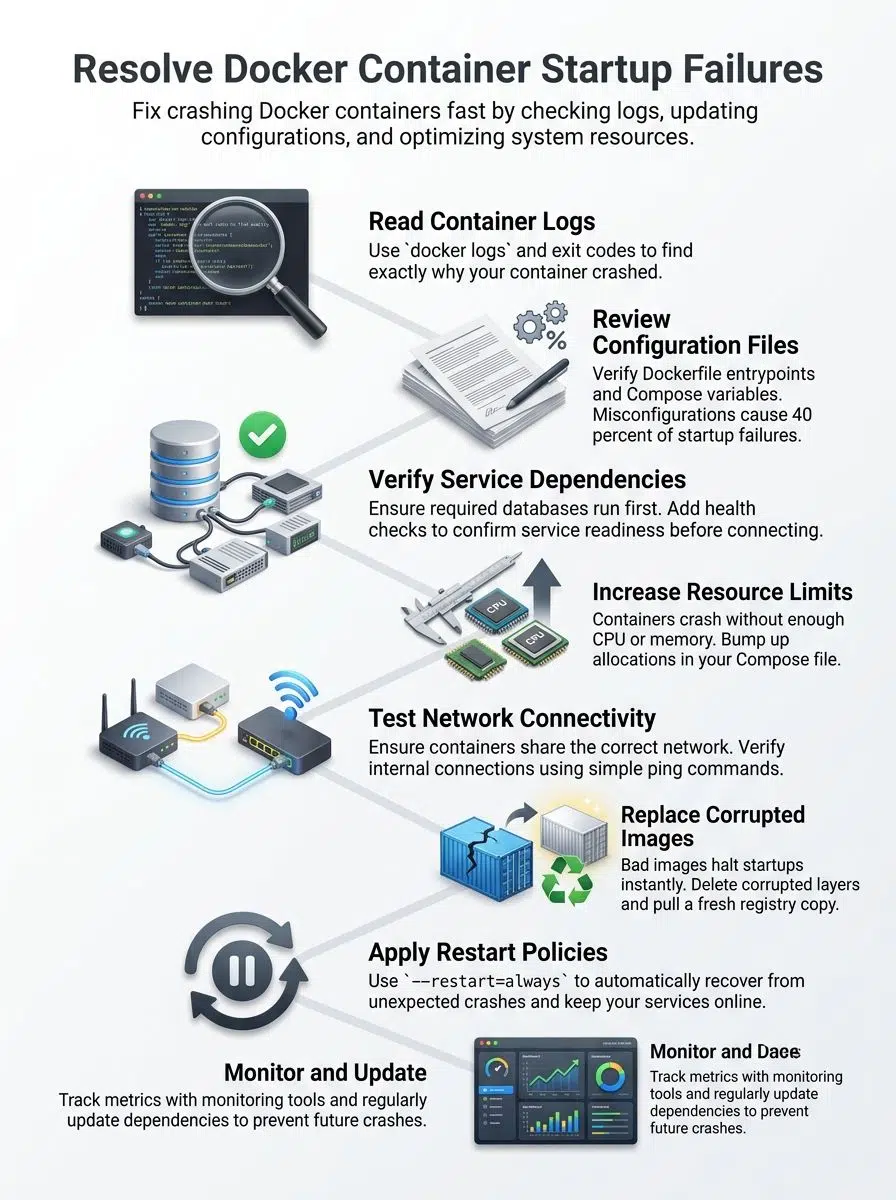
If you need to learn how to resolve Docker container startup failures, the good news is that most issues have simple fixes. Here is a secret that completely changed how I troubleshoot: almost 40 percent of container problems actually come from simple configuration mistakes, not broken code. That means you can solve many startup failures just by checking a few key settings.
I am going to walk you through the exact steps I use to find the real problem. You will learn how to spot dependency issues fast and prevent future headaches.
Common Causes of Docker Container Startup Failures
Docker containers fail to start for several straightforward reasons. Most of them fall into predictable patterns. You will spot the real culprits once you know where to look.
Missing or incorrect configurations
A misconfigured container is like a car with the wrong fuel; it will not run no matter how hard you try.
Configuration mistakes trip up most developers. Your Dockerfile might have the wrong entrypoint, or your environment variables could point to bad file paths. These small errors create big problems fast, causing the container to crash immediately.
To fix configuration issues, you need to carefully inspect your setup files. Open your Dockerfile and check the entrypoint and command sections. Look at your environment variables next, as mismatched values cause initialization failures all the time.
A great pro-tip for 2026 is to use a dedicated linter like Hadolint. This open-source tool scans your Dockerfiles and flags common syntax errors before you even run a build. Catching these mistakes early keeps them from derailing your deployment.
Dependency issues
Your containers often fail to start because they depend on other services that are not running yet. Docker does not wait around for dependencies to be ready. It just starts your container and hopes for the best.
If your web app needs a database, and the database container has not launched, your application will crash. Here are the best ways to handle this in modern environments:
- Check container logs: Look for connection errors pointing to unreachable databases.
- Implement health checks: Let Docker know when a service is truly ready to accept connections.
- Control startup order: Use the `depends_on` feature combined with a `condition: service_healthy` rule in your Docker Compose file.
- Add retry logic: Program your application code to keep trying to connect instead of giving up immediately.
Resource constraints
Your container will also fail to start if it runs out of gas. Resource constraints hit hard when Docker containers lack sufficient CPU or memory to initialize properly. This often leaves you staring at mysterious exit codes.
Many developers on Windows and macOS hit immediate limits because of default settings. For instance, Docker Desktop on Mac defaults to using only half of your available CPU cores and as little as 2GB of memory. If you are running a heavy Java application, it will crash before it even boots.
You can adjust these settings in your Docker Compose file or right in the Docker Desktop UI. Monitoring your memory spikes during initialization shows you exactly what your container consumes.
Networking problems
A container that cannot talk to the network is like a phone with no signal; it simply will not work.
Docker containers live in their own network world. Your container might fail to start because it cannot reach other services it depends on.
Port mappings might be wrong, or the container might be trying to connect to a service that is not running yet. You can troubleshoot this by using `docker exec` to inspect running containers and check if they can ping other services.
Image corruption
Docker images can get corrupted during downloads, storage, or transfers. A corrupted image will not start properly, leaving you stuck with instant crashes.
You can spot corruption by pulling the image again and running `docker inspect` to verify the image layers. If corruption shows up, delete the bad image with `docker rmi` and pull a fresh copy from your registry.
Corrupted images sometimes hide inside your local Docker storage after interrupted downloads. Catching image corruption early saves you from debugging initialization problems that stem from bad source material.
Diagnosing Startup Failures
You need to dig into what went wrong when your container failed to start. Learning to read the clues Docker leaves behind will save you hours of frustration.
Reviewing container logs
Docker container logs tell you exactly what went wrong during startup. These logs act like a window into your container’s mind.
- Run the `docker logs` command with your container ID to pull up all recorded messages.
- Add the `–tail` flag to limit output to the last number of lines you want to see.
- Use the `-f` or `–follow` flag to stream logs in real time as your container runs.
- Include the `–timestamps` flag to see exactly when the failure happened.
- Check for error messages, stack traces, and exception details that point directly to the cause.
- Scan for “undefined variable” messages that indicate your container lacks required settings.
Checking exit codes
Exit codes tell you exactly why your container stopped running. These numeric signals act like a secret language Docker uses to communicate.

When you run the `docker inspect` command to pull the exit code from a stopped container, you get a clear answer. Here is a quick reference to the most common codes you will see during troubleshooting:
| Exit Code | What It Means | How to Fix It |
|---|---|---|
| Code 0 | The container exited successfully. | No action needed. It completed its task normally. |
| Code 1 | General application error or missing configuration. | Check app logs for syntax errors or missing files. |
| Code 125 | The Docker command itself failed. | Fix the incorrect syntax in your `docker run` command. |
| Code 127 | Command not found. | Check the file path for your entrypoint script. |
| Code 137 | Out of Memory (OOM Killer). | Increase the memory limit in your Compose file. |
Monitoring resource usage
Your containers might fail to start if they lack the CPU and memory they need. Tracking resource consumption helps you catch problems before they spiral out of control.
- Open your terminal and run `docker stats` to see real-time CPU and memory usage.
- Look at the memory percentage. If a container uses over 90 percent, you have found a bottleneck.
- Check the CPU percentage to identify containers stuck in infinite loops.
- Use `docker inspect ` to view the exact memory and CPU limits you set.
- Set resource limits in your Docker Compose file to prevent containers from consuming all system resources.
Inspecting container dependencies
Container dependencies often hide the real reasons why your containers fail to start. Investigating these relationships helps you spot problems.
- List all containers that your application needs to run successfully.
- Check network connections by running `docker network inspect`.
- Test connectivity using `docker exec` to run ping or curl commands.
- Review your Compose file to verify services started in the correct order.
- Ensure health checks are properly configured so dependent containers wait for the right signals.
Resolving Configuration Issues
Your Dockerfile and Docker Compose files might be the culprits behind your startup troubles. Let’s fix them together and get your containers running smoothly.
Reviewing Dockerfile and Compose configurations
Your Dockerfile holds the blueprint for your entire container, so checking it first makes real sense. Look at each line to spot typos or missing steps. If you set the wrong base image or skip an installation step, your container will fail.
Docker Compose files control how multiple containers talk to each other. You must verify that service names match, ports align correctly, and volume paths point to real locations.
Many US-based development teams use automated staging environments to test these files. Testing your configurations in staging catches problems before they reach production, saving you hours of downtime.
Correcting environment variables
Environment variables often trip up Docker deployments, but fixing them is straightforward. Your application needs specific values to run, like database passwords, API keys, or server ports.
Compare the variables in your configuration files against what your application actually needs. Open your container logs to spot error messages that hint at missing variables. These clues point you straight to the culprit.
Setting appropriate entry points and commands
The exec form of an entrypoint works best because it runs your application directly without a shell wrapper.
Your container needs clear instructions on what to do when it starts up. The entrypoint tells Docker which program to run first, while the command passes arguments to that program.
You set the entrypoint in your Dockerfile with the ENTRYPOINT instruction. If you mess up this setup, your application initialization fails immediately. Check your container logs to see what actually ran, and double-check that your file paths are correct.
Handling Dependency and Networking Problems
When your containers talk to each other, things get tricky fast. Your app might crash because it cannot find the database, or the web server will not start because the cache layer is not ready.
Ensuring dependent containers are up and running
Your application stops working when its supporting services fail to start first. Getting dependent containers running in the right order prevents cascade failures.
- Use the `depends_on` directive in your Docker Compose configuration.
- Implement health checks so Docker knows a service is truly ready.
- Start dependent containers manually using `docker run` to troubleshoot isolation issues.
- Check container logs for dependent services to spot setup errors.
- Verify database containers and message brokers are active using `docker ps`.
Configuring proper network modes
Docker containers need the right network setup to talk to each other and the outside world. Getting this configuration right prevents startup failures before they happen.
| Network Mode | How It Works | Best Used For |
|---|---|---|
| Bridge Mode | Creates a private, isolated network on the host. | Standard, everyday communication between containers. |
| Host Mode | Removes isolation and uses the host’s networking directly. | Applications needing maximum network performance. |
| Overlay Mode | Connects containers across multiple host machines. | Distributed systems like Docker Swarm. |
Using health checks for dependencies
Health checks act as a safety net for your dependent containers. You set up a command that runs at regular intervals to verify that a service is actually working.
If the command returns zero, the container stays healthy. If it returns a non-zero value, Docker marks the container as unhealthy. Your application will not crash trying to reach a database that is still starting up.
Building health checks into your Docker Compose file transforms troubleshooting from a guessing game into a structured process. The logs will show you exactly why a dependency failed.
Managing Resource Constraints
Your container might crash because it runs out of memory or CPU power. You need to give your application enough resources to breathe and perform well.
Allocating sufficient CPU and memory
Docker containers fail to start when they lack computing power. If a container tries to use more resources than available, Docker kills it before startup completes.
- Use the `–memory` flag to allocate gigabytes of RAM.
- Use the `–cpus` flag to assign processor cores.
- Check application documentation for minimum resource requirements.
- Set limits based on peak usage patterns, not average ones.
- Test container startup in a staging environment to catch OOM errors.
Adjusting resource limits in Compose or CLI
Get your memory numbers wrong, and your application initialization fails fast.
Docker Compose lets you set these limits right in your YAML file. You can cap memory with `memory: 512m` and restrict CPU with `cpus: 0.5`.
The CLI approach works too. Using flags like `–memory=512m` helps you test limits on the fly. Exit codes will tell the story of what went sideways, making it easy to see if a container crashed from starvation.
Configuring swappiness and block IO constraints
Swappiness controls how much your system uses swap memory instead of RAM. Lower swappiness values keep your processes running faster because they rely on actual RAM.
Block IO constraints limit how much disk input and output your container can use. Containers that read or write too much data can slow down the entire system.
You control block IO through the `–blkio-weight` options. Setting appropriate block IO limits prevents resource constraints from derailing your application initialization.
Restarting Stuck or Failed Containers
Sometimes containers get stuck, and you need to bring them back to life with restart policies, manual commands, or process managers.
Using restart policies: `–restart=always`
Docker restart policies act like a safety net. The flag tells Docker to automatically restart your container if it crashes or stops.
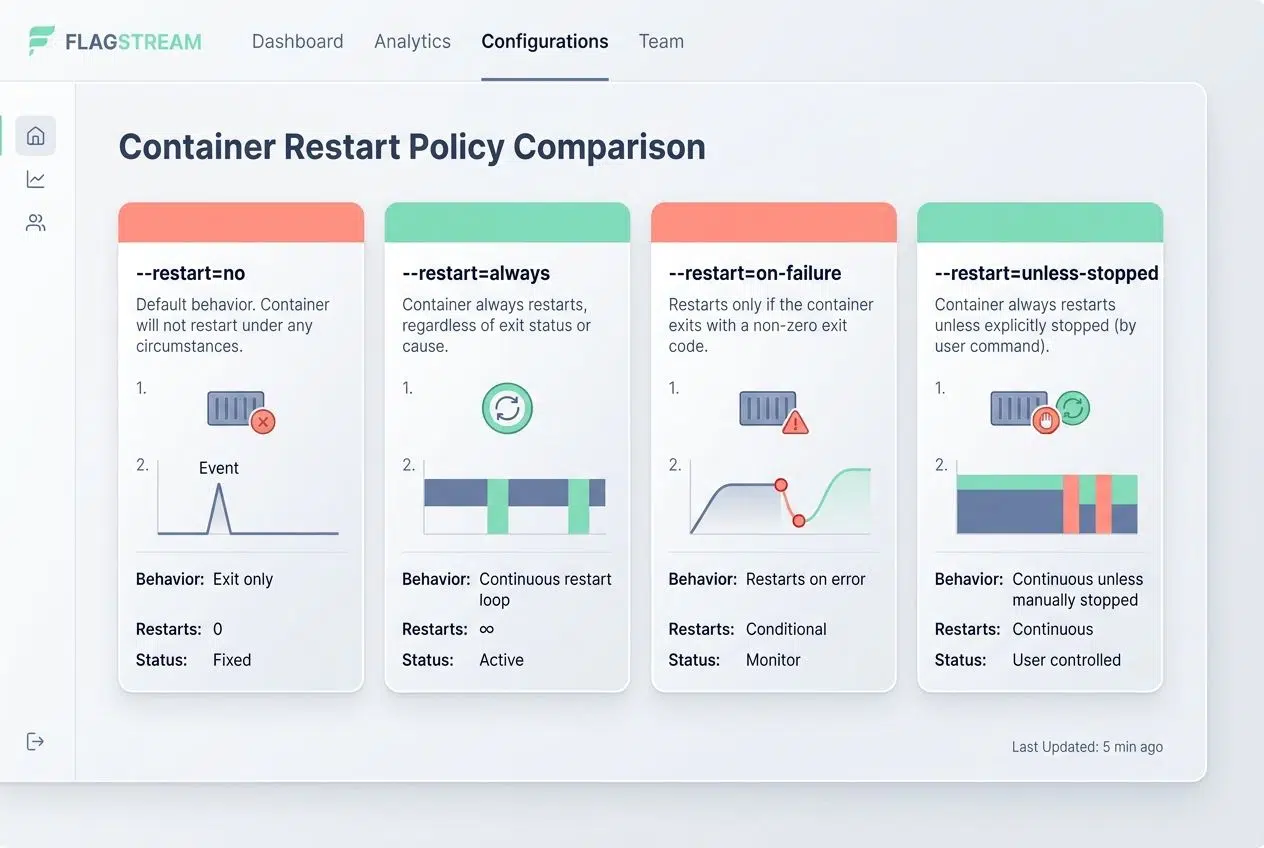
| Policy Flag | What It Does | Best Use Case |
|---|---|---|
| `–restart=no` | Never restarts automatically (default). | One-off scripts and testing. |
| `–restart=always` | Always restarts the container if it stops. | Critical services that need constant uptime. |
| `–restart=on-failure` | Restarts only if the exit code is non-zero. | Apps that crash due to unexpected errors. |
| `–restart=unless-stopped` | Restarts always, unless manually stopped. | Services you want persisting through reboots. |
Manually restarting containers with `docker start`
Restart policies work great for automatic recovery, but sometimes you need to take the wheel yourself. Manual restarts give you control when a container stops unexpectedly.
The `docker start` command brings a stopped container back to life without rebuilding it. This approach saves time because the container keeps its configuration intact.
If a container fails during initialization, you investigate the logs first, then restart it after fixing the issue. This puts you in charge of your application’s stability.
Implementing a process manager inside containers
A process manager acts like a traffic cop inside your container, keeping everything running smoothly.
- Install tools like Supervisor or runit inside your Dockerfile.
- Configure the manager to watch for crashes and restart failed services.
- Set the process manager to run as the main process inside the container.
- Keep your container up even if individual services hiccup.
- Simplify debugging since all logs flow through the manager.
Preventing Future Failures
You stop problems before they start by setting up automatic restarts and monitoring tools that catch issues early.
Automating container restarts on system boot
Your Docker containers should restart automatically when your system boots up. Setting a persistent restart policy prevents your containers from sitting idle.
Linux systems running Docker can configure systemd services to start the Docker daemon on boot. Your infrastructure stays healthy without requiring you to log in manually.
Automating your deployment process stops failures before they happen. Your team spends less time fighting fires when restart policies handle recovery automatically.
Using monitoring tools for proactive issue detection
Monitoring tools catch problems before they spiral out of control, saving you from firefighting at 2 AM.
- Use industry standards like Datadog or Prometheus to track container health metrics in real time.
- Set alerts for CPU spikes, memory limits, or unexpected restarts.
- Review automatically collected logs without digging through server files manually.
- Spot failed container dependencies before they impact end users.
Regularly updating images and dependencies
Old container images often carry security vulnerabilities and compatibility issues that trigger initialization problems.
Stale images create a breeding ground for startup failures. You should pull fresh images from your registry on a regular schedule.
For modern environments in 2026, tools like Snyk and GitHub’s Dependabot automatically scan your images and dependencies for known vulnerabilities. Running these automated checks quarterly prevents major troubleshooting headaches down the road. It ensures you deploy secure and updated code.
Advanced Debugging Techniques
When your container refuses to cooperate, you need to roll up your sleeves and dig deeper into what is actually happening inside the box.

Running containers in interactive mode
Running a container in interactive mode gives you direct access to your application’s shell. This is an incredibly powerful debugging method.
- Use the `-it` flags with your `docker run` command.
- Jump straight into the environment with `/bin/bash` or `/bin/sh`.
- Test environment variables directly to ensure they are set correctly.
- Run your application command manually to spot exactly where things break down.
- Fix problems on the spot before rebuilding your image.
Using `docker exec` to inspect running containers
Sometimes you need to peek inside a container that is already running without stopping it. The `docker exec` command lets you do exactly that.
This tool acts like a bridge between your host machine and a live container. You can troubleshoot initialization problems and dig through logs without disrupting operation.
Typing `docker exec-it container_name /bin/bash` jumps you right into the shell. This hands-on approach beats guessing every time.
Analyzing container network traffic
Looking at how your container talks to the network reveals whether it can actually reach the databases or external APIs it needs.
- Install network diagnostic tools like `tcpdump` inside your container.
- Capture packets to see if traffic reaches its destination.
- Use `docker network inspect` to see which IP addresses containers hold.
- Check if your host machine forwards traffic correctly.
Best Practices for Stable Docker Container Operations
You will want to build containers that stay running smoothly, and these strategies show you exactly how to make that happen.
Keeping images lightweight and optimized
Lightweight Docker images start with a solid foundation. Bloated images consume more storage space and drastically slow down startup times.
- Choose minimal base images like Alpine Linux instead of full operating systems.
- Strip out unnecessary files, dependencies, and layers.
- Use multi-stage builds to separate your build environment from your runtime environment.
- Combine related operations into a single RUN command to reduce image layers.
Testing configurations in staging environments
Your staging environment is your safety net before containers hit production. Test your Docker configurations there first, so problems show up in a controlled space.
Run the exact same container startup sequences you plan to use in production. Verify that environment variables work as expected, and check that your entrypoint commands execute without errors.
This hands-on testing catches missing dependencies and resource constraints while the stakes are low. Your team can investigate logs and exit codes in peace.
Documenting container dependencies and configurations
Documentation transforms container deployment issues from mysteries into solvable problems.
Documentation acts like a map for your Docker setup. You need to write down exactly what each container needs to run properly.
Record the environment variables required, the ports exposed, and the volume mounts used. This simple information saves immense amounts of time for your whole team when troubleshooting startup errors.
Wrapping Up
Learning how to resolve Docker container startup failures does not have to stop your workflow. You now have the tools to tackle troubleshooting with confidence. Start by checking your logs and exit codes, then move through configuration problems, dependency issues, and resource constraints.
Each step gets you closer to a working container. Apply these debugging techniques to your next problem, and you will spot issues faster each time.
Your containers will run more smoothly when you invest in prevention. Keep your images lightweight and updated. Set up monitoring tools to catch problems early.
Use restart policies and health checks so your containers bounce back without your help. These practices transform container deployment from a source of stress into a manageable part of your routine.
Frequently Asked Questions (FAQs) on Docker Container Startup Fixes
1. Why does my Docker container fail to start?
Your container usually fails because the image is corrupted, there’s a bad command in your startup script, or you’re missing an environment variable. Port conflicts are one of the most common culprits, especially on default ports like 8080 or 3000. If you see “port already in use,” check if another app grabbed that spot first.
2. How do I find out what caused my Docker container to crash?
Run docker logs followed by your container name to see the full error output. The logs will show you problems like missing files, permission errors, or failed network connections that caused the crash.
3. What steps can I take to fix common Docker startup issues?
Start by double-checking your Docker-compose.yml or Dockerfile for typos and incorrect paths. Try running docker restart with your container name, and if that doesn’t work, rebuild with docker build to catch any build-time errors.
4. Can network settings cause my Docker containers not to launch properly?
Yes, port conflicts and misconfigured bridge networks can stop containers cold. Make sure each port mapping in your Docker run command, or Docker-Compose file, is unique across all running services.