In today’s digital-first world, eCommerce has become a crucial channel for businesses to thrive. However, getting started with an online store can seem overwhelming. That’s where WooCommerce comes in. WooCommerce is a WordPress plugin that seamlessly transforms a WordPress site into a fully functional online store.
WooCommerce stands out because of its flexibility, scalability, and user-friendly interface. It’s perfect for both beginners and experienced developers, offering numerous customization options to help you tailor the store to your specific needs. Whether you’re selling physical goods, digital products, or services, WooCommerce can be adapted to suit your business model.
In this guide, we’ll walk you through the 7 steps to set up an online store with WooCommerce. You’ll learn everything from choosing a domain and hosting to marketing your store effectively.
Step 1: Choose a Domain Name and Hosting Provider
Before you dive into building your online store, you need two key things: a domain name and web hosting. These are foundational elements that will shape your store’s performance, credibility, and customer experience.
Selecting the Right Domain Name
Your domain name is your store’s online identity. It’s the address that customers will use to find you, so it’s essential to make the right choice. Here’s how to pick the perfect domain name:
- Keep it simple and short: Avoid long names or complicated words that may be hard to remember or spell.
- Incorporate keywords: If possible, use keywords related to your products or business. This can help with SEO and make your domain name more descriptive (e.g., OrganicBeautyStore.com).
- Avoid special characters or hyphens: Special characters or hyphens may confuse potential customers and hurt your brand’s credibility.
- Choose a .com domain: While there are other domain extensions (.net, .store), .com is still the most widely recognized and trusted by users.
Best Hosting Providers for WooCommerce
Choosing the right hosting provider is critical because it impacts your site’s speed, uptime, and overall user experience. For a WooCommerce store, you need reliable hosting with high performance and excellent customer support. Here are a few hosting providers that excel in supporting WooCommerce stores:
| Hosting Provider | Features | Best For |
| Bluehost | Free SSL, One-click WordPress install, 24/7 support | Beginners, small businesses |
| SiteGround | Fast loading, enhanced security, daily backups | Growing businesses, high-traffic stores |
| Kinsta | Premium performance, WooCommerce optimized, high scalability | High-end stores with large product catalogs |
It’s important to choose hosting that offers SSL certificates for secure payments and personal data encryption. As you scale, look for hosting providers that offer scalable solutions so your website can handle increasing traffic and sales.
Step 2: Install WordPress and WooCommerce Plugin
Once you have your domain name and hosting in place, the next step is setting up WordPress and installing the WooCommerce plugin.
How to Install WordPress on Your Hosting
Most hosting services now offer a one-click WordPress installation, making the process easier than ever. Here’s how to install WordPress:
- Log in to your hosting account.
- Locate the WordPress installer tool within your hosting dashboard (most providers like Bluehost or SiteGround will have this option).
- Follow the installation instructions to set up your WordPress site.
- Once installed, access your website’s dashboard through www.yourstorename.com/wp-admin.
Installing the WooCommerce Plugin
WooCommerce is a plugin for WordPress, so it needs to be installed separately. Follow these simple steps to install it:
- In your WordPress dashboard, go to Plugins > Add New.
- Type WooCommerce in the search bar.
- Click Install Now and then Activate.
Once activated, WooCommerce will automatically prompt you to go through a setup wizard. The wizard helps you configure essential store settings, such as currency, location, and payment methods.
Step 3: Customize Your Online Store’s Design
The design of your WooCommerce store is a key factor in attracting and retaining customers. It’s essential to choose a theme that not only reflects your brand but also offers a seamless shopping experience.
Choosing the Right Theme for WooCommerce
When selecting a WooCommerce theme, look for one that is both aesthetically pleasing and functional. A good theme should be mobile-friendly, fast-loading, and customizable. Here are a few popular WooCommerce themes:
| Theme | Features | Best For |
| Storefront | Free, simple design, customizable with WooCommerce features | Beginners, small stores |
| Astra | Lightweight, highly customizable, integration with page builders | Medium to large stores |
| Flatsome | Drag-and-drop builder, pre-built templates, fast-loading | Creative, visually-driven stores |
Customizing Your Store Design with WordPress Themes
Once you’ve chosen a theme, you’ll want to customize it to fit your brand. Here’s how to approach customization:
- Logo & Branding: Ensure your logo is visible and represents your brand identity. A clean, professional logo enhances credibility.
- Navigation: Organize your main menu for ease of navigation. Make sure important pages (like Products, About Us, Cart, and Checkout) are accessible.
- Colors & Fonts: Stick to a color palette that aligns with your brand’s identity. Use easy-to-read fonts that are large enough for mobile users.
- Calls-to-Action (CTAs): Highlight action buttons like “Add to Cart” and “Checkout” to guide users through the purchasing process.
Step 4: Set Up Product Pages and Categories
Once your store design is in place, it’s time to add products. Organizing your products in clear categories helps improve the customer shopping experience. Let’s explore how to do it effectively.
Creating Product Categories
Organizing products into categories makes it easier for customers to find what they’re looking for. For instance, if you run a fashion store, your categories might include Men’s Clothing, Women’s Clothing, and Accessories.
To create categories:
- Go to Products > Categories in your WordPress dashboard.
- Add a new category name (e.g., “Men’s Clothing”), a description, and an image (optional).
- Click Add New Category.
You can assign products to multiple categories to ensure easy navigation for your customers.
Adding and Organizing Products
Adding products involves more than just uploading photos and setting prices. You need to provide customers with all the information they need to make informed decisions. Here are the essential details to include:
- Product Name: Make it descriptive and concise.
- Description: A detailed, keyword-optimized description of the product’s features, benefits, and usage.
- Images: High-quality product images (showing the product from different angles).
- Price: Be clear about the price, including any discounts or promotions.
- Stock: Specify how many items are in stock, or enable WooCommerce’s stock management feature to automatically update inventory.
Example: Fashion Store Case Study
For a fashion store, a product page might feature an image carousel of a dress from multiple angles, detailed fabric information, size charts, and customer reviews. This enhances the likelihood of conversions.
Step 5: Configure Payment Gateways and Shipping Methods
With your products ready, you need to set up payment gateways and shipping methods to facilitate transactions.
Setting Up Payment Gateways
WooCommerce integrates with several payment gateways such as PayPal, Stripe, and credit card payments. Here’s how to set them up:
- Go to WooCommerce > Settings > Payments.
- Enable the payment methods you wish to use.
- Enter any required information, such as API keys or account details.
Configuring Shipping Zones and Rates
WooCommerce lets you set shipping zones (regions where you’ll ship products) and apply different rates depending on the zone. This is important if you plan to offer free shipping in some areas or charge based on distance.
Here’s how to set it up:
- Go to WooCommerce > Settings > Shipping.
- Create shipping zones by specifying geographical regions (e.g., US, Europe, etc.).
- Add shipping methods (flat rate, free shipping, local pickup).
- Optionally, you can use WooCommerce Shipping Calculator to show customers the shipping cost based on their location.
Step 6: Install Essential WooCommerce Extensions
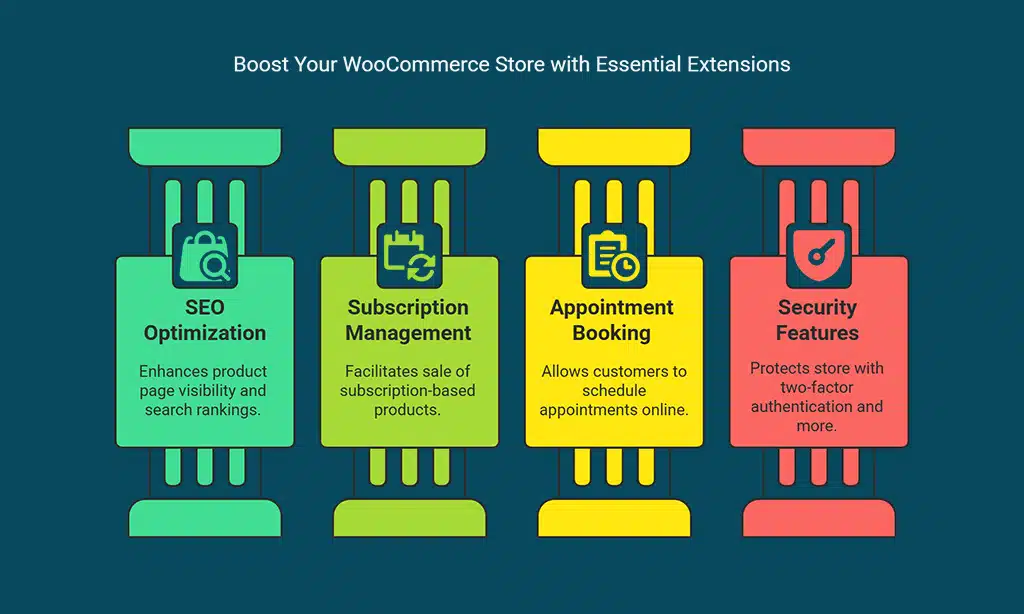
To enhance the functionality of your WooCommerce store, you can install several extensions to improve payment processing, SEO, and security.
Top WooCommerce Extensions to Enhance Your Store
| Extension | Features | Best For |
| Yoast SEO for WooCommerce | Improves SEO by optimizing product pages | Improving organic search visibility |
| WooCommerce Subscriptions | Enables subscription-based products | Subscription-based businesses |
| WooCommerce Bookings | Allows customers to book appointments | Service-based businesses like salons or consultants |
| WooCommerce Security | Provides features like two-factor authentication | Ensuring security for your store |
These extensions help streamline operations, improve customer experiences, and ensure the store runs smoothly.
Step 7: Launch Your Store and Market It
Once your store is set up, it’s time to launch and begin marketing to drive traffic and sales.
Finalizing Your Store Settings Before Launch
Before launching, check off these tasks:
- Speed optimization: Use tools like Google PageSpeed Insights to ensure your store loads quickly.
- SSL certificate: Ensure your website is secure for transactions by enabling an SSL certificate.
- Payment and shipping tests: Run test transactions to ensure everything functions as expected.
Best Practices for Marketing Your WooCommerce Store
Now, it’s time to make your store known. Here are marketing tips for your WooCommerce store:
- Search Engine Optimization (SEO): Optimize your product pages with keywords, images, and content that cater to your audience.
- Social Media: Promote your store on platforms like Instagram, Pinterest, and Facebook. Utilize paid ads to target specific audiences.
- Email Marketing: Build a customer list and send out newsletters about new products, sales, and promotions.
Wrap Up
Congratulations! You’ve learned the 7 steps to set up an online store with WooCommerce. By following these steps, you’ve created a robust foundation for your eCommerce business. But remember, the key to success lies in continuously improving your store.
Track customer behavior, adjust your product offerings, and invest in marketing strategies to grow your brand.
With WooCommerce’s powerful features, your store has the potential to scale as your business grows. Now, it’s time to launch and take your online store to the next level!