A custom mechanical keyboard feels different from the first key press. It is not just another desk upgrade. It changes how you type, how you game, and how your setup sounds. A good keyboard can make work feel smoother. A bad one can make every sentence, shortcut, or gaming session feel dull.
Most ready-made keyboards are built for everyone. That sounds fine until you realize your hands are not everyone’s hands. Your desk is not everyone’s desk. Your gaming style, typing habit, and sound preference are not the same as your friend’s.
That is where a custom build makes sense.
You can pick smooth linear switches for fast gaming. You can choose tactile switches if you like feedback while typing. You can go silent if you share a room. You can also try magnetic switches if competitive gaming matters to you.
And no, you do not need to be an engineer.
Hot-swappable keyboard kits have made the hobby much easier. You can build a solid keyboard without soldering. Firmware tools like VIA and QMK also let you remap keys, create layers, and make compact layouts easier to use.
The keyboard market is growing fast, too. More brands now offer gasket-mounted cases, PBT keycaps, wireless kits, magnetic switches, and beginner-friendly barebones boards. That is great, but it also makes shopping confusing.
This guide keeps things simple.
You will learn what to buy, what to avoid, how to choose switches, how layouts work, how to assemble the board, and how to make it sound and feel better.
| Key Area | What You’ll Learn | Why It Matters |
|---|---|---|
| Layout | 60%, 65%, 75%, TKL, 96%, full-size | Helps you choose the right size |
| Switches | Linear, tactile, clicky, silent, magnetic | Controls feel, speed, and sound |
| Case | Plastic, aluminum, acrylic, polycarbonate | Changes weight, sound, and comfort |
| Keycaps | ABS, PBT, profiles, legends | Shapes the look and typing surface |
| PCB | Hot-swap, soldered, wired, wireless | Decides how easy the build is |
| Firmware | VIA, QMK, layers, macros | Lets you control key behavior |
| Tuning | Stabilizers, foam, sound mods | Makes the board feel finished |
Custom Mechanical Keyboard Parts You Need First
Start with the basic parts
A keyboard build looks scary only when you see all the parts at once. Once you break it down, it becomes simple.
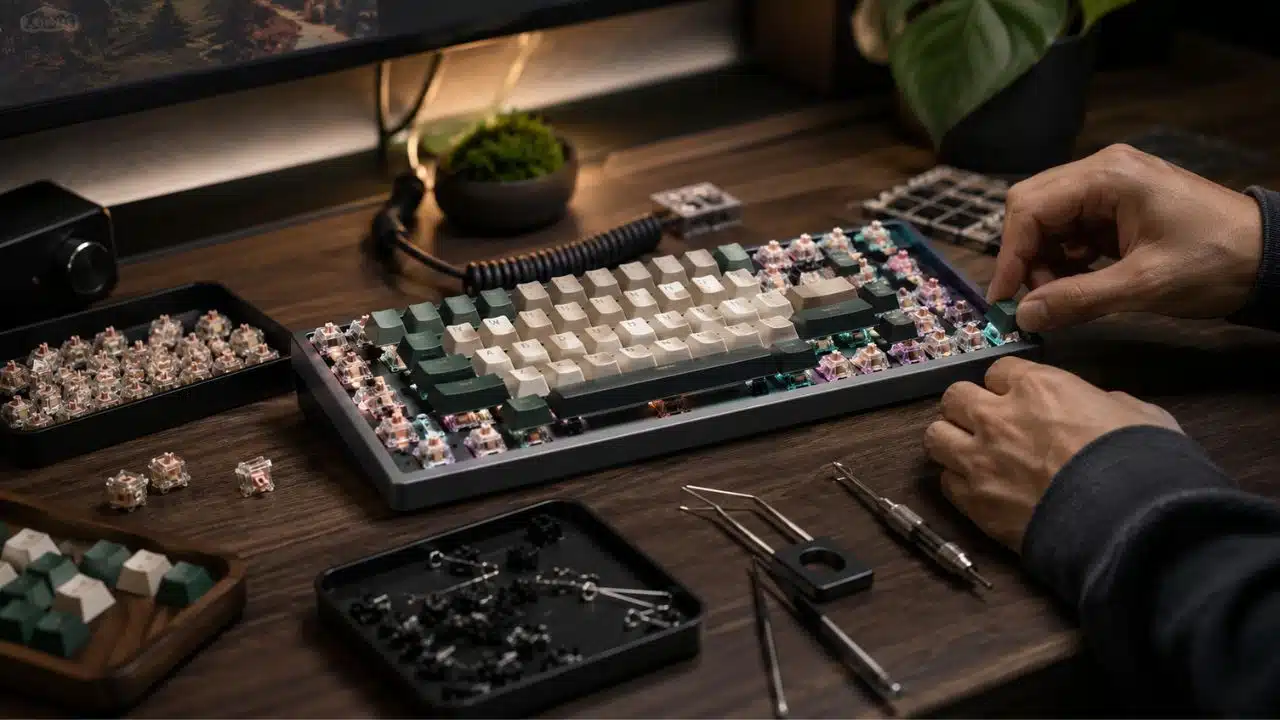
The case holds the keyboard together. The PCB reads every key press. The plate keeps the switches straight. The switches create the feel. The stabilizers support bigger keys. The keycaps are what your fingers touch.
That is the main build.
You may also see foam, gaskets, silicone pads, tape mods, and other extras. Do not worry about those first. They help with sound and feel, but they are not where beginners should start.
For your first build, a barebones kit is the easiest path. It usually includes the case, PCB, plate, and mounting hardware. Some kits also include stabilizers. You then add switches and keycaps.
| Part | What It Does | Beginner Advice |
|---|---|---|
| Case | Holds the full keyboard body | Start with a trusted barebones kit |
| PCB | Registers each key press | Choose hot-swap for your first build |
| Plate | Keeps switches aligned | Aluminum feels firm; polycarbonate feels softer |
| Switches | Decide sound and feel | Try a switch tester if possible |
| Stabilizers | Support big keys | Tune them before closing the case |
| Keycaps | Create the typing surface | Check layout compatibility |
| Foam/Gaskets | Adjust sound and flex | Add only if needed |
| Cable/Battery | Powers or connects the board | USB-C is the safest wired option |
Pick the kit before buying extras
Do not buy switches, keycaps, foam, or fancy cables before choosing the keyboard kit.
The kit decides what fits.
Some PCBs support both 3-pin and 5-pin MX-style switches. Some do not. Some boards use optical switches. Some use magnetic switches. Low-profile keyboards need low-profile switches and keycaps.
Check the product page before paying. Look for:
- PCB type
- Switch compatibility
- Layout support
- Stabilizer type
- Plate material
- Firmware support
- Wired or wireless mode
A little checking now can save you from a box full of parts that do not work together.
Choose the Right Keyboard Layout
Pick a layout that matches your real life
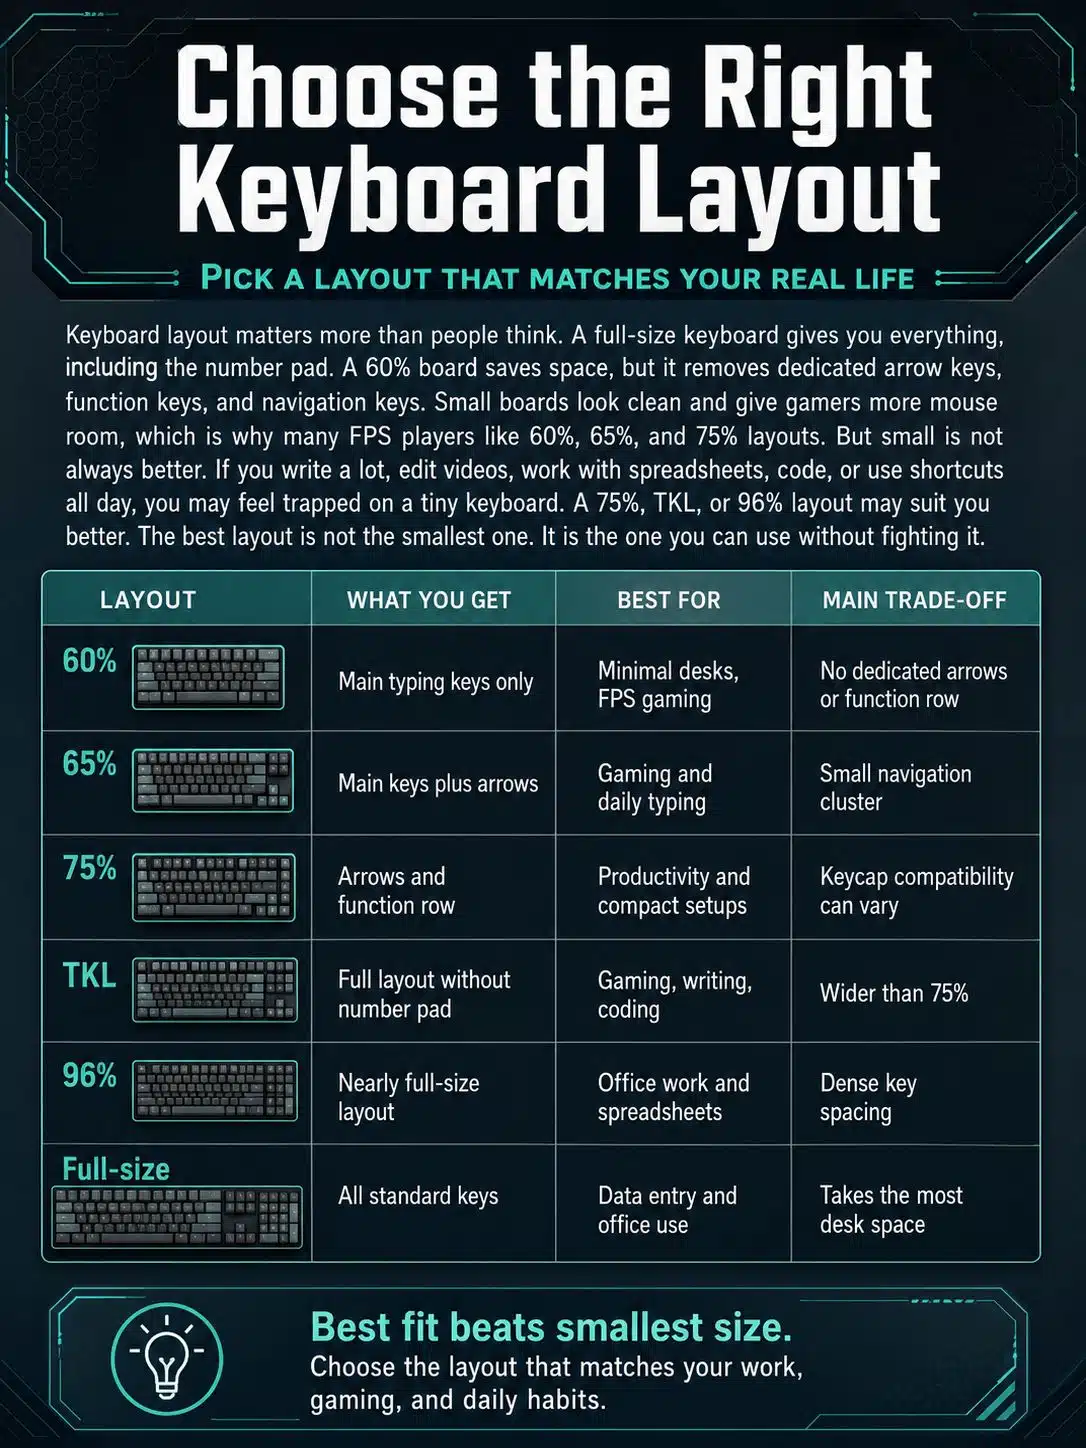
Keyboard layout matters more than people think.
A full-size keyboard gives you everything, including the number pad. A 60% board saves space, but it removes dedicated arrow keys, function keys, and navigation keys.
Small boards look clean. They also give gamers more mouse room. That is why many FPS players like 60%, 65%, and 75% layouts.
But small is not always better.
If you write a lot, edit videos, work with spreadsheets, code, or use shortcuts all day, you may feel trapped on a tiny keyboard. A 75%, TKL, or 96% layout may suit you better.
The best layout is not the smallest one. It is the one you can use without fighting it.
| Layout | What You Get | Best For | Main Trade-Off |
|---|---|---|---|
| 60% | Main typing keys only | Minimal desks, FPS gaming | No dedicated arrows or function row |
| 65% | Main keys plus arrows | Gaming and daily typing | Small navigation cluster |
| 75% | Arrows and function row | Productivity and compact setups | Keycap compatibility can vary |
| TKL | Full layout without number pad | Gaming, writing, coding | Wider than 75% |
| 96% | Nearly full-size layout | Office work and spreadsheets | Dense key spacing |
| Full-size | All standard keys | Data entry and office use | Takes the most desk space |
ANSI vs ISO layout matters
This is one of those boring details that can ruin a build.
Most US-style keyboards use ANSI layout. Many UK and European keyboards use ISO layout. The Enter key shape, left Shift size, and a few key positions are different.
If your keyboard is ANSI, buy ANSI keycaps. If your keyboard is ISO, buy ISO-compatible keycaps.
Do not guess. Check before ordering.
| Layout Standard | Common Region | Main Difference |
|---|---|---|
| ANSI | United States and many global keyboards | Wide Enter key, longer left Shift |
| ISO | UK and parts of Europe | Tall Enter key, shorter left Shift |
| JIS | Japan | Extra language/input keys |
Chassis Options: Plastic, Aluminum, Acrylic, or Polycarbonate?
The case changes more than the look
The case is not just decoration. It changes weight, sound, stiffness, and feel.
Plastic cases are light and affordable. Aluminum feels heavier and more premium. Polycarbonate usually gives a softer, deeper sound. Acrylic works well if you like RGB because it spreads light through the body.
Beginners often think a heavy aluminum case automatically means a better keyboard. Not always.
A well-built plastic or polycarbonate board with good switches and tuned stabilizers can feel better than an expensive aluminum case with bad parts inside.
| Case Material | Feel | Sound Profile | Best For |
|---|---|---|---|
| Plastic | Light and flexible | Softer, sometimes hollow | Budget and first builds |
| Aluminum | Heavy and firm | Clean, dense, sometimes louder | Premium desk setups |
| Polycarbonate | Softer and more flexible | Muted, lower-pitched | Comfortable typing |
| Acrylic | Light and bright | Sharper, sometimes echoey | RGB-heavy builds |
| Wood | Warm and unique | Natural, softer tone | Aesthetic setups |
Mounting style affects comfort
Mounting style means how the plate and PCB sit inside the case.
Tray mount is common in budget boards. It is simple, but it can feel uneven because screws connect the PCB or plate to the bottom case.
Top mount feels firmer and more consistent. Gasket mount uses soft material between the plate and case, which can make the board feel cushioned.
Gasket-mounted keyboards are popular because they often sound good with less work. But that does not mean everyone needs one. Some gamers prefer a firmer board because it feels more direct.
| Mounting Style | Typing Feel | Sound | Best Use |
|---|---|---|---|
| Tray Mount | Firm, sometimes uneven | Can sound hollow | Budget builds |
| Top Mount | Firm and consistent | Clean and stable | Typing and gaming |
| Gasket Mount | Softer and cushioned | Muted and deeper | Comfortable daily use |
| Sandwich Mount | Firm plate pressure | Depends on case | Simple custom kits |
| Integrated Plate | Very stiff | Sharp and loud | Users who like firm boards |
Switch Selection: Linear, Tactile, Clicky, Silent, or Magnetic?
Switches give the keyboard its personality
Switches are the heart of a custom mechanical keyboard.
They decide how each key feels when you press it. They also affect sound, speed, and comfort.
Linear switches move straight down without a bump. They feel smooth and fast. Gamers often like them because quick repeated presses feel easy.
Tactile switches have a small bump during the press. That bump gives your fingers feedback. Writers, coders, and office users often enjoy tactile switches because they feel more controlled.
Clicky switches add a tactile bump and a loud click. They can be fun, but they are not friendly in shared rooms.
Silent switches reduce noise with dampening inside the switch. They are great for offices, late-night typing, family homes, and shared gaming spaces.
Magnetic or Hall Effect switches work differently. They use magnetic sensing instead of the normal metal contact system. Many gaming keyboards use them for adjustable actuation and rapid trigger features.
| Switch Type | Feel | Sound | Best For |
|---|---|---|---|
| Linear | Smooth, no bump | Usually quieter than clicky | Gaming and fast typing |
| Tactile | Noticeable bump | Medium sound | Writing and mixed use |
| Clicky | Bump plus click | Loud | Solo typing setups |
| Silent Linear | Smooth and dampened | Quiet | Shared spaces |
| Silent Tactile | Bump with less noise | Quiet to medium | Office typing |
| Magnetic/Hall Effect | Adjustable actuation | Varies | Competitive gaming |
Do not buy switches by color alone
Switch names can be confusing.
Red often means linear. Brown often means tactile. Blue often means clicky. But that is not always true across every brand. Some companies use their own names and colors.
Check the actual specs.
Look at actuation force, travel distance, spring weight, pin count, and switch type. A light switch can feel fast but may cause accidental key presses. A heavy switch can feel controlled but may tire your fingers.
For a first build, a medium-weight linear or tactile switch is a safe choice.
| Spec | What It Means | Why It Matters |
|---|---|---|
| Actuation Force | Pressure needed to register a key | Affects fatigue and control |
| Pre-travel | Distance before activation | Affects speed |
| Total Travel | Full key press distance | Changes typing feel |
| Pin Count | 3-pin or 5-pin base | Must match the PCB |
| Factory Lube | Lubricant applied by the brand | Can make switches smoother |
| Spring Weight | Resistance inside the switch | Changes bounce and comfort |
| Housing/Stem Material | Plastic parts inside the switch | Affects sound and friction |
Hot-Swap vs Soldered PCB
Hot-swap keeps the first build simple
A hot-swappable PCB lets you install and remove switches without soldering.
That is a big deal.
You can test different switches. You can replace a bad switch. You can change the whole feel of the board later without buying a new keyboard.
For beginners, hot-swap is the smart choice.
A soldered PCB is more permanent. It can offer more layout options in some custom kits, but it needs soldering tools and more patience. If you make a mistake, desoldering can become frustrating fast.
| PCB Type | Pros | Cons | Best For |
|---|---|---|---|
| Hot-swappable | Easy switch changes, no soldering | Sockets can wear if abused | Beginners and switch testers |
| Soldered | Strong connection, flexible layouts | Needs soldering skill | Experienced builders |
| Wired PCB | Stable and simple | Cable required | Gaming and daily work |
| Wireless PCB | Cleaner desk setup | Battery and latency concerns | Portable setups |
| RGB PCB | Better lighting options | Can cost more | Aesthetic builds |
Hot-swap does not mean every switch will fit
This is where many beginners get caught.
Hot-swappable does not mean universal.
Most custom kits use MX-style switches. But some keyboards use optical switches. Some use low-profile switches. Some magnetic keyboards use special Hall Effect switches. Some brands use their own switch systems.
Before buying switches, check the PCB and socket type. Also check whether the plate supports your chosen switch housing.
| Compatibility Check | What to Confirm |
|---|---|
| Switch Style | MX-style, low-profile, optical, or magnetic |
| Pin Support | 3-pin, 5-pin, or both |
| Socket Type | Kailh hot-swap, Outemu-style, optical, or magnetic sensor |
| Plate Fit | Standard MX cutout or special plate |
| Stabilizer Support | Plate-mounted, clip-in, or screw-in |
Keycap Layout and Design
Keycaps must fit before they look good
Keycaps can make a keyboard look beautiful. They also change how it feels and sounds.
But the wrong keycap set can ruin the build.
A 65%, 75%, split spacebar, or compact layout may need special key sizes. Check details like 1.75u right Shift, 7u spacebar, stepped Caps Lock, and bottom-row sizes.
Material matters too.
PBT keycaps usually resist shine better and feel more textured. ABS keycaps often look brighter and feel smoother. High-quality ABS can still be excellent, especially with doubleshot legends.
So do not judge keycaps by material alone. Look at thickness, profile, legend quality, and layout support.
| Keycap Feature | Common Options | What to Know |
|---|---|---|
| Material | ABS, PBT, POM, ceramic, metal | PBT resists shine; ABS can offer vivid colors |
| Profile | Cherry, OEM, SA, XDA, MT3 | Changes height and finger angle |
| Legend Method | Doubleshot, dye-sub, UV print | Doubleshot and dye-sub last longer |
| Layout Support | ANSI, ISO, 65%, 75%, TKL | Check special key sizes |
| Thickness | Thin or thick caps | Thicker caps often sound deeper |
| Texture | Smooth or grainy | Affects grip and comfort |
Pick a theme before shopping
A keyboard can look clean, retro, loud, soft, futuristic, or professional.
Choose a theme before buying parts. Otherwise, you may end up with a nice case, nice keycaps, and a nice cable that look strange together.
For gaming setups, match the keyboard with your mouse, desk mat, monitor light, or PC case. For work setups, neutral colors usually age better.
| Theme Style | Color Direction | Best Setup Match |
|---|---|---|
| Minimal | White, gray, black | Clean desk setups |
| Retro | Beige, cream, brown | Classic PC look |
| Gaming | Black, red, neon, RGB | PC and console gaming desks |
| Soft | Pastel, cream, muted tones | Cozy rooms |
| Premium | Navy, dark green, gold | Aluminum cases |
| Creator Desk | Neutral base with accent keys | Editing, writing, streaming |
Tools You Need for Basic Assembly
You do not need a workshop
A simple keyboard build does not need many tools.
You need a clean desk, a small screwdriver, a keycap puller, a switch puller, and tweezers. That is enough for many beginner builds.
If you want to tune stabilizers or lube switches, you may need lubricant, a small brush, a switch opener, and a stem holder.
Go slow. Too much lube can make switches and stabilizers feel mushy.
Build on a clean surface. Avoid carpet if you can. Touch a metal object before handling the PCB to reduce static risk.
| Tool | Purpose | Beginner Note |
|---|---|---|
| Screwdriver | Opens the case and mounts parts | Use the right bit size |
| Switch Puller | Removes switches | Pull straight up |
| Keycap Puller | Removes keycaps | Wire pullers are safer |
| Tweezers | Tests sockets and fixes pins | Use carefully |
| Brush | Applies lube | Use a tiny amount |
| Switch Opener | Opens switches | Optional for beginners |
| Stem Holder | Holds switch stems | Useful for lubing |
| Microfiber Cloth | Cleans parts | Keeps dust away |
Inspect everything first
Before assembly, check every part.
Look for dents in the case, bent sockets on the PCB, warped plates, missing keycaps, and damaged switches. Count your switches too. You need one switch per key, plus a few extras.
Keep the packaging until the keyboard is fully built and tested. If something arrives broken, you may need it for returns.
Step-by-Step Custom Keyboard Assembly
Test the PCB before building
This step feels boring. Do it anyway.
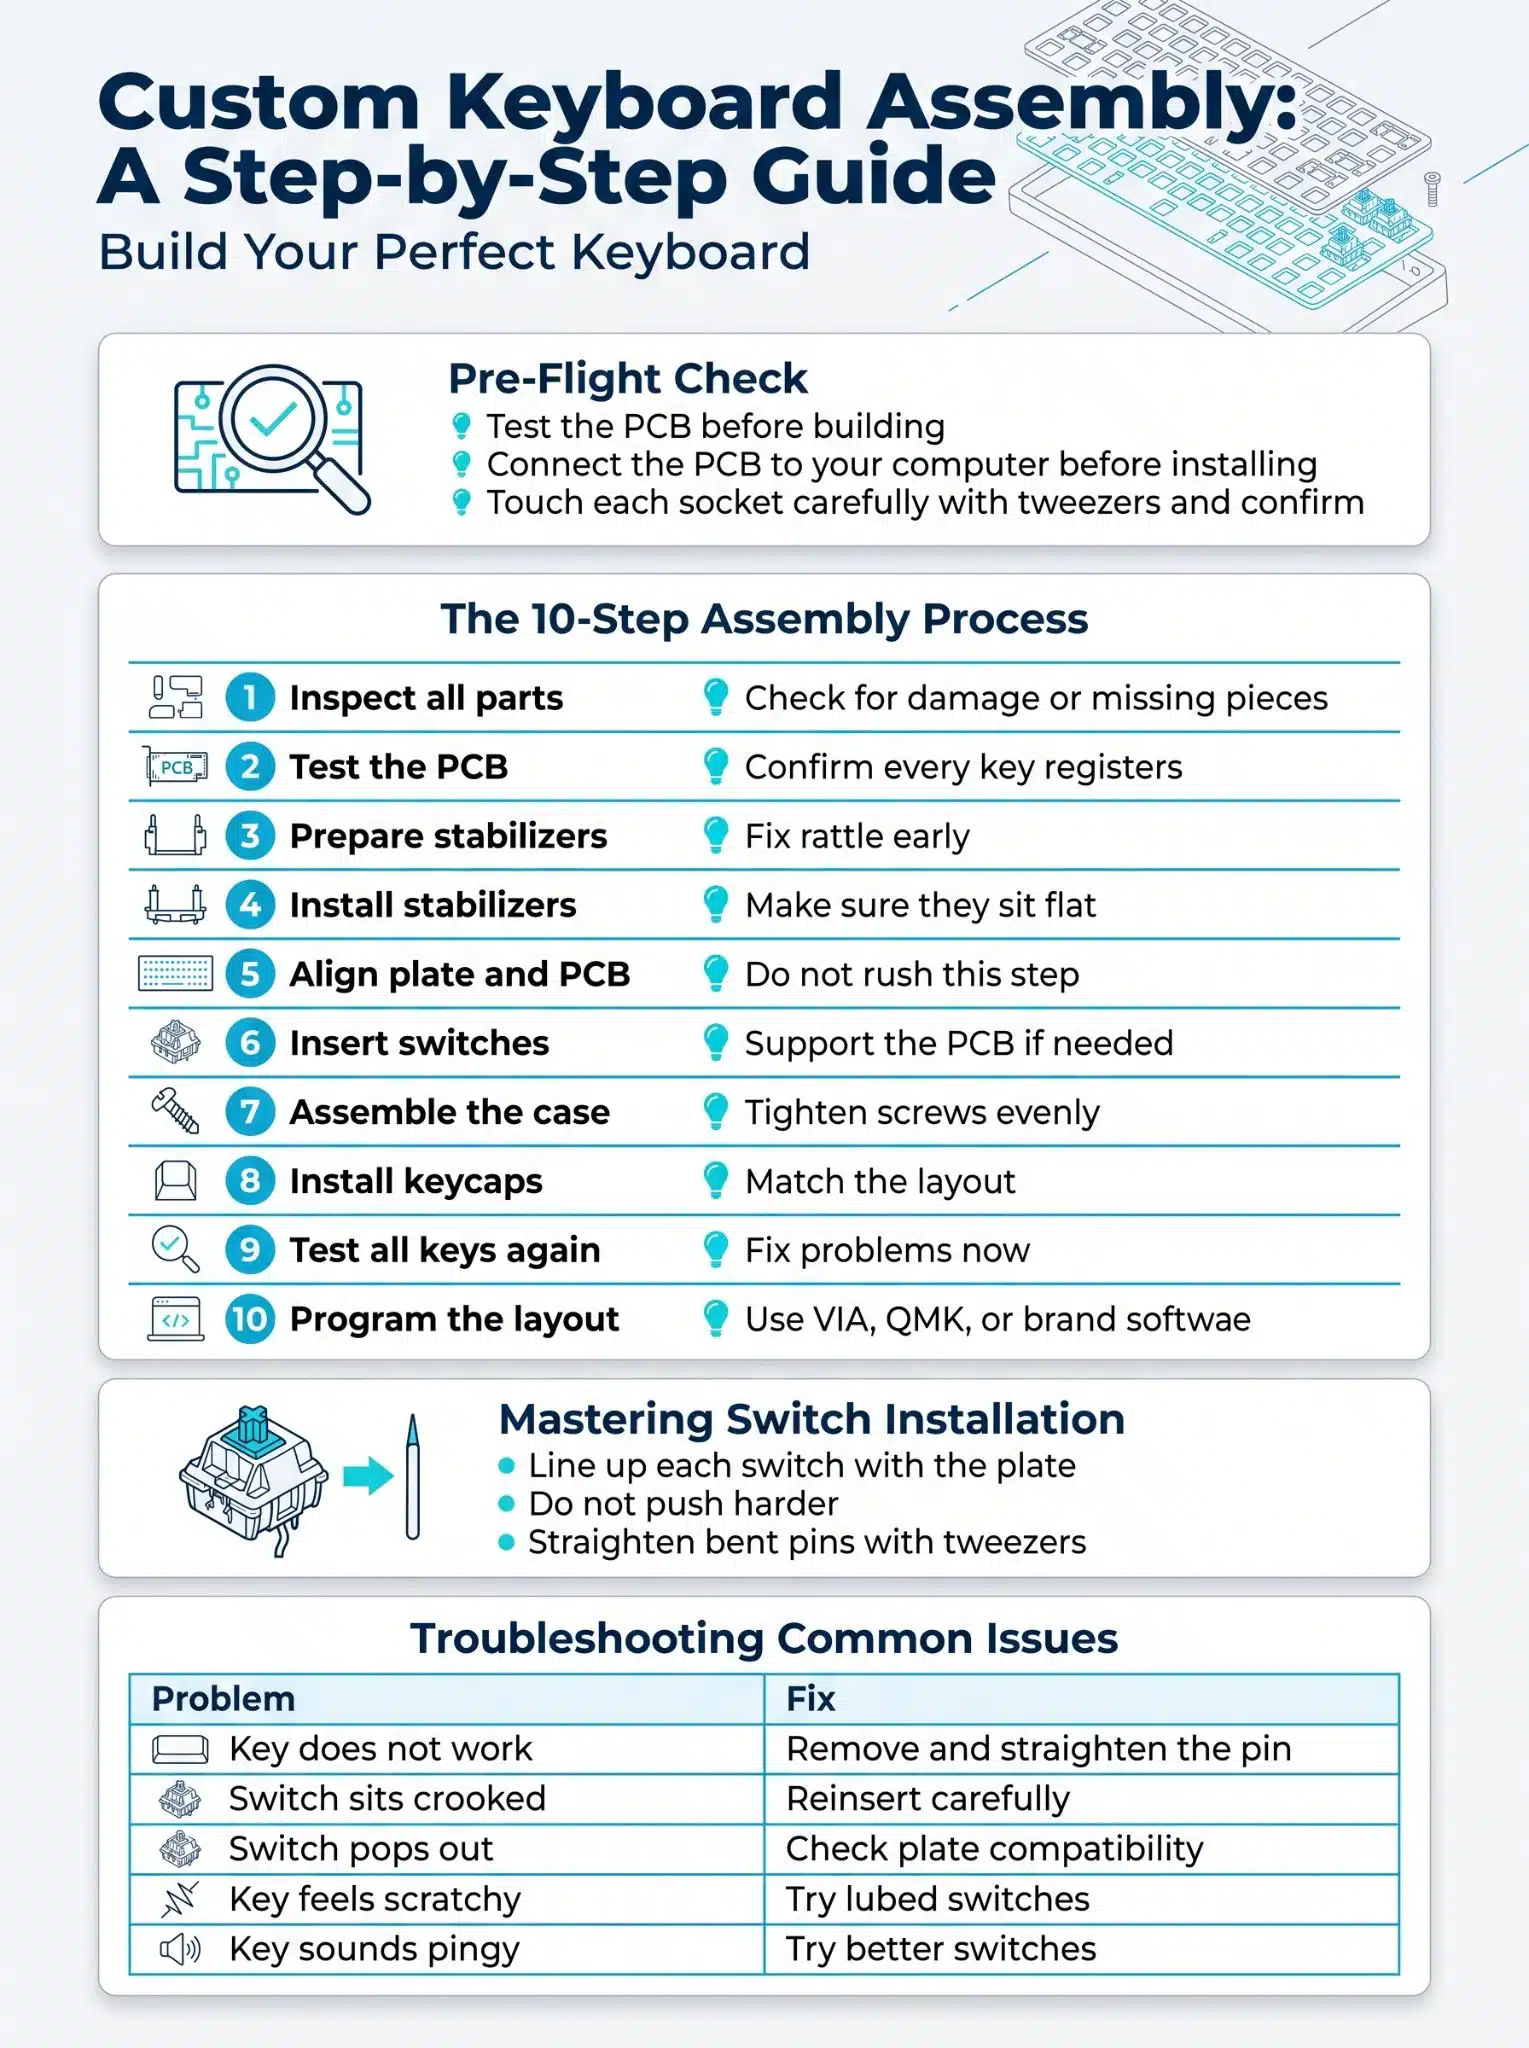
Connect the PCB to your computer before installing the switches. Use an online keyboard tester or keyboard testing software. Touch each socket carefully with tweezers and confirm that every key registers.
This can save you from taking the whole board apart later.
After testing, install the stabilizers. Big keys like Spacebar, Enter, Shift, and Backspace need them. Stabilizers should go in before the switches.
| Step | What to Do | Key Tip |
|---|---|---|
| 1 | Inspect all parts | Check for damage or missing pieces |
| 2 | Test the PCB | Confirm every key registers |
| 3 | Prepare stabilizers | Fix rattle early |
| 4 | Install stabilizers | Make sure they sit flat |
| 5 | Align plate and PCB | Do not rush this step |
| 6 | Insert switches | Support the PCB if needed |
| 7 | Assemble the case | Tighten screws evenly |
| 8 | Install keycaps | Match the layout |
| 9 | Test all keys again | Fix problems now |
| 10 | Program the layout | Use VIA, QMK, or brand software |
Install switches with patience
Line up each switch with the plate and PCB socket. The metal pins should go straight into the socket.
If the switch does not slide in smoothly, stop.
Do not push harder.
Pull it out and check the pins. Bent pins are common. You can usually straighten them with tweezers.
A bent pin can stop a key from working. A forced switch can damage a hot-swap socket.
| Problem | Likely Cause | Fix |
|---|---|---|
| Key does not work | Bent switch pin | Remove and straighten the pin |
| Switch sits crooked | Not aligned with the plate | Reinsert carefully |
| Switch pops out | Plate does not grip well | Check plate compatibility |
| Key feels scratchy | Dry or rough switch | Try factory-lubed or lubed switches |
| Key sounds pingy | Spring noise | Try better switches or spring lube |
Stabilizers: Small Parts, Big Difference
The spacebar can make or break the build
Stabilizers support large keys. Without them, a long key would wobble because the switch sits in the middle while your finger may press the side.
The spacebar matters most.
A rattly spacebar can make a good keyboard sound cheap. Enter, Shift, and Backspace also need proper stabilizer tuning.
Many beginner kits include decent stabilizers. Some still need a little work. Add a small amount of lubricant where the wire enters the housing. Do not drown the stabilizer in grease.
| Stabilizer Type | How It Mounts | Best For |
|---|---|---|
| Plate-mounted | Clips into the plate | Budget builds |
| PCB clip-in | Clips into the PCB | Better than many plate-mounted options |
| PCB screw-in | Screws into the PCB | Stable custom builds |
| Pre-lubed | Factory-tuned | Beginner-friendly builds |
| Premium aftermarket | Better housing and wire | Enthusiast tuning |
Common stabilizer problems
A ticking stabilizer often means the wire is uneven or dry. A mushy stabilizer may have too much lube. A sticky large key may come from poor seating or a warped keycap.
Fix stabilizers before closing the case. It is much easier now than later.
| Issue | Cause | Solution |
|---|---|---|
| Rattle | Dry wire or loose fit | Add light lube |
| Tick | Uneven wire | Balance or reseat the wire |
| Sticky key | Too much lube or bad seating | Clean and reinstall |
| Wobble | Poor stabilizer quality | Replace with better stabilizers |
| Hollow spacebar | Keycap or case resonance | Try foam or a thicker spacebar |
Sound Tuning: Thock, Clack, or Quiet?
Build for your ears
Keyboard sound is personal.
Some people want a deep “thock.” Some like a sharp “clack.” Some just want a quiet board that will not disturb anyone at night.
Sound comes from many parts: case, plate, switches, keycaps, stabilizers, foam, desk mat, and even how hard you type.
No single part creates the whole sound.
If the board sounds hollow, case foam may help. If it feels too stiff, a softer plate or gasket mount may help. If big keys rattle, fix the stabilizers first.
| Sound Goal | Parts That Help | Notes |
|---|---|---|
| Deep sound | Thick keycaps, foam, softer plate | Works well with larger cases |
| Crisp clack | Aluminum plate, ABS keycaps | Can be louder |
| Quiet typing | Silent switches, foam, desk mat | Best for shared rooms |
| Softer feel | Gasket mount, polycarbonate plate | Comfortable for long sessions |
| Better spacebar | Tuned stabilizers | Biggest sound improvement |
Do not over-mod the keyboard
Mods can help. Too many mods can ruin the feel.
New builders often add too much foam, too much lube, or too many tape layers. The keyboard then sounds flat and feels lifeless.
Start with the stock build. Test it. Then change one thing at a time.
A simple tuning order works best:
- Tune the stabilizers.
- Try a desk mat.
- Add case foam if the board sounds hollow.
- Try different switches.
- Change keycaps if the sound still feels wrong.
Firmware and Key Mapping
VIA and QMK make compact boards easier
Firmware controls what each key does.
Many custom keyboards support QMK, VIA, or both. QMK is powerful open-source keyboard firmware. VIA gives users a simpler visual interface on supported boards.
With VIA, you can remap keys, create layers, assign media controls, set macros, and adjust lighting.
This matters a lot on compact keyboards. A 60% or 65% board can feel limited if the layers are poorly planned. With smart layers, you can still use arrows, media keys, screenshots, volume controls, and gaming shortcuts.
| Feature | What It Does | Why It Helps |
|---|---|---|
| Key Remapping | Changes what a key does | Fixes layout issues |
| Layers | Adds extra functions | Essential for compact boards |
| Macros | Runs repeated actions | Useful for games and workflows |
| Media Keys | Controls audio and playback | Handy for daily use |
| Lighting Control | Adjusts RGB or backlight | Matches your setup |
| Profiles | Saves different layouts | Useful for gaming and work |
Check firmware support before buying
Not every keyboard supports QMK or VIA.
Some brands use their own software. Some software works only on Windows. Some wireless boards have limited firmware options.
Before buying, check:
- QMK support
- VIA support
- Browser configurator support
- Firmware update instructions
- Windows, macOS, and Linux compatibility
A good keyboard should not trap you in bad software.
Build Planning for Gaming, Typing, and Everyday Use
Build for how you actually use your keyboard
A gaming keyboard and a writing keyboard do not need to feel the same.
FPS players often like compact layouts, fast switches, and more mouse space. Writers may prefer tactile switches and a stable layout. Office users may need silent switches. Programmers may care more about layers and key mapping.
For console players who also use a PC, a small keyboard can help with chat, browsing, and quick controls. For creators, a 75% or TKL board with media shortcuts may feel more useful than a tiny 60% layout.
A good custom mechanical keyboard should fit your daily routine, not someone else’s desk photo.
| User Type | Good Layout | Good Switch Choice | Extra Tip |
|---|---|---|---|
| FPS Gamer | 60%, 65%, 75% | Linear or magnetic | Keep mouse space open |
| RPG/MMO Player | TKL, 75%, 96% | Tactile or linear | Use macros carefully |
| Writer | 75%, TKL | Tactile or silent tactile | Focus on comfort |
| Programmer | 65%, 75%, TKL | Tactile or linear | Plan layers well |
| Office User | TKL, 96%, full-size | Silent switches | Avoid loud clicky switches |
| Creator | 75%, TKL | Tactile or linear | Add media shortcuts |
Hall Effect switches are big in gaming
Hall Effect keyboards are getting more attention in competitive gaming.
They let users adjust actuation. That means you can decide how far a key must travel before it registers. Many also support rapid trigger, which resets the key quickly as you release it.
This can help in fast games where movement control matters.
But not everyone needs it.
If you mostly type, write, edit, or play casually, a traditional mechanical keyboard may feel better and cost less.
| Feature | Traditional Mechanical | Hall Effect / Magnetic |
|---|---|---|
| Input System | Metal contact switch | Magnetic sensing |
| Actuation | Usually fixed | Often adjustable |
| Rapid Trigger | Usually not available | Common in gaming boards |
| Switch Choice | Very broad | More limited |
| Best For | Typing and general use | Competitive gaming |
Budget: How Much Should You Spend?
Start smart, not expensive
A custom keyboard can be affordable. It can also become very expensive if you chase every premium part.
For beginners, the best route is balance.
Get a decent hot-swap barebones kit. Choose reliable switches. Buy keycaps that fit. Make sure the stabilizers are usable.
Do not spend the whole budget on the case. Switches and stabilizers often affect the final feel more than beginners expect.
The best part? You can upgrade later.
| Budget Level | Expected Build | Best For |
|---|---|---|
| Entry | Plastic kit, budget switches, basic PBT caps | First-time builders |
| Mid-range | Gasket kit, better switches, quality caps | Daily use |
| Premium | Heavy case, tuned stabilizers, premium caps | Enthusiasts |
| Gaming-focused | Fast PCB, magnetic or linear switches | Competitive players |
| Silent build | Silent switches, foam, desk mat | Office/shared rooms |
Spend where it matters
A beautiful case is nice. But if the stabilizers rattle and the switches feel rough, the keyboard will not feel premium.
Spend money in this order:
- A layout you can use every day
- A reliable hot-swap PCB
- Good stabilizers
- Switches that match your use
- Keycaps that fit the layout
- Firmware support if you need remapping
- Case upgrades after the basics are right
A practical build always beats a pretty but annoying one.
Common Mistakes to Avoid
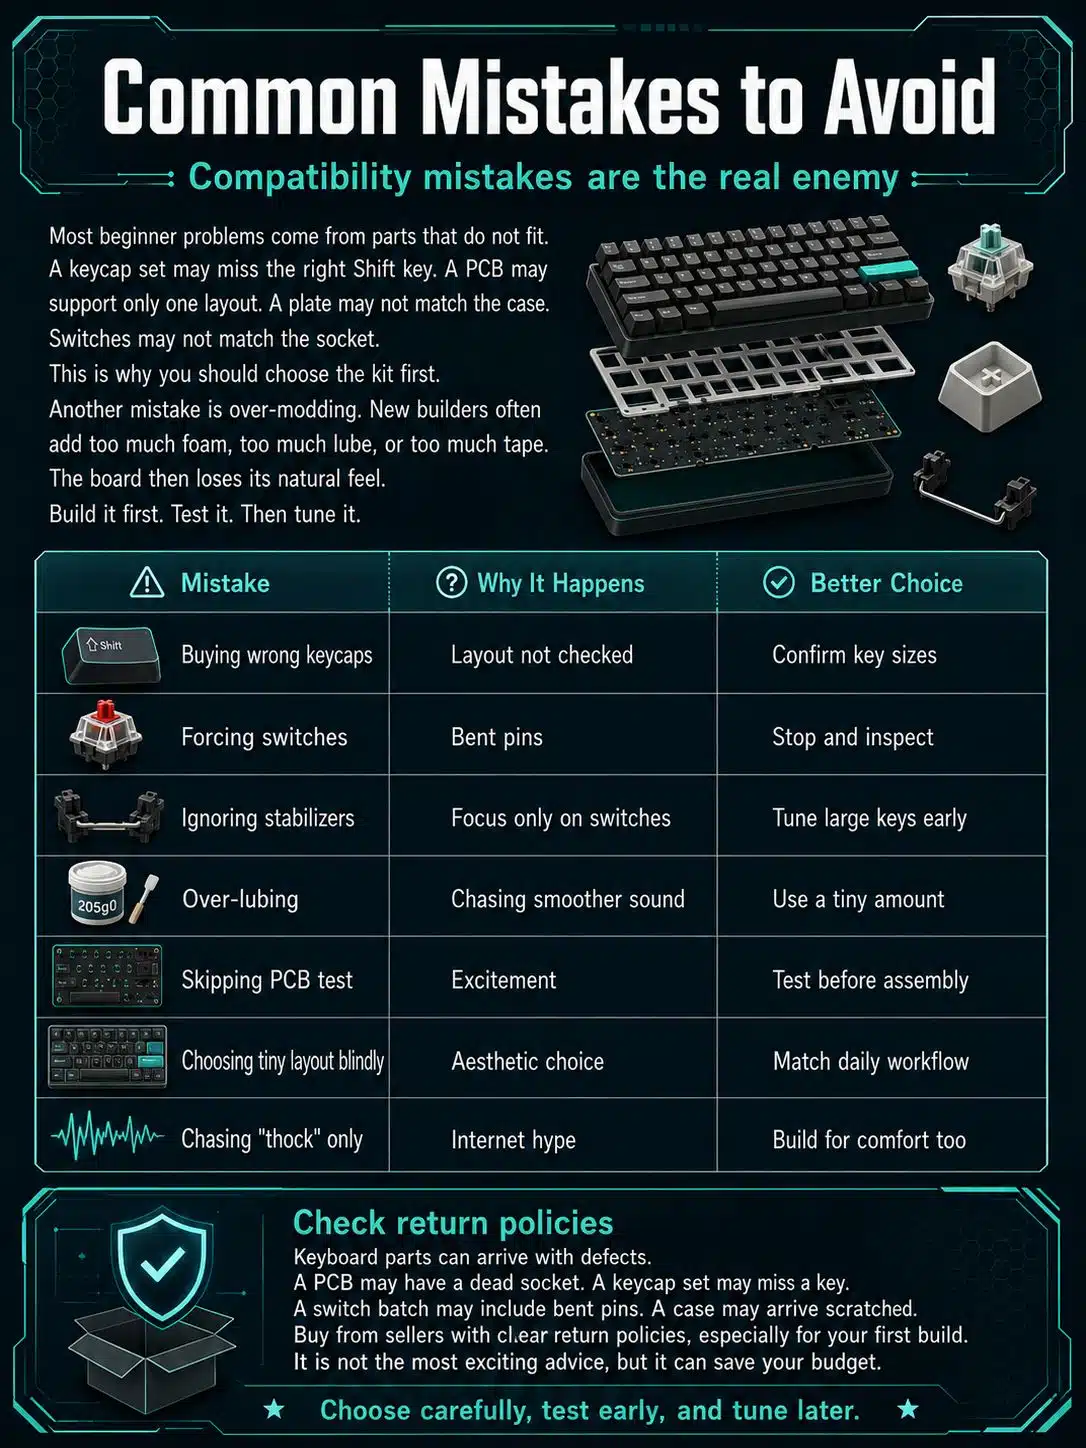
Compatibility mistakes are the real enemy
Most beginner problems come from parts that do not fit.
A keycap set may miss the right Shift key. A PCB may support only one layout. A plate may not match the case. Switches may not match the socket.
This is why you should choose the kit first.
Another mistake is over-modding. New builders often add too much foam, too much lube, or too much tape. The board then loses its natural feel.
Build it first. Test it. Then tune it.
| Mistake | Why It Happens | Better Choice |
|---|---|---|
| Buying wrong keycaps | Layout not checked | Confirm key sizes |
| Forcing switches | Bent pins | Stop and inspect |
| Ignoring stabilizers | Focus only on switches | Tune large keys early |
| Over-lubing | Chasing smoother sound | Use a tiny amount |
| Skipping PCB test | Excitement | Test before assembly |
| Choosing tiny layout blindly | Aesthetic choice | Match daily workflow |
| Chasing “thock” only | Internet hype | Build for comfort too |
Check return policies
Keyboard parts can arrive with defects.
A PCB may have a dead socket. A keycap set may miss a key. A switch batch may include bent pins. A case may arrive scratched.
Buy from sellers with clear return policies, especially for your first build.
It is not the most exciting advice, but it can save your budget.
Maintenance After the Build
Keep it clean if you want it to last
A good custom mechanical keyboard can last for years.
Dust, hair, crumbs, and drink spills are the real enemies.
Wipe the keycaps once a week. Brush between the keys every month. Remove the keycaps every few months for a deeper clean. If a switch starts acting up, a hot-swap board makes replacement simple.
And please, do not eat over the keyboard.
Crumbs under the spacebar can make even an expensive board feel awful.
| Maintenance Task | How Often | Why It Matters |
|---|---|---|
| Wipe keycaps | Weekly | Removes oils |
| Brush between keys | Monthly | Clears dust |
| Deep clean keycaps | Every few months | Restores texture |
| Check stabilizers | When rattle appears | Keeps large keys smooth |
| Replace bad switches | As needed | Fixes missed inputs |
| Update firmware | Only when needed | Avoids layout bugs |
Final Thoughts: Build the Keyboard You’ll Actually Enjoy
A custom mechanical keyboard is worth it if you care about feel, sound, comfort, and control.
You do not need the most expensive parts. You need the right parts.
Start with a hot-swappable kit. Choose a layout that fits your work and gaming habits. Pick switches based on feel, not hype. Spend time on stabilizers. Test everything before closing the case.
Most importantly, build for yourself.
Not for a desk photo.
Not for a trend.
Not for someone else’s sound test.
Build a keyboard that feels right under your fingers every single day.
That is the real joy of a custom mechanical keyboard.
FAQs About Building a Custom Mechanical Keyboard
Can I build a custom mechanical keyboard without soldering?
Yes. Choose a hot-swappable PCB or barebones kit. You can install switches by hand without soldering.
This is the best option for most beginners.
| Quick Answer | Best Choice |
|---|---|
| No soldering needed | Hot-swappable PCB |
| Easy switch changes | Hot-swap sockets |
| Best first build | Barebones kit |
Do 3-pin switches work in 5-pin PCBs?
Yes, in most standard MX-style boards. A 5-pin PCB usually accepts 3-pin switches.
A 3-pin PCB may require clipping the two plastic legs from a 5-pin switch.
| Switch/PCB Match | Works? | Note |
|---|---|---|
| 3-pin switch in 5-pin PCB | Usually yes | Fits easily |
| 5-pin switch in 5-pin PCB | Yes | More stable |
| 5-pin switch in 3-pin PCB | Sometimes | May need clipping |
Why does my spacebar rattle after building?
The stabilizer is usually the problem.
It may need light lube, better seating, wire balancing, or replacement.
| Cause | Fix |
|---|---|
| Dry stabilizer wire | Add light lube |
| Uneven wire | Balance carefully |
| Loose stabilizer | Reinstall properly |
| Thin spacebar | Try a better keycap |
Are clicky switches good for gaming?
They work, but most gamers prefer linear, tactile, or magnetic switches.
Clicky switches are loud. They can become distracting during long gaming sessions.
| Switch Type | Gaming Fit |
|---|---|
| Linear | Great for fast inputs |
| Tactile | Good for mixed use |
| Clicky | Fun but loud |
| Magnetic | Strong for competitive gaming |
Does plate material really change keyboard sound?
Yes. Plate material changes both sound and feel.
Aluminum often feels firm and sounds sharper. Polycarbonate feels softer and can sound deeper. Brass feels heavy and stiff. FR4 often feels balanced.
| Plate Material | Feel | Sound |
|---|---|---|
| Aluminum | Firm | Clean and sharp |
| Polycarbonate | Soft | Deeper and muted |
| Brass | Stiff and heavy | Bright and premium |
| FR4 | Balanced | Neutral |
| POM | Flexible | Soft and smooth |
Should I lube switches on my first build?
Not always.
Many modern switches come factory-lubed and feel good enough. Try them first. If they feel scratchy or pingy, consider lubing later.
| Situation | What to Do |
|---|---|
| Smooth factory-lubed switches | Use as-is |
| Scratchy switches | Consider lubing |
| Spring ping | Lube springs |
| Beginner build | Avoid over-lubing |