Listen to the Podcast:
Do you know how to fix internet connection problems in windows 10? Well, friends, we continue with the problems that we found after having updated our operating system to Windows 10.
And is that the new version of Microsoft’s operating system is full of errors and bugs that, by the way, it will try to repair with a great update that will be released. Shortly. Well, having said that, it should be noted that one of the problems that many users suffer after upgrading their operating systems to Windows 10 is the inability to connect to the Internet through their Wi-Fi connection.
You may also be interested in: How to fix the problem: “One or more protocols are missing on this computer and Windows Sockets registry entries required for network connectivity are missing” in Windows 10 Internet connection.
Many users are reporting that when they try to connect to the internet via a Wi-Fi connection, a connection status will be displayed: “Limited connection.” This will prevent your computer from connecting to the internet until the connection is successful. The problem is that no matter how many times we disconnect and reconnect to our Wi-Fi network, the status of our connection will not change. That being said, we should know that Windows
If after updating to Windows 10 UNKNOWN NETWORK is displayed, this is the solution: How to solve an unknown network or limited connection in Windows 10. (WiFi or Ethernet connection).
That is why today we want to show you a series of tips and tricks to be able to solve internet connectivity problems when upgrading to Windows 10:
The first thing that we recommend before anything else is to make a restore point in our operating system so that in the event that our computer suffers a failure, we can always return to the point before the changes shown in this tutorial. To create a point, you will only have to search for the Create a Restore Point tool through the search box on the Windows 10 taskbar. You can also access it from the Control Panel. This will cause a window to open in which you must follow the steps indicated during the process.
Once the restore point has been created, we must go to the Device Manager; for this, we will have to search through the Windows search or by going to the Control Panel. Once the Device Manager window is open, we must go to the ” Network adapters ” section.
Click on ” Network Adapters ” to display all the adapters that allow you to make a wireless connection. Among the different adapters shown, we must locate our wireless network card that is normally identified by including the word Wireless in its name. Double-click on it to open a new window.
In this new window, you must access the Driver tab and click on the Update Driver button. Once updated, you should check if you already have a correct internet connection.
If your problem has not been solved, you should go back to the device manager to in this case, click with the right mouse button on your wireless network card. From the drop-down menu, you must click on the Disable option. Confirm the changes and check your connectivity to the Wi-Fi network again.
If this still doesn’t work, you’ll need to re-enable the wireless network card disabled in the previous step. Now you will need to access the Command Prompt with Administrator rights. You can do this from the Windows 10 search, by clicking the right mouse button on the search result and selecting the Run as administrator option.
In the Command Prompt window, we must enter the following commands, do not forget to press the Enter key after each of the commands:
Command:
- netsh int tcp set heuristics disabled
- netsh int tcp set global autotuninglevel=disabled
- netsh int tcp set global rss=enabled
- netsh int tcp show global
Finally, you must restart your computer for the changes to take effect. Once restarted, you should check the internet connection again.
Read More: Razer Blade 15 2018 H2
If the Network Icon (WFI) is not Shown on the Taskbar: How to Solve the Lack of the Wi-Fi Icon in Windows 10 and be Able to Connect to the Internet?
Extra Method 1: (Thanks to the user Maritza)
Go to the Device Manager tool. When the window of said tool is open, we must go to the Network adapters section. Once you display this section, you must right-click on your Web adapter, in the case of the photo: Dell Wireless 1703 802.11b/g/n (2.4GHz)
From the drop-down menu, you must select the properties option, which will cause the opening of a new window in which we will have to click on the Energy Management tab. It will be here where you will find the option: Allow the computer to turn off this device to save energy.
Uncheck the box for that option and click the OK button. Immediately afterward, proceed to restart your computer to check if you now have an internet connection via Wi-Fi.
Read Also: How to Get Twitch on Samsung TV
Extra Method 2:
The problem may be the router you are connecting to. In this case, we must check if the router is broadcasting the SSID. To find out if your router is making this transmission, you should check it as follows:
Type 192.168.1.1 in the address bar of your browser; the address will connect to your router. Here you may need to log in with your admin credentials. Once inside, you should look for the Wireless settings/configuration section. Check if the SSID is displayed here and if the “Broadcast SSID” box is checked. You should keep in mind that this can vary a bit depending on the manufacturer of the router.
Another solution can change the SSID name and click save for the changes to take place and make sure the SSID is visible in the list of networks that is displayed when we click the network icon in the system tray Windows 10
Note: Sometimes, a power cycle of the router can fix the problem. To do this, you will only have to press the router’s Off button to immediately disconnect the power cable from the router. Leave it for a few seconds, reconnect the power cable, and press the Power button again. After this check, if the WiFi connection is now visible and ready to connect to the Internet.
Read Also: How to fix Bluetooth Problems in Windows 11
Extra Method 3:
The problem with the Internet connection may be due to the previous or current use of a VPN program or service. In this case, you must remove the VPN service through the Registry Editor in Windows 10. To do this, we will have to perform the following steps:
Make use of the keyboard shortcut: Windows key + R to open the Run dialogue box here, enter the CMD command and press the Enter key to launch the command prompt. In this window, we must enter the following command:
reg delete HKCR\CLSID\{988248f3-a1ad-49bf-9170-676cbbc36ba3} /va /f
Once you have entered the command and pressed the Enter key to execute it, for the next line, let’s enter this new command:
Bonus Method 4:
Finally, perhaps the final solution is to use the official Microsoft tool to fix network problems in Windows 10. This tool is included in Windows to fix network problems, check what is causing the problem, and fix it automatically. To access the Windows network troubleshooter, you must type the following term in the Windows search field: Identify and repair network problems.
When the tool is displayed among the search results, we must click on it. This will allow you to search for errors in order to find and repair them automatically.
Hopefully, after this article update, you can finally fix this Wi-Fi connectivity issue on Windows 10 operating system.
New solution. (courtesy of our reader Eduardo Alvarez)
The first thing will be to connect to the Wi-Fi network to then access the device manager. It will be then when we have to look for the Network Adapters.
This will reveal the list of network cards installed on your computer, that is, the Ethernet and Wireless cards. It will be in the Wireless adapter that we will have to double-click so that, in this way, a window is displayed in which we will have to click on the Advanced Options tab.
In this tab, you will find the option: Roaming aggressiveness. This will reveal a configurable field in which we must configure the Highest option (the highest).
Finally, you just have to click on accept to save the changes. Now your computer will disconnect from your Wi-Fi network to do it again in a more persistent and aggressive way. This configuration will now allow all the connections that you try to connect to; your Wireless network card will force the connection to the maximum.
Read Also More: How to Turn on Bluetooth on Windows 10
How to Fix WiFi Connected But No Internet Connection (Advanced Solutions)
Because some of you may be experiencing a WiFi connection but no Internet connection problem, we’ll continue to provide some advanced techniques to help you resolve this issue below. If you can access the internet on other devices but not on your PC, you can try some of these workarounds.
Temporarily Disable Antivirus Software
You can try temporarily disabling or uninstalling any third-party antivirus software to test if the WiFi is connected, but there is no way to fix the internet problem. Antivirus software can occasionally interfere with certain functions on your computer.
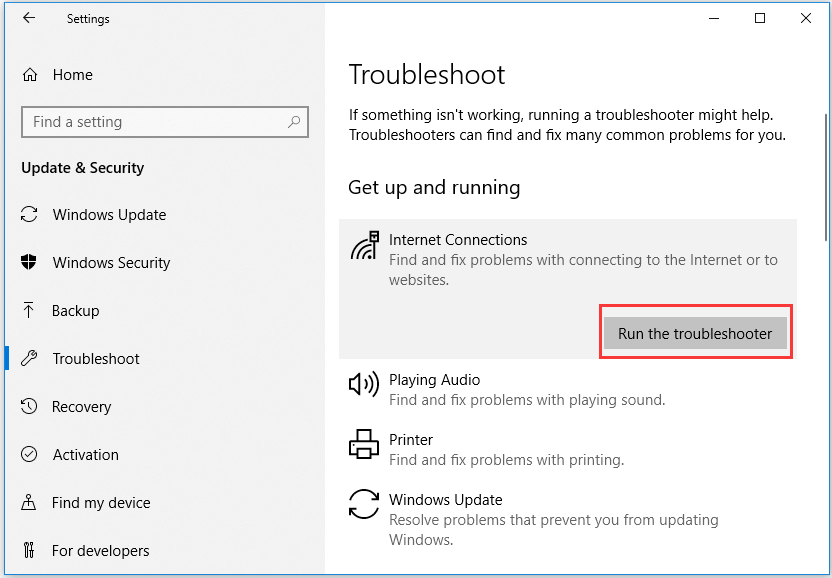
Troubleshoot Your Device Internet Connection Problems
You can click Start -> Settings -> Update & Security -> Troubleshoot. Click Internet Connections and click Run the troubleshooter button. Windows will automatically search and fix detected problems with the connection to the Internet or websites.
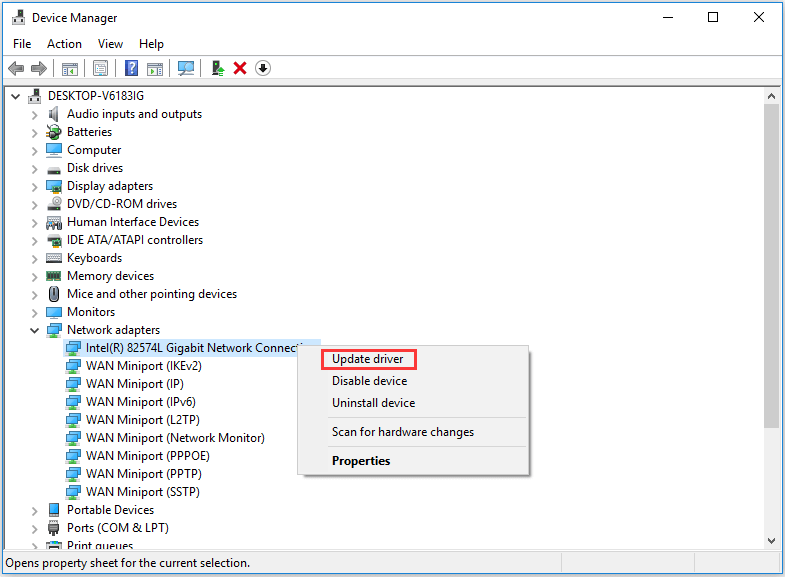
Update Network Adapter Drivers
- You can click Start, type device manager, and choose Device Manager to open it.
- Expand Network adapters, right-click your network device, and choose Update driver.
Then you can check if your Windows 10 PC can connect to the Internet.
This tutorial contains 11 fixes to assist you in troubleshooting Internet problems; hopefully, your Internet connection issues such as no Internet connection, WiFi connected but no Internet Windows 10, router not connecting to the Internet, Internet connected but not working, and so on can now be resolved. If you have better solutions to Internet connection problems, please share them with us.