
A messy desk is not just ugly. It is noisy, distracting, and time-wasting. You lose minutes every day untangling chargers, moving cables to clean, or guessing which plug belongs to what.
This guide is designed for desk cable management in dubai, where many people work from apartments, shared coworking desks, and compact office spaces. The goal is simple: make your desk look clean, feel calm, and stay that way.
You will learn a practical system plus 14 proven tricks. You can use them on a small laptop desk or a multi-monitor setup. You can also do most of it without drilling or buying expensive items.
Desk cable management in Dubai: Quick audit before you start
10-minute desk audit checklist
| Step | What to check | What to write down |
| 1 | Devices | Laptop/PC, monitors, dock, router, speakers |
| 2 | Connections | USB-C, HDMI/DP, Ethernet, audio, power |
| 3 | Power bricks | Count adapter “blocks” |
| 4 | Outlet position | Wall outlet distance and side |
| 5 | Cable zones | Desktop vs under-desk vs wall/floor |
| 6 | Daily-use cables | Phone, headset, camera |
Before you buy anything or start sticking clips everywhere, do a quick audit. This prevents the most common failure: you “tidy” cables, then realize you forgot a device and have to redo everything.
Step 1: List every device you actually use
Write the list. Do not rely on memory. Include:
- Laptop or desktop
- Monitor(s)
- Docking station or USB hub
- Phone charger
- Router or mesh node (if it sits near the desk)
- Speakers or microphone
- Printer (if it is near your desk)
- Webcam, ring light, capture card, external drives
Step 2: Sort cables by purpose
Create three piles:
- Power cables (AC adapters, monitor power, laptop power)
- Display cables (HDMI/DisplayPort)
- Data cables (USB, Ethernet, audio)
This makes bundling easier later.
Step 3: Decide cable zones
You want fewer visible cables. The easiest way is to give cables “homes.”
Use these zones:
- Desktop zone: only the cables you touch daily
- Under-desk zone: power strip, bricks, slack, and bundles
- Wall/floor zone: the route to the outlet
Step 4: Plan your “one main drop”
A pro-looking desk usually has one main cable trunk dropping from the desk to the outlet area. Everything else stays hidden.
If your outlet is far, you will route the trunk along the wall using a raceway or along the desk leg using clips.
Tools and supplies checklist (what to buy first)
Buying random accessories can waste money fast. This section helps you pick tools in the right order, so every item has a clear job. The best cable management is not about expensive gadgets. It is about a few smart basics used consistently. Start small, test the look, then upgrade only if you need a cleaner finish. The goal is a setup that stays practical, not just pretty.
Table: The smart buying plan
| Budget level | What to buy | Why it matters |
| Low budget | Velcro ties, cable clips, labels | Biggest visual improvement |
| Medium | Under-desk tray, cable sleeve | Hides the ugly zone |
| Higher | Raceway, grommet, desk upgrade | Built-in look and long-term ease |
You can do a lot with basic supplies. The trick is to buy the right items first.
Essentials (cheap, high impact)
- Hook-and-loop (Velcro) ties: These are adjustable, reusable, and easy to edit when your setup changes.
- Cable clips or cable holders: Great for daily-use cables so they do not fall behind the desk.
- Labels: You can use sticker labels, tape, or even a marker on masking tape.
Pro-looking upgrades (best value)
- Under-desk cable tray or basket: This is the “hidden engine room.” It holds your strip, bricks, and slack.
- Cable sleeve: Turns several cables into one neat trunk.
- Cable management box: Perfect for rentals or desks where you cannot mount anything.
Nice-to-have items
- Shorter cables: The cleanest desks use correct cable lengths, not loops of extra slack.
- Right-angle adapters (only when quality is good): Useful for tight spaces behind monitors, but avoid cheap versions that fail.
- A compact USB hub or docking station: Reduces the number of cables that must run across your desk.
The 14 cable-management tricks for a clean, pro-looking desk
This section helps you avoid the most common problem: cleaning cables once, then redoing everything again. A quick audit gives your setup a plan, not just a quick “tidy.” It also helps you spot what creates clutter in the first place, like extra-long cables or too many adapters. If your desk is in a small room, tiny changes make a big visual difference. Think of this as the foundation for everything you will do next.
14 tricks, with best use cases
| Trick | Best for | Biggest benefit |
| Unplug-and-reset | Any desk | Clears “hidden mess” fast |
| Reduce slack | Any desk | Removes hanging clutter |
| Velcro bundles | Any desk | Adjustable, clean grouping |
| Label both ends | Multi-device | Fast troubleshooting |
| Desktop cable lane | Phone/headset | Easy daily access |
| Under-desk power strip | Most desks | Clears floor and improves look |
| Cable box | Rentals | No-drill hiding |
| Under-desk tray | Multi-brick | Pro look under desk |
| Cable sleeve | Multi-cable | One clean drop |
| Raceway | Far outlet | Built-in routing look |
| Binder clip hack | Small desks | Free cable holder |
| Desk grommet | Permanent setup | “Built-in” pass-through |
| Upgrade desk features | Long-term | Less work forever |
| Weekly reset | Everyone | Keeps it tidy long-term |
Below are the tricks. You do not need all 14. Pick what matches your desk and your rules (rental, no drilling, shared desk, or permanent setup).
1. Unplug-and-reset (the fastest cleanup)
This step creates a clean baseline. It also shows you the real problem areas. You will find cables you do not need. You will also notice where slack builds up. When you rebuild from zero, you can create a cleaner path. This is the fastest way to get a visible change.
This step creates a clean baseline.
How to do it:
- Take a photo of your current setup.
- Shut down devices safely.
- Unplug everything from the power strip and from the device side.
- Put cables into piles (power, display, data).
Why it works:
- You stop treating the mess like “normal.”
- You can rebuild with a plan.
2. Fix cable slack and remove “waterfalls”
Slack makes cables look heavy and messy. It also catches dust and snags. But zero slack can damage ports over time. The goal is controlled slack, stored out of sight. Once slack is handled, your desk looks cleaner instantly. This is a key step for desk cable management in dubai setups with compact spaces.
Slack is the enemy of a clean desk. But removing all slack is also a mistake.
Use this approach:
- Keep enough slack to pull out a laptop or move a keyboard.
- Store the extra slack under the desk, not hanging in the open.
Simple slack storage methods:
- Coil slack into a neat loop and secure it with Velcro.
- Store the loop inside a tray or cable box.
- Run long cables along the desk frame so they look intentional.
3. Bundle cables with Velcro ties (not permanent zip ties)
Velcro makes your system flexible. It also keeps bundles neat without crushing cables. If you upgrade a monitor later, you can reopen and re-bundle fast. This is better than cutting zip ties again and again. A tidy bundle also helps airflow around adapters. It is a simple habit with a big payoff.
Velcro is forgiving. Zip ties are not.
Bundle by purpose:
- Display bundle: HDMI/DP lines to monitors
- Data bundle: USB devices and hubs
- Power bundle: power bricks and adapters
Rule:
- Make bundles small. Over-bundling becomes a thick, ugly rope.
4. Label both ends of every cable
Labels turn chaos into a system. They help when something stops working. They also help when you move desks or travel. This is especially helpful for multi-device desks. It also reduces stress because you always know what to unplug. Labels are a small step that feels very professional.
Labels are a “future you” gift.
A simple labeling system:
- Monitor 1 → Laptop
- Dock → Monitor
- Router → Desk Ethernet
- Speaker power → Strip
If you share a workspace or have multiple stations at home, labeling prevents mistakes and saves time.
5. Build a desktop cable lane for daily-use cords
Daily cables should be easy, not annoying. If a cable is hard to reach, you will stop using your system. A cable lane keeps things tidy and usable. It also looks neat in photos and video calls. This is one of the best comfort upgrades for any desk. It helps your setup feel “managed” every day.
Your desk should not be a charging jungle.
Pick 1–3 daily-use cables:
- Phone charging
- Headphone/earbud charging
- A spare USB-C cable for quick connections
Use clips along the desk edge:
- Keep cable heads at the same spot every day.
- Prevent cables from dropping behind the desk.
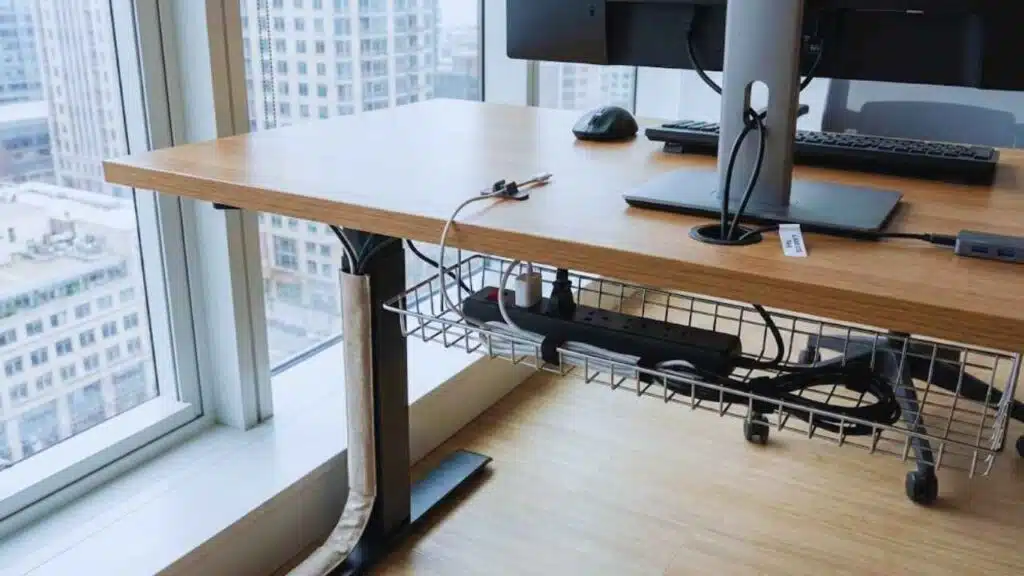
6. Get the power strip off the floor
Floor strips attract dust and clutter. They also get kicked by accident. Once the strip moves under the desk, the area looks cleaner. It also makes cable routing simpler because everything starts in one hidden place. This step can change the whole look of a desk. If you do only one upgrade, consider this.
Floor power strips collect dust and look messy. They also get kicked.
Better options:
- Under-desk mounting (if allowed)
- Inside a cable management box (no drilling)
- On the back of a desk leg (using strong mounting strips or strap systems
Practical tips:
- Keep the strip accessible.
- Avoid sharp bends near the plug.
- Do not press power bricks against each other in a tight pile.
7. Hide the power strip and bricks in a cable management box
A cable box is the rental hero. It hides the worst-looking parts fast. It also prevents loose cords from spreading across the floor. It helps if your outlet is in a visible spot. It can also make cleaning easier because everything is contained. This is great for quick desk cable management in dubai improvements.
A cable box is perfect when:
- You rent
- You cannot mount anything
- You want a quick improvement
How to set it up:
- Put the power strip inside the box.
- Place large power bricks inside with space between them.
- Route cables out through side slots.
- Coil extra length inside.
Pro tip:
- Put the box where it is easy to reach but hard to see, like behind a drawer unit.
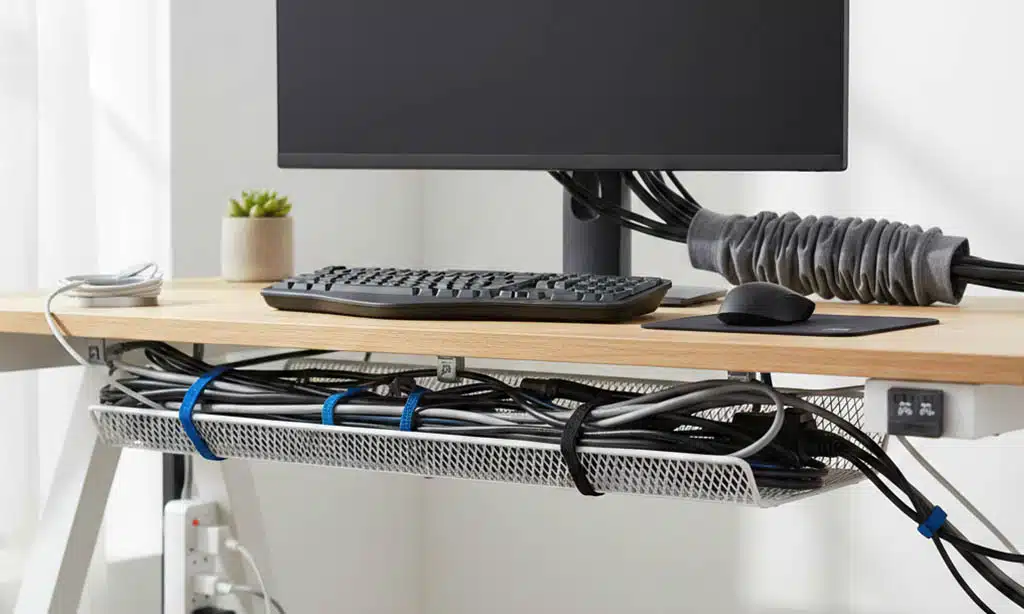
8. Install an under-desk cable tray (the “pro desk” move)
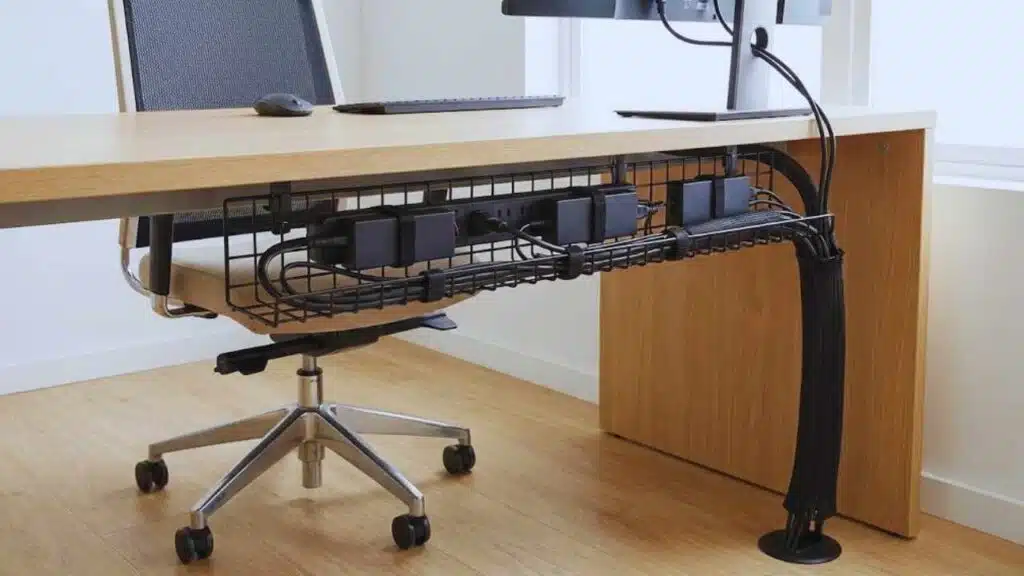
This is where desks start to look like offices in magazines. A tray turns the under-desk mess into a controlled zone. It also keeps cables away from feet and cleaning tools. It gives you a place to store slack neatly. It supports a single cable trunk idea. If you want the cleanest result, this is a top upgrade.
If you want the cleanest look, a tray is one of the best upgrades.
What goes into the tray:
- Power strip
- Laptop brick
- Monitor bricks
- Extra slack loops
- Small USB hubs (optional)
How to position the tray:
- Near the back edge, centered or on the outlet side
- Keep enough room so your knees never hit it
How to keep it neat:
- Use Velcro to secure bricks.
- Bundle each set of cables before it enters the tray.
- Create one main trunk leaving the tray.
9. Use a cable sleeve to create one clean trunk
A sleeve makes a desk look intentional. It reduces visual noise instantly. It also keeps cables from drifting apart. It works well when you have many cables going in the same direction. It also helps when the desk is in the middle of a room. This is a simple way to get the “one main drop” look.
A sleeve makes many cables look like one.
Best use cases:
- Dual monitors
- Docking station setups
- Creator desks with many devices
How to do it cleanly:
- Bundle cables first.
- Start the sleeve near the under-desk tray.
- End the sleeve near the outlet area.
- Leave a small service loop near the desk for movement and unplugging.
10. Use a raceway for wall runs (built-in look)
A raceway is best when the outlet is not behind the desk. It makes routing look planned. It also prevents cables from spreading across the floor. It helps keep spaces safer and easier to clean. It is a strong choice for shared homes and offices. If you care about a neat wall line, this is the move.
If the outlet is far from your desk, wall routing is often the cleanest solution.
Raceway benefits:
- No loose cables across the floor
- Cleaner appearance from any angle
- Easier cleaning
Best places to run it:
- Along the baseboard
- Under the desk edge
- Down a desk leg, then along the wall
Rental tip:
- If you use adhesive, choose a method that can be removed cleanly and test a small area first.
11. Use binder clips as a simple cable holder hack
This is a smart trick for tight budgets. Binder clips are easy to find. They also work well for thin cables. They keep cable heads in reach. They reduce the habit of dropping cables behind the desk. This is perfect for small desks with minimal tools. It is simple, but it works.
Binder clips are surprisingly useful.
How to use them:
- Clip to desk edge.
- Run a thin cable through the clip arms.
- Adjust so the cable pulls smoothly.
This is great for:
- Phone charging cable
- USB cable
- Small audio cable
12. Add a grommet or pass-through hole for a built-in look
A grommet cleans up the desktop fast. It gives cables a direct path down. It reduces messy side routing. It also makes your desk look designed for work. This is best for permanent setups. If you plan to keep the desk for years, it is worth considering.
A desk grommet creates a clean cable entry point.
Ideal setup:
- Cables drop through the grommet
- Cables enter the tray under the desk
- One trunk goes to the wall
If you cannot drill:
- Use a clamp-on pass-through accessory
- Or route cables through a rear gap if your desk has one
13. Upgrade to a desk designed for cable management
Some desks fight cable management. Others help you. A desk with built-in routing reduces the work you must do. It also hides cables naturally. It can save time every week. It is a good upgrade if you are already buying furniture. Think of it as buying less mess.
If you are buying furniture anyway, look for:
- Rear cable channels
- Built-in grommets
- A modesty panel (hides cables from the front)
- Space for under-desk tray mounting
- A stable frame (important for monitor arms)
This reduces effort long-term.
14. Keep it clean with a 5-minute weekly reset
Cable management is a system, not a one-time event. The weekly reset is what keeps it alive. It stops small mess from becoming a big mess. It also helps you notice worn cables early. It keeps your desk camera-ready for meetings. If you do this every week, your desk stays clean all year.
Cable management fails when it has no maintenance routine.
Weekly reset checklist:
- Put daily cables back into their clips
- Tighten any loose Velcro ties
- Tuck slack back into tray/box
- Wipe dust under the desk
- Make sure nothing is pulling or bending sharply
This is the difference between “clean for one day” and “clean for months.”
Safety and power tips for Dubai/UAE desk setups
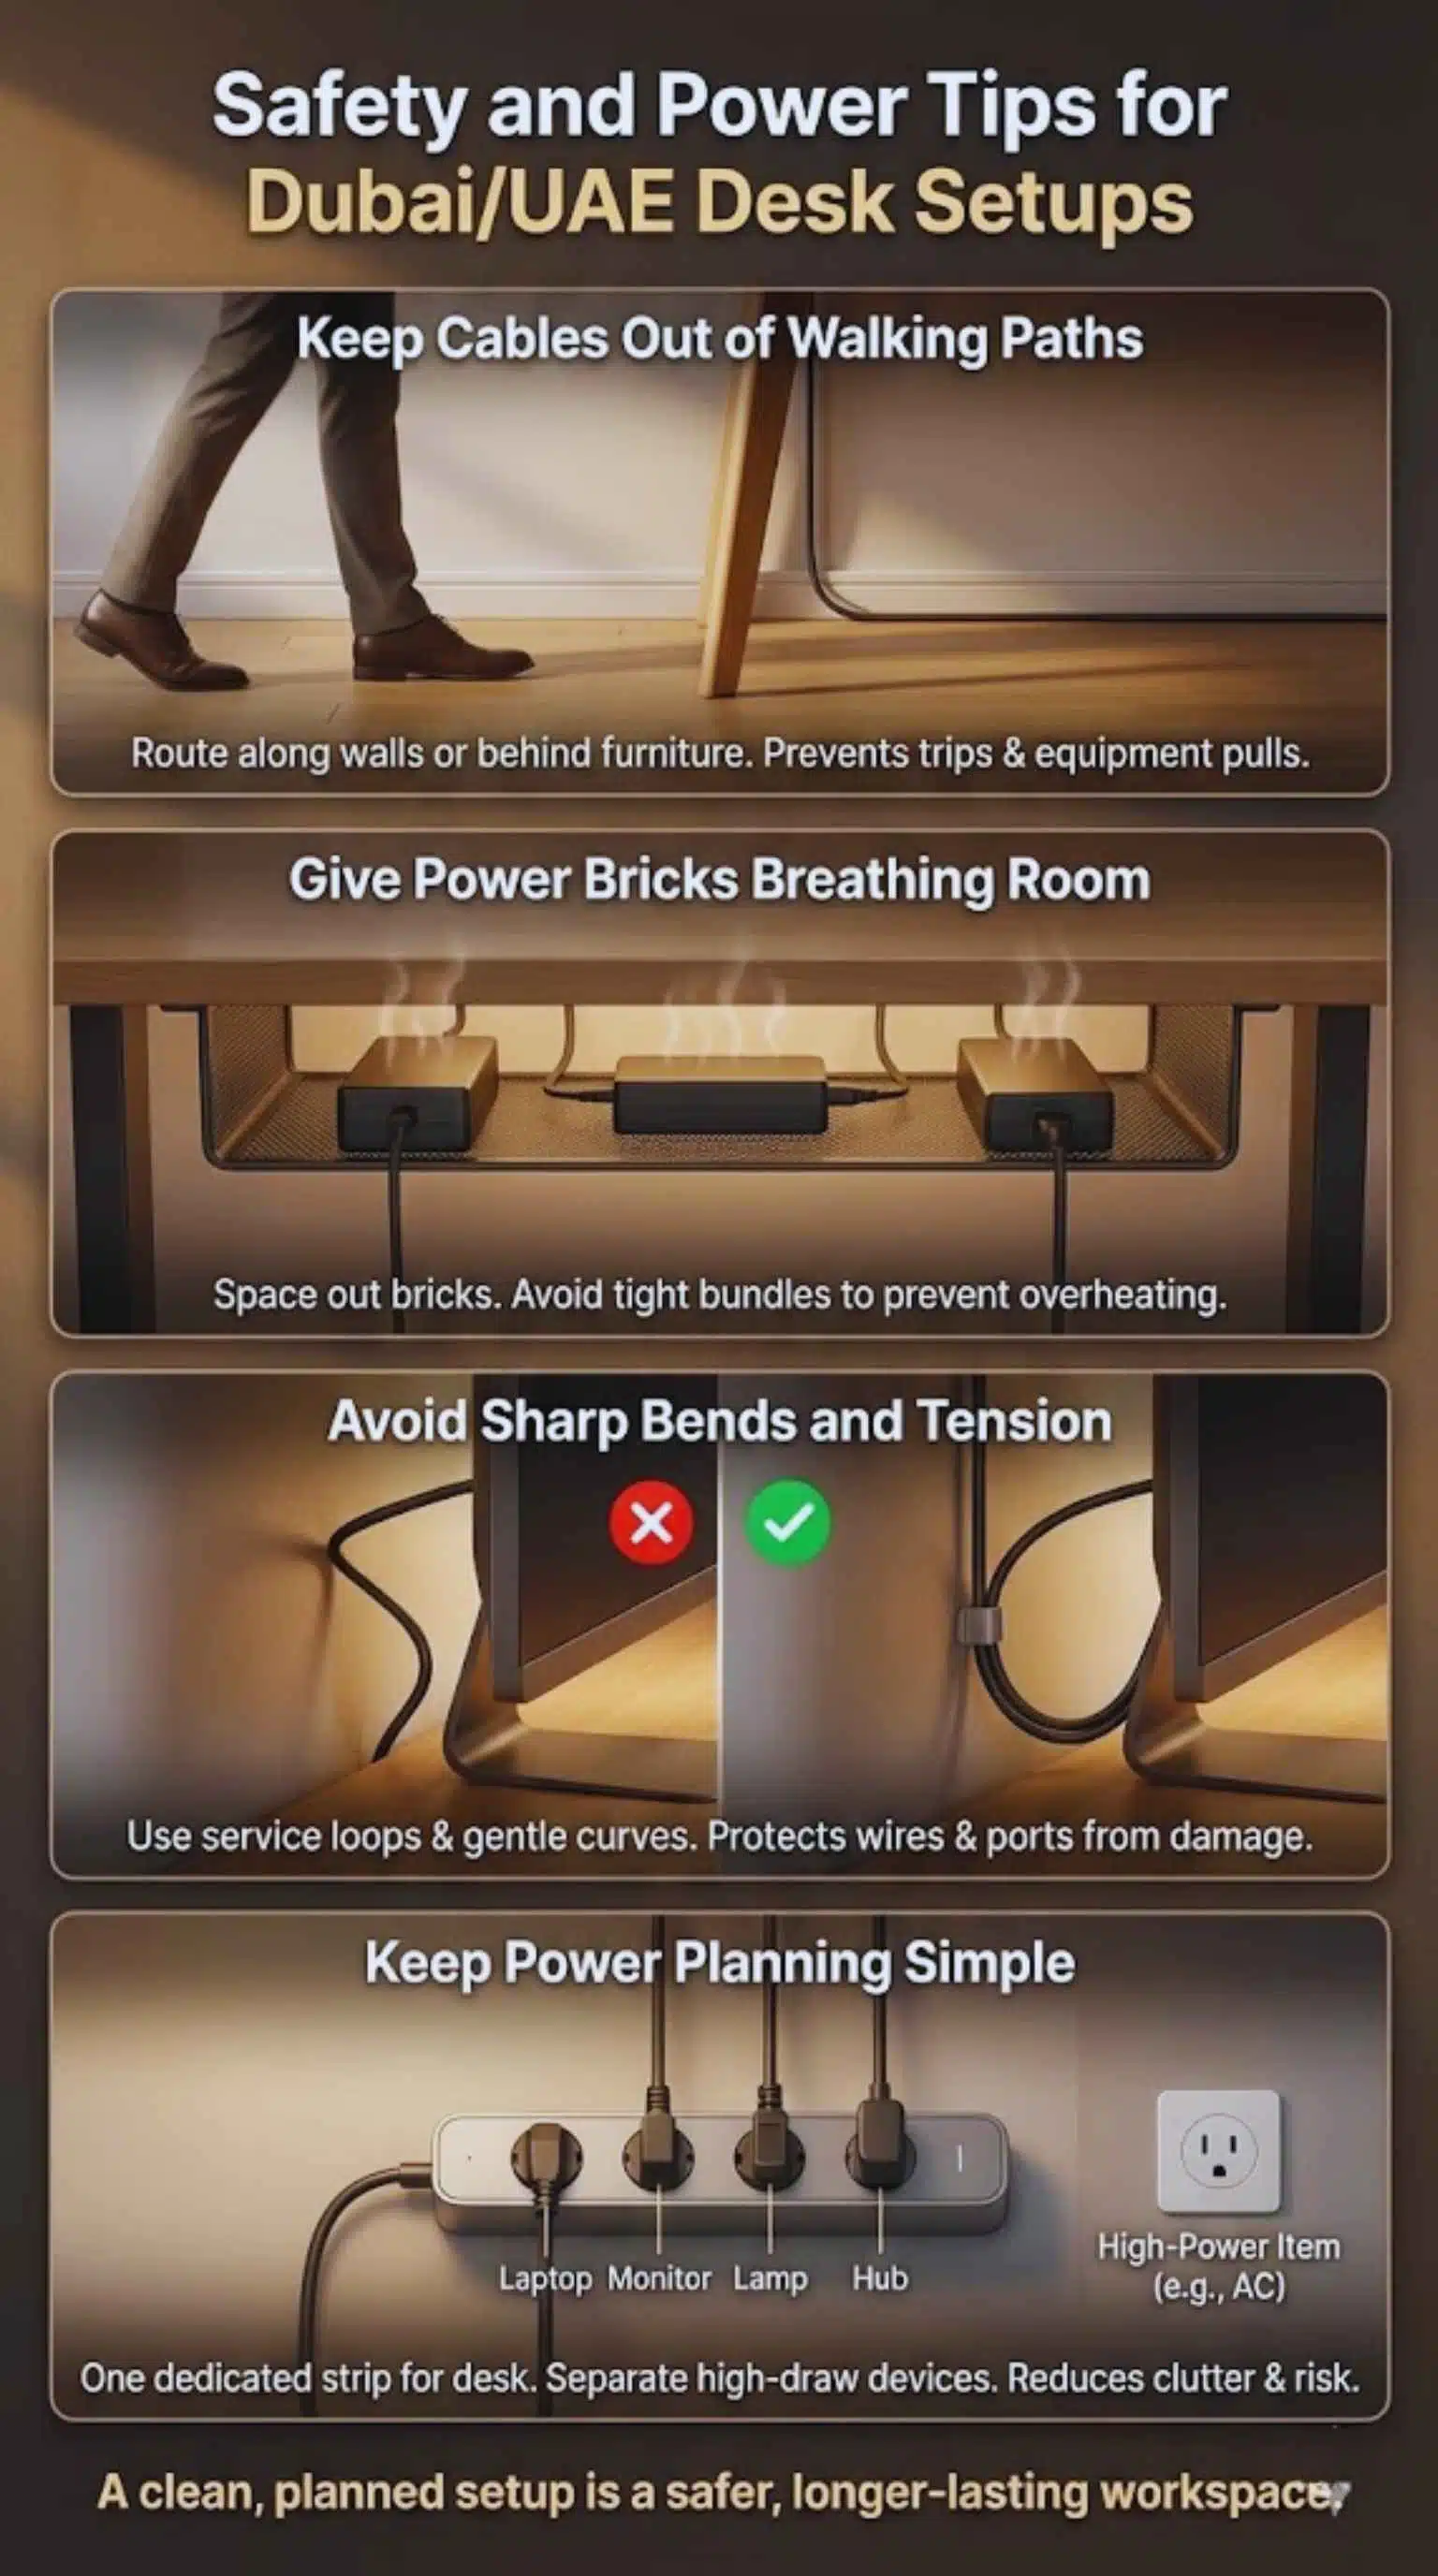
A clean desk should also be a safe desk. Loose cables can trip people, snag chairs, and pull equipment off the desk. Power bricks can heat up, especially if packed tightly with no airflow. Bad routing can also damage cables over time, which creates connection problems and replacement costs. This section focuses on practical habits that reduce risk without making your setup complicated.
Safety-first setup rules
| Risk | What causes it | What to do |
| Trips | Cables across walking paths | Use wall routing, raceways, or route behind furniture |
| Heat buildup | Bricks packed tightly | Give space, avoid tight piles, keep airflow |
| Cable damage | Sharp bends and tension | Use service loops and strain relief |
| Confusion | Unlabeled cables | Label both ends |
| Overload | Too many high-draw devices | Spread load, avoid daisy-chaining strips |
A clean desk is also a safer desk.
Keep cables out of walking paths
This is a safety rule first, not a style rule. Cables across paths get stepped on. They also pull devices off desks if someone trips. Even one loose line can cause trouble. Routing along walls looks better too. Always plan your cable route like you plan furniture flow.
If you ever walk between your desk and the door, do not run loose cables across that path. Route cables:
- Along the wall
- Behind furniture
- Under the desk frame
Give power bricks breathing room
Power bricks can get warm during use. Heat plus tight packing is not a good combo. A messy brick pile also makes troubleshooting harder. When bricks are spaced out, you can unplug the right one quickly. This also keeps your under-desk area cleaner. Think of it like giving devices room to breathe.
Power adapters can get warm during use. Avoid packing many bricks in a tight bundle with no space.
Better:
- Use a tray or box with space
- Place bricks side by side, not stacked tightly
- Do not cover bricks with fabric or thick materials
Avoid sharp bends and tension
Many cables fail near the ends. Tight bends stress the wires inside. Tension can also damage ports over time. A gentle curve is always better. Clips and service loops solve this easily. This also keeps your setup looking neat because cables sit naturally.
Common damage points:
- Behind monitors
- At the edge of the desk
- Where cables drop down the leg
Fix:
- Use a gentle curve, not a tight bend
- Add a small service loop for movement
- Clip cables so they do not hang by the connector
Keep power planning simple
Power planning reduces clutter and risk. A desk should have a clear power “center.” When power is scattered, cables multiply. One dedicated desk strip is easier to manage. It also helps if you travel or move the desk later. Keep it simple so it stays stable.
If you have many devices, consider:
- One power strip dedicated to the desk only
- One “always on” outlet for router/modem (if near desk)
- A separate strip for high-power items (where appropriate)
Cable-management setups by desk type
Different desks need different strategies. A laptop-only desk does not need the same approach as a dual-monitor creator setup. Rental apartments also require different choices than permanent home offices. This section gives ready-to-copy layouts so you do not have to guess. Choose the desk type that matches your space and follow the matching combo. Once you copy a layout, you can refine it later.
Table: Copy-and-paste layouts
| Setup type | Best combo | What it looks like |
| Small home desk | Clips + Velcro + labels | 1–2 visible cables |
| Rental apartment | Cable box + sleeve + clips | Hidden strip, one trunk |
| Corporate workstation | Tray + labels + standard lengths | Easy maintenance |
| Creator/gaming | Tray + sleeve + lanes | Organized, flexible |
| Sit-stand | Tray + sleeve + slack plan | Moves without tugging |
Small home desk (laptop only)
This setup is about speed and simplicity. It is perfect for students and remote workers. It also works on compact apartment desks. The goal is a clean surface, not a complex system. You keep only what you use daily visible. Everything else stays tucked away.
Goal: minimal spending, maximum impact.
Do this:
- Clip a phone charging cable to the desk edge
- Bundle the laptop charger slack with Velcro
- Label the charger and any hub cable
- Keep everything else in a small tray or drawer
Rental apartment setup (no drilling)
Rentals need flexible solutions. You want clean cable paths without damage. A cable box and sleeve do most of the work. Clips handle the daily-use cables. Labels help when you move. This is a strong approach for desk cable management in dubai renters.
Goal: hide the strip and keep one clean drop.
Do this:
- Put power strip + bricks in a cable management box
- Use a cable sleeve for the trunk leaving the desk
- Use clips for daily cables
- Label both ends so moving later is easy
Corporate workstation setup
Office desks must be easy to support and repair. A neat setup saves time for everyone. Labels reduce mistakes during swaps. Standard lengths keep desks consistent. Trays keep the floor clear for cleaning crews. This layout also looks professional for visitors and clients.
Goal: consistent and maintainable.
Do this:
- Under-desk tray for strip and bricks
- Labels on both ends of every cable
- Standard cable lengths (avoid messy extra-long cables)
- One main trunk, routed away from walkways
Creator or gaming setup
Creator desks change often. New gear gets added all the time. That is why structure matters even more here. Separate bundles keep things flexible. A swap lane helps you plug in devices fast. Extra labels prevent confusion when ports are full. Done right, the desk stays clean even with lots of gear.
Goal: flexibility without chaos.
Do this:
- Separate bundles: power vs data vs display
- One “swap lane” for devices you plug often (camera, mic, drives)
- Extra labels for USB devices
- Keep spare cables coiled and stored, not draped on the desk
Sit-stand desk setup
Sit-stand desks need movement planning. If you ignore slack, cables tug and pull. That can damage ports and create mess again. A sleeve trunk keeps movement controlled. Anchor points stop cables from swinging. This setup stays neat even when you change desk height daily.
Goal: movement without pulling cables.
Do this:
- Leave controlled slack for the full height range
- Use a sleeve trunk and anchor points under the desk
- Avoid heavy bricks hanging; keep them secured in a tray
- Test the desk movement slowly after setup
Common mistakes that ruin a clean desk
Most cable management fails for simple reasons, not complex ones. People over-bundle everything, hide cables so well they become annoying to use, or create a tight “brick pile” that becomes messy again. Others forget labeling and then dread changing anything. The good news is that these mistakes are easy to fix once you know what they look like. Use this section as your “avoid list” while you set up.
Mistakes and quick fixes
| Mistake | What it causes | Quick fix |
| Bundling everything into one thick rope | Looks bulky, hard to edit | Use smaller bundles by purpose |
| Too much slack everywhere | Hanging clutter | Store slack in tray/box |
| Power strip on floor | Dust, kicks, mess | Mount, tray, or box |
| No cable labels | Slow troubleshooting | Label both ends |
| Daily cables hidden | Annoying to use | Create a desktop cable lane |
| Tight bends behind monitor | Cable wear | Use clips and gentle curves |
These are the biggest traps people fall into.
Mistake 1: One giant bundle
A thick bundle feels organized, but it often looks worse. It becomes hard to route cleanly. It also makes it harder to replace one cable later. Smaller bundles bend more naturally. They also hide more easily behind a desk edge. Keep it simple and modular.
A thick bundle is hard to bend, hard to hide, and hard to edit.
Better:
- Two to four smaller bundles
- Clear separation between display, power, and data
Mistake 2: Hiding cables but making them unusable
A tidy desk should still feel easy to use. If charging becomes annoying, the mess returns. This mistake happens when everything is tucked away with no access plan. Daily cables need a visible, controlled place. Convenience is part of good cable management. Build a system that matches your habits.
Cable management should not reduce convenience.
If you charge your phone daily:
- The cable should be clipped and easy to grab
- It should not be buried under the desk
Mistake 3: Creating a “brick pile”
Brick piles happen when you rush. They also happen when there is no tray or box. Piles look messy and feel stressful. They can also strain sockets because bricks pull in odd directions. Spacing and securing bricks solves this fast. Treat the under-desk zone like a small shelf, not a dump area.
This happens when you shove everything into one space.
Fix:
- Use a tray
- Spread bricks out
- Secure them so they do not swing or press together
Mistake 4: No plan for cleaningx
Dust and clutter love cable mess. If cleaning is hard, you avoid it. Then the desk starts to look bad again. A clean desk needs easy access paths. Floor cables block vacuuming and wiping. Trays and wall routing keep floors open. Make cleaning part of the plan, not an afterthought.
Dust builds up under desks. If cables block cleaning, the mess returns.
Fix:
- Keep floor clear when possible
- Use trays and wall routing
- Leave access paths so you can vacuum or wipe easily
Pro-looking desk photo checklist (final pass)
This section is your final polish step. It helps you spot the small details that make a desk look “finished.” The difference between tidy and professional is usually consistency: one trunk, parallel lines, and zero random slack hanging down. This checklist also helps if you want to record videos, take Zoom calls, or post desk photos. Run it once after setup, then use it as a quick monthly check.
The “showroom” rules
| Rule | Target |
| Visible cables on desktop | 0–2 max |
| Main cable drops | 1 clean trunk |
| Power strip visibility | Hidden (tray/box) |
| Slack | Stored, not hanging |
| Cable directions | Parallel lines, neat corners |
| Labels | Hidden but present |
If you want your desk to look professional from any angle, follow these visual rules.
The “one visible drop” rule
This rule is simple and powerful. It makes a desk look planned. It also hides most cable clutter automatically. When people see many drops, they see mess. When they see one drop, they see order. This is the fastest way to get a pro look.
Most pro setups have one visible cable trunk dropping down.
How to achieve it:
- Combine cables with a sleeve
- Route the sleeve down one desk leg
- Keep everything else under the desk
The “parallel lines” trick
Messy routing looks random and stressful. Parallel routing looks calm and clean. This is why offices look neat even with many devices. Clips make parallel lines easy. Clean turns also protect cables from bending. Your desk will look better in real life and on camera.
Random cable directions look messy.
Do this:
- Route cables along edges
- Use clips to guide them
- Make turns at clean angles
The final 10-minute sweep
This is your finishing move. It locks in the clean look. It also removes dust and small clutter. You can do this before meetings. You can also do it every Friday. The desk will always feel “ready.”
- Put daily cables into the lane
- Tighten loose Velcro ties
- Tuck slack into the tray/box
- Align the trunk
- Wipe the desktop and the floor area
Takeaways
A clean setup is not about hiding every wire. It is about building a simple system that stays practical: sort cables by purpose, hide the power and slack under the desk, and keep daily cables easy to reach. When you do this, the desk feels calmer and works better every day. The biggest visual win is usually one clean cable trunk and a hidden “engine room” under the desk. After that, labeling and a quick weekly reset keep everything from slipping back into chaos. If you want a setup that stays sharp long-term, keep your rules simple and repeatable.
With these steps, desk cable management in dubai becomes easier to maintain, safer to move around, and more professional-looking whether you work from a small apartment desk or a full office workstation.
FAQs
What is the easiest first step for desk cable management in Dubai?
Do a full unplug-and-reset, then set up a daily cable lane with clips. This gives fast results with minimal cost.
How can I hide a power strip without drilling?
Use a cable management box. Store the strip and slack inside, then route only the required cables out. Add clips to prevent cables from dropping behind the desk.
Is an under-desk tray really worth it?
Yes if you have multiple power bricks, a docking station, or more than one monitor. A tray hides the ugly zone and makes the desk look “finished.”
What if my desk is far from the wall outlet?
Use a raceway along the baseboard or route a sleeve trunk down a desk leg and along the wall. Avoid running cables across open walking paths.
How do I keep cable management neat on a sit-stand desk?
Plan slack for the full height range. Anchor cables under the desk. Use a sleeve trunk, and keep heavy bricks secured in a tray rather than hanging.
How often should I redo my cable management?
You do not need a full redo often. Do a 5-minute weekly reset, and a deeper check once a month to re-label, replace worn cables, and re-tighten bundles.