
Trace on Cool Math Games is a free, browser-based escape room experience comparable to Escape Simulator and the Room. You must make your way out of an undisclosed location from which you begin.
You’ll find a few items and hints in your inventory; to proceed, you’ll need to acquire additional items and overcome obstacles. You can find the necessary solutions and instructions here and learn how to solve Trace on Cool Math Games.
How to Solve Trace on Cool Math Games
On Cool Math Games, here’s a guide to escaping Trace. We go over the game room by room, so feel free to skip ahead to wherever you’re stuck in Trace.
The Washroom
First, you need to get the half-pair of scissors in this sink. After that, type 5472 into the safe behind the picture instead of looking around for the combination numbers to get out of the room. This will show you a lightbulb, which you should put inside a pumpkin in the cabinet to the left of the toilet. Under the sink, in the other cabinet, there is a red tile with a key on it. This key opens a sliding puzzle on the bathroom door.
Move the puzzle pieces around to ensure that every one of the yellow and green pieces is on the right side of the puzzle. Move the red piece over the green lock square to open the door and leave the first room.
The House
Discover the metal star beneath the couch, a battery, and an ogre figurine near the plant. Bring a blue tin horse and the other metal star stuck to the painting with you. Open the cabinet under the window and arrange the puzzle inside in a low, high, middle, high middle pattern. When you press the button, a broken metal table appears, which you should also take.
Return to the bathroom by walking down the hall and retrieving the tin horse. It can be applied to the image in front of the window. And move the horse’s neck around until it matches the maze you’ll see. To obtain the final piece for your broken metal tablet, press the button on the giraffe.
Finally, activate the tall artwork in front of the stall entrance. A red button can be found on the puzzle if the metal tablet is matched to it. Press the following sequence of red buttons located throughout the room:
The button on the fish tank
Fan of the shell.
The button on the computer
In the plant puzzle box
Behind the puzzle’s painting
Finally, on the small grey box
If you do everything correctly, the box will open, revealing a green knife and key. To open the patio door, use this key.
The Small Patio
Keep any items you find (such as the vampire figure and the metal star) in your inventory. Set up the black cubes in the following order: left to right, top to bottom, hanging, tall pot, tall plant, and finally, painting. Press the red button to receive a metal star. Please return to the giraffe puzzle window and complete it again to obtain another battery. You will also notice a metal star beside the mini piano.
The metal star can be found beneath a table in the patio area, so return there next. There are also six jigsaw puzzle pieces here, with one missing that requires you to return inside. You can solve a heart-shaped puzzle of black and red pieces using your knife on the carpet.
You can now decorate your heart-shaped lamps with arrows by inserting batteries. Click the button to reveal a puzzle piece and submarine, which both go into the fish tank and use the black hearts to point in the correct direction.
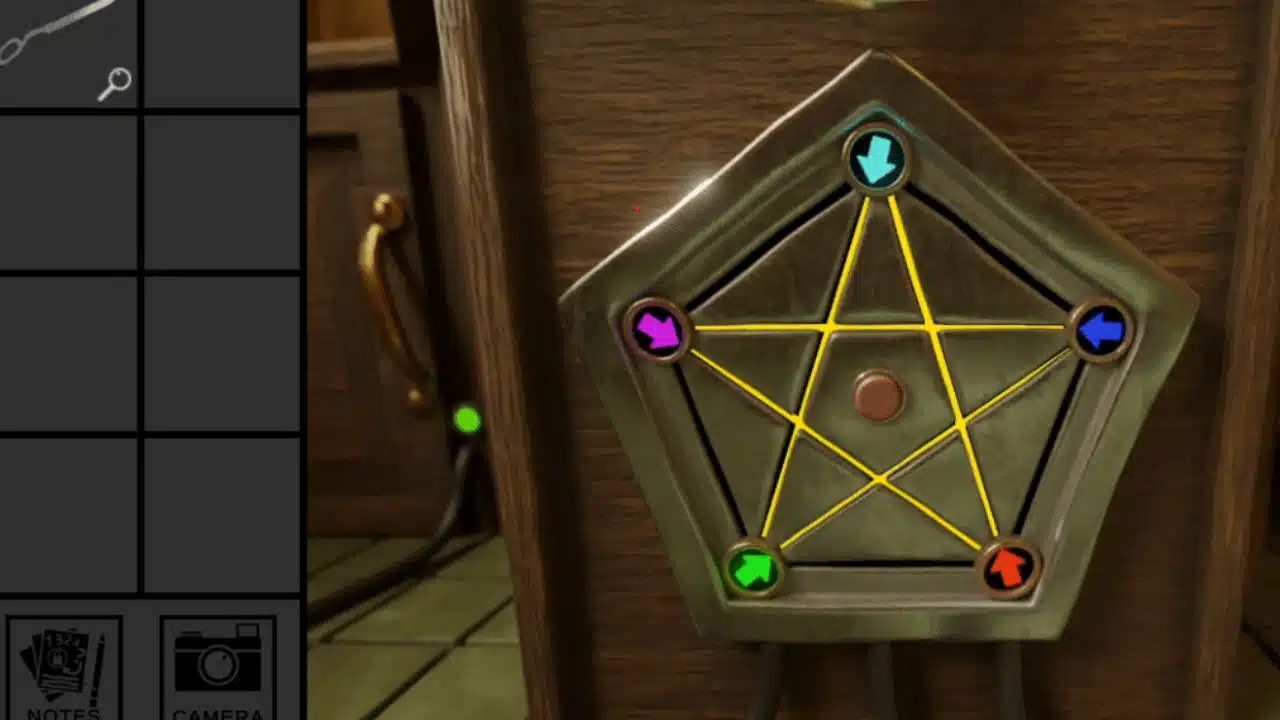
You can get a pentagon key behind a panel on the couch’s side if you use your utility knife to open the panel. To access the computer, correctly enter 9, 2, and 3. After the computer booms, use the submarine by clicking on the water bowl. The code it gives you is 26336 6161.
Related Read: Best Idle RPG Games for Android
The Tower
A panel on the locked door will unlock once you enter this code. After using your final star, please return to your computer. After receiving instructions, the fish tank’s drawers must be opened and closed in the following order: X O X O. To solve the hearts puzzle, you need a magnet, which you can get from the U drawer.
Like in Sudoku, you need to return to the panel and place the stars so that no two are adjacent and no row or column contains more than one. You may now enter the tower as the door has been unlocked. Step inside, and your eyes will immediately be drawn to the tiny table holding the red flowers.
Above the table, there’s yet another sliding puzzle. Ensure the buttons are set to the down arrow, s, jagged line, d, and x positions. An additional figure, a phoenix, can be removed using the umbrella’s key, revealing a passage through the wall. Take the robot you find dangling from a wire in the tower and head upstairs. If you look out the window near the base of the stairs, you’ll see the words “CABBAGE FACED” written there.
Use the key you found to open the umbrella on the front porch. An image appears on the porch swing when the umbrella is opened. In addition to snapping a photo of this scene, you should also go outside and attach the robot to the end of a kite string. Afterward, return to that little piano you saw earlier and play the keys in the sequence corresponding to the hidden message you discovered: CABBAGE FACED.
If you’re feeling stuck on the puzzle, taking a short mental break can help. Play Free Spider Solitaire Card Games Online to clear your mind before returning to the challenge. You can look it up online if you are unfamiliar with the piano’s note order. Once you’ve done that, the piano will reveal a robotic arm inside. Return to the original computer and attach that arm to the submarine.
The Computer
After logging into the computer, the first step is to use the robot under your command to traverse the bridge and examine a series of symbols. The shapes included in this set are circles, squares, triangles, stars, squares, and circles. You’ll need your submarine to decipher the inverse of the number code you discovered earlier in the game: I DID DEEDS. The next step is to type “I DID DEEDS” into the machine in the flower table drawer.
You can return to the tower’s main room through the door, where you’ll find the dragon figure it gave you. You should go to the far wall and use the pinboard to recreate your drawing on the porch chair in the previous section.
If you turn off the lights in the eight-line puzzle in the following sequence (12356784), you’ll see an image of a stone plinth again. Place each of your four figurines on the appropriate plinth below. Comparatively, the phoenix is associated with fire and wings, while the vampire is associated with bat wings and fangs.
The plinth should be centered around the dragon. After completing this task, you will receive a screwdriver as a reward. Once you have the symbols, head back up to the tower’s upper level and use them on the bridge you saw through the robot’s eyes.
Related Read: Slope Unblocked Game- The Best in 2024
How to Solve Trace on Cool Math Games: The Final Part
The final step is the most challenging of the three. Remove the metal panel from the fan’s shelf using your screwdriver. The six symbols read “password” and appear as “0-|-“. With that code, you can access the computer’s Tower section. After that, you’ll also have access to the full version of Mathemagic. When you’re done, you’ll know which signs denote which mathematical signs.
With this, you can get into the safe below and retrieve the sequel to Adventures of a Wayward Cosmonaut. Don’t forget the launch year of 2793 and the colors of the planets visited in each book. Take a screenshot of the image displayed by the machine upstairs after entering this 4-digit number, and then return to the pyramid shape outside the window.
The pyramid will open, and a key will fall out if you press only the triangle points shown in your screenshot. This key and your pentagon key will unlock the toilet’s lid, revealing a passageway to freedom. You’ve done well, evader.