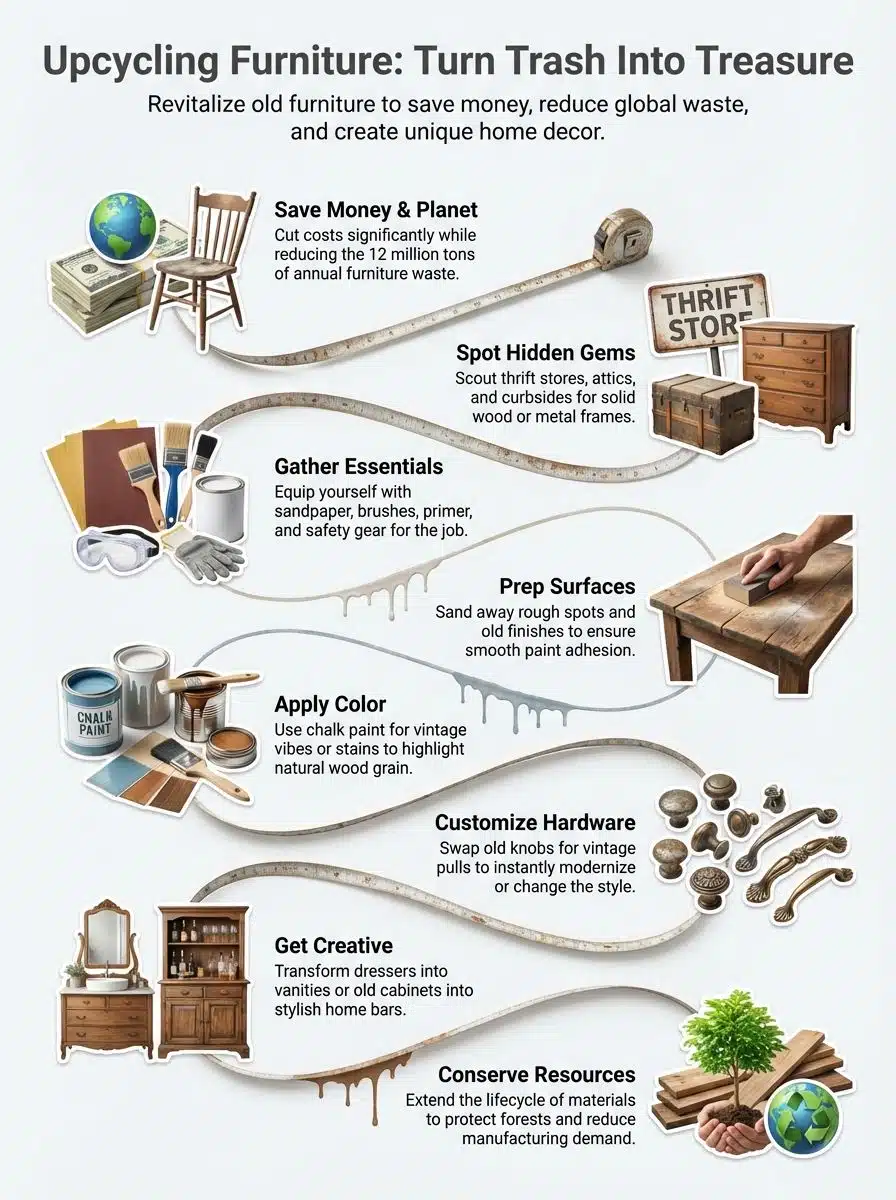
Your old furniture might be gathering dust, stuffed in the garage, or sitting curbside for trash day. Maybe your table has scratches, or a chair is missing a leg. These pieces often feel like junk, yet buying new costs money and wastes materials. Did you know Upcycling Furniture: Turning Trash Into Treasure is easier than you think? Many people now reuse old items to save money, get creative with home decor, and help our planet breathe easier.
In this guide, I’ll walk you through practical ways to give tired chairs and tables fresh life by repurposing what you have. I’ll show you the exact steps I use to see that “junk” in a whole new light.
What is Upcycling Furniture?
From the basics you just read, let’s talk about what furniture upcycling really means. Upcycling is the process of taking old, worn-out items and turning them into something fresh and useful again. Instead of tossing a scratched side table or battered chair, you use creativity to give these pieces a new function or look.
Old doors become desks. Broken dressers find work as bathroom vanities. Some folks use salvaged materials for stylish home decor, like shelves or wall art. With a bit of sanding, painting, or even adding new handles, anyone can do a simple DIY makeover at home.
The Core Difference: Recycling breaks materials down (like melting plastic). Upcycling keeps the form but upgrades the value. It fits perfectly with restoration strategies that save money and cut waste.
Upcycling fits well with recycling and restoration principles. It saves money while making rooms look great with eco-friendly choices.
Benefits of Upcycling Furniture
Upcycling old chairs or tables can spark your imagination and stretch your budget. Give worn-out pieces a fresh spin, and add a dash of personality to any room in the house.
Reduces waste and promotes sustainability
Old chairs, tables, and dressers often end up in landfills. Giving these pieces a new life helps cut down on waste significantly. According to the EPA, Americans toss over 12 million tons of furniture and furnishings every year. That is a staggering amount of wood and metal going to waste.
Instead of sending them to a dump, creative reuse keeps these items out of the trash heap. Recycling and repurposing old furniture saves trees because fewer new pieces need to be built from fresh wood. Using salvaged materials means less energy goes into making brand-new goods.
Every small step makes our planet greener. DIY projects also help protect wildlife habitats by lowering demand for raw resources like wood or metal that come from nature’s backyard.
Saves money compared to buying new furniture
Buying new furniture costs a lot of money. Upcycling saves you from spending big bucks. You can find old dressers or chairs at garage sales, thrift stores, or even left on the curb for free. Restoration projects often use simple tools like brushes, screws, and stains, which are much cheaper than buying all-new pieces.
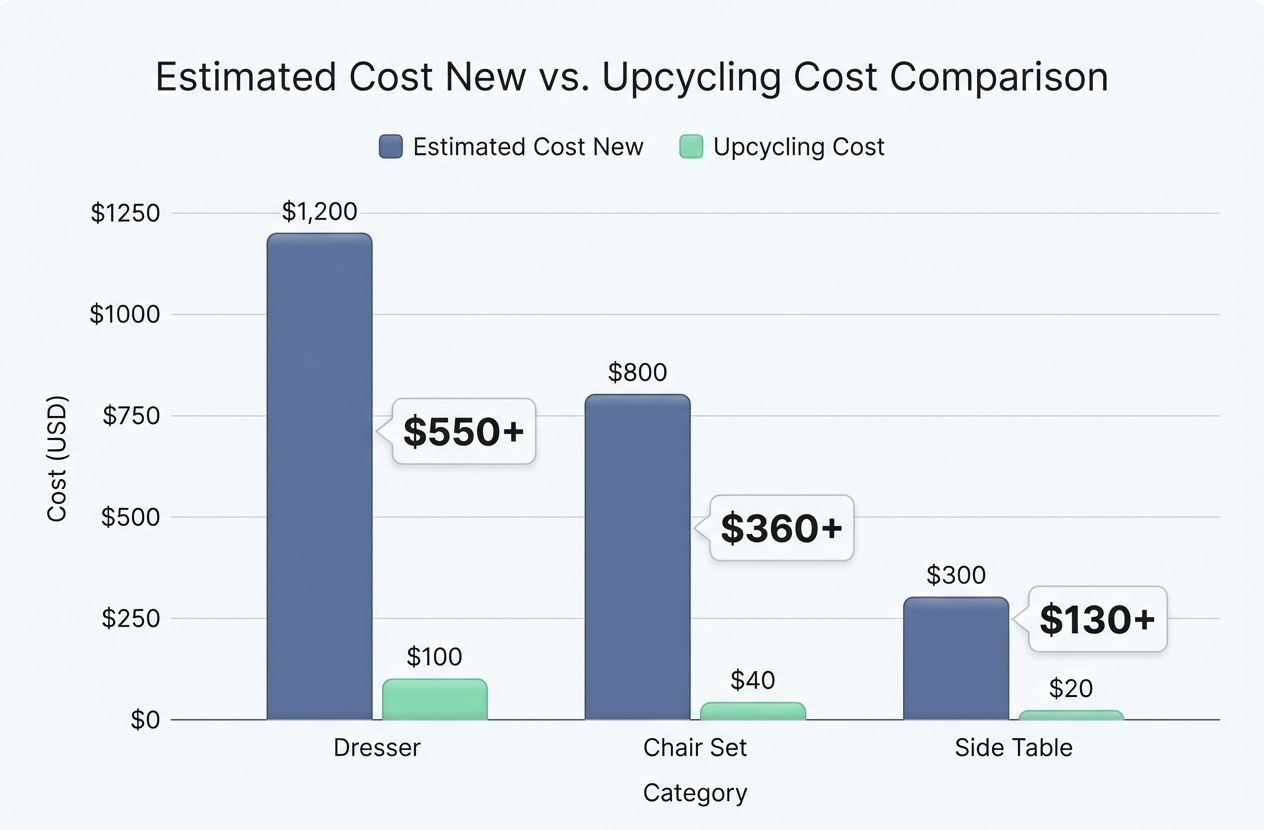
Here is a quick look at the potential savings when you choose to DIY:
| Item | Estimated Cost New | Estimated Upcycling Cost | Total Savings |
|---|---|---|---|
| Solid Wood Dresser | $600 – $1,200 | $50 – $100 (Paint & Hardware) | $550+ |
| Dining Chair Set (4) | $400 – $800 | $40 (Fabric & Staples) | $360+ |
| Side Table | $150 – $300 | $20 (Sandpaper & Stain) | $130+ |
That is real savings right there. Your wallet will thank you every time you skip that trip to the fancy store!
Encourages creativity and personalization
Upcycling furniture turns old pieces into works of art. You get to pick your own colors, stencils, or even new handles. Want a red dresser with funny cat knobs? Go ahead. No one will stop you.
Current trends for 2026 favor “Raw & Refined” looks, where you sand back wood to reveal its natural grain, or “Sculptural Silhouettes” that add wavy, scalloped trim to boxy edges. People have turned battered tables into painted LEGO play stations or added comic book pages to cabinet doors. It is all DIY magic.
Swapping parts, adding decals, or using salvaged materials gives each project its own twist. Every brush stroke shows your personality and style in home decor. Creative reuse lets kids join too. Paint together on weekends and laugh at the mess as much as the results.
Preserves the sentimental value of old pieces
Grandpa’s rocking chair or Mom’s old dresser holds memories you just can’t buy at a store. Taking on a furniture makeover breathes fresh life into these special items. Instead of sending them to the landfill, restore them with some sanding, painting, or creative reuse.
Salvaged materials keep family stories alive and fill your home with warmth. Passing down that repurposed table keeps tradition ticking in your house. Kids see how “trash” becomes treasure through hands-on crafting and DIY projects. Old pieces get a new purpose while keeping their heart and history close by.
How to Get Started with Upcycling Furniture
Start with something old that catches your eye, maybe a chair or table waiting for a second chance. Gather what you need, roll up your sleeves, and let your imagination lead the way.
Identify pieces with potential
Check your attic, a thrift store like Goodwill or Habitat for Humanity ReStore, or even sidewalks on trash day. Old wooden chairs, dressers with worn paint, and sturdy tables are goldmines for upcycling furniture projects. Drawers that stick can be fixed. Scratches and dents add character.
Look for solid frames made from wood or metal. Avoid anything falling apart or covered in mold. A pro-tip for spotting quality is to look for dovetail joints in drawers, which look like interlocking puzzle pieces. This usually means the piece is solid wood and worth saving. Trust your gut. If a piece feels heavy and strong, it could become tomorrow’s star in your home decor makeover.
Gather the right tools and materials
You don’t need a professional workshop to start. A few key items will get you through most projects. Start with these essentials:
- Cleaning Agents: TSP (Trisodium Phosphate) or a degreaser to remove years of grime.
- Sanding Gear: An orbital sander for big areas and sanding blocks (120 and 220 grit) for details.
- Safety First: An N95 dust mask for sanding and safety glasses.
- Priming Power: A high-quality primer like Zinsser BIN. This shellac-based primer sticks to almost anything, including laminate and glossy finishes.
- Application Tools: Synthetic bristle brushes for paint and lint-free rags for staining.
Pick eco-friendly supplies whenever you can. It keeps your project green. Salvaged materials like vintage knobs or reclaimed wood add character to your furniture makeover. A tape measure helps things fit just right before cutting anything down to size.
Learn basic techniques like sanding, painting, and staining
Grab some sandpaper and rub it over rough spots. This helps old paint and sharp edges disappear. Even if a paint label says “no prep needed,” I always recommend a “scuff sand.” This means lightly sanding the surface just enough to give the new paint something to grip. It stops chips later on.
Pick bright or soft colors for painting, as this gives new life to tired wood. Choose water-based paints if you want easy cleanup. For a smooth, modern finish, many professionals now use Fusion Mineral Paint because it has a built-in topcoat. For a rustic, distressed vibe, Chalk Paint is still the king.
Try staining with a brush or rag so the wood grain shows through. It can make salvaged materials look rich and warm again. Paint dries fast in warm weather, but stain can take hours. Be patient for the best results! Upcycling furniture is simple if you use these DIY tricks to refresh home decor.
Upcycling Ideas for Different Furniture Types
You can turn old furniture into fresh, fun pieces that stand out in any room. Explore fresh ways to give tired tables, beat-up dressers, or battered chairs a new lease on life.
Transform a dresser into a sink vanity
Old dressers make great sink vanities. Start by finding a dresser that fits your bathroom space. Remove the top drawers to allow room for plumbing pipes. Cut holes in the back of the dresser for water lines and drains.
Use salvaged materials, like tile or stone, to create a new countertop if you want extra style points. Seal any wood surfaces with waterproof paint or stain so splashes do not ruin your hard work.
Waterproofing Tip: Bathrooms are humid. Apply at least three coats of a marine-grade spar varnish or a high-quality polyurethane to seal the wood against moisture. Don’t skip the feet!
Install the sink and faucet next. Finish by attaching handles or knobs that match your home decor vibe. This eco-friendly project helps keep good furniture out of landfills while adding real charm to your DIY bathroom makeover.
Convert an old cabinet into a bar
Just as a dresser can become a bathroom sink vanity, an unused cabinet can shine as your home’s new bar. Wipe it clean first, then remove any shelves you don’t want. A fresh coat of paint or stain creates instant charm and hides scratches.
Add racks for glasses using simple hooks or rails from the hardware store. Install wine bottle holders where needed. Sometimes a single shelf does the trick. Store mixers and bottles on lower shelves for easy reach during parties with friends or family nights at home.
Top it off with wireless LED puck lights inside to highlight your stylish DIY transformation. This makes it fit right into your creative reuse journey while saving money and reducing waste.
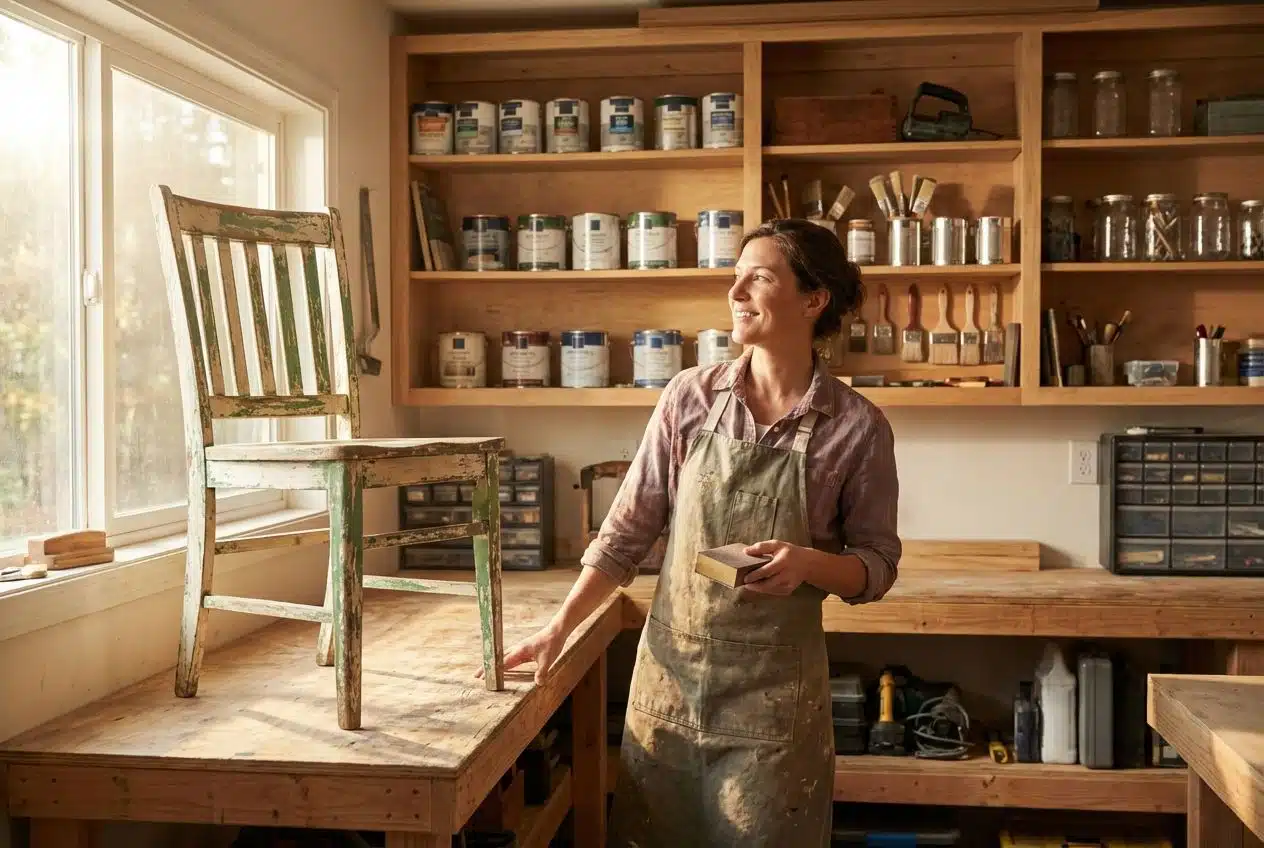
Repaint and redesign side tables
Old side tables get a fresh start with some sandpaper, bright paint, and basic tools. Sand the top to remove old finish or rough spots. Add a primer if needed so colors stay bold. Acrylic paint works well for most wood surfaces.
Try stencils for shapes or patterns that fit your style. Brands like Cricut allow you to cut custom vinyl stencils for personalized designs. Swap out knobs using salvaged materials like glass pulls or metal handles found at thrift shops. A coat of sealant keeps everything looking sharp longer. Upcycling furniture this way adds character and helps make your home decor both eco-friendly and creative.
Use reclaimed wood for shelving
After brushing fresh color onto old side tables, turn your focus toward the shelves next. Reclaimed wood steps into the spotlight here, taking scraps and giving them new life as creative storage.
Grandma’s weathered barn boards or a stack of shipping pallets waiting by the curb can become striking floating shelves. Many people use salvaged materials, making each shelf a conversation starter in any room.
Sand rough edges smooth, then add paint or stain if you like a cleaner style. Keep scars and marks for rustic charm if that suits your taste. Add sturdy brackets from a hardware store or repurpose leftover metal parts from old furniture makeovers to hold up these eco-friendly shelves safely. You will save cash compared to buying new shelving and also help reduce landfill waste with this simple bit of DIY handiwork on your walls.
Advanced Upcycling Techniques
Feeling bold? Try advanced methods that add flair and function, giving your old find a second chance to shine. Some tricks turn plain pieces into true head-turners.
Powder coating metal furniture
Powder coating covers metal furniture with a tough, colorful finish. This method uses dry powder and heat instead of regular paint. It sticks better and does not chip or peel easily. Many DIY folks pick this for outdoor benches, old steel chairs, or sturdy shelves.
While you can buy DIY powder coating guns from brands like Eastwood, it requires a dedicated oven that you can’t use for food. For most people, taking your metal patio set to a local professional powder coating shop is the best route. It costs a fraction of buying a new high-end set and lasts for decades.
Adding upholstery to chairs and benches
Adding fabric and padding to old chairs or benches can make them feel brand new. Choose tough fabrics like canvas or denim for busy homes, or use vintage materials for a retro twist.
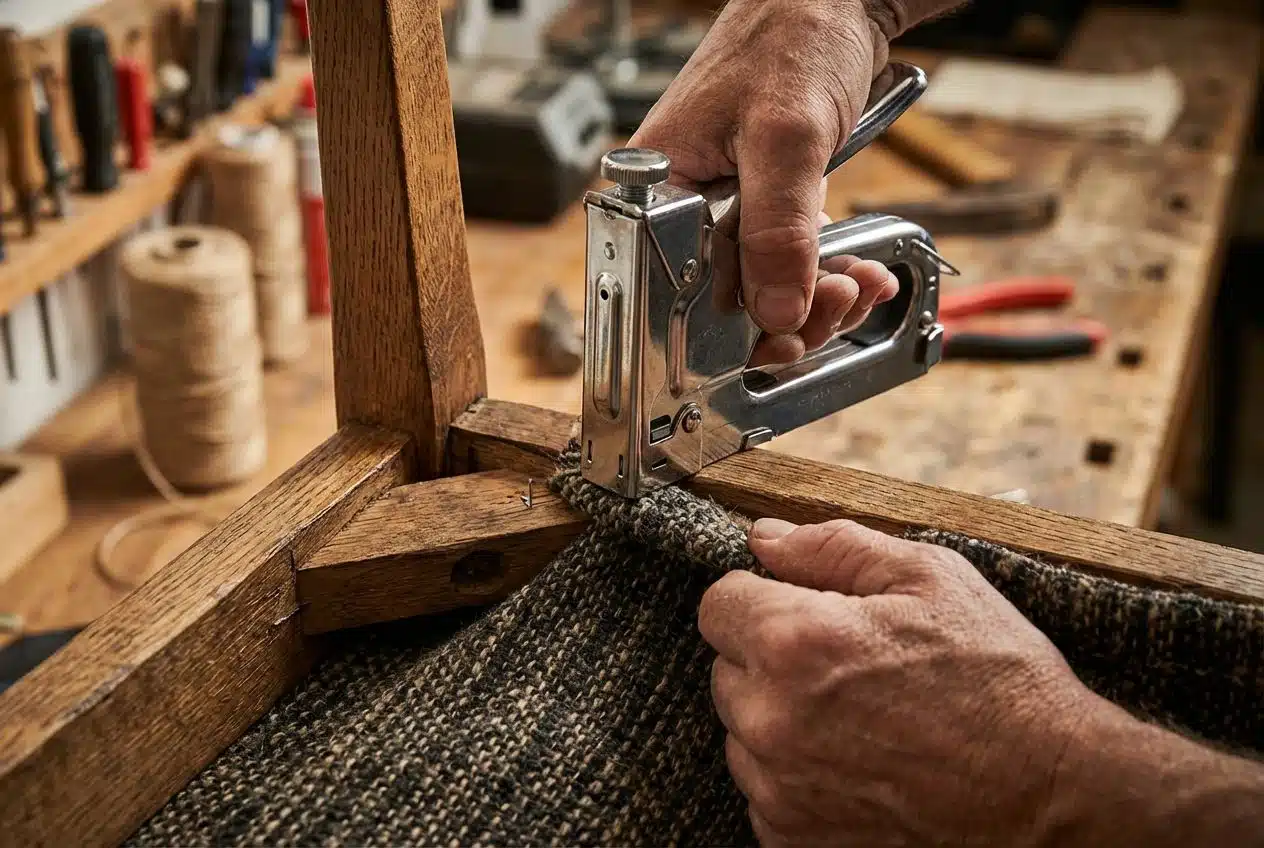
Follow these steps for a simple seat cover:
- Remove the Seat: Unscrew the seat pad from the chair frame.
- Remove Old Fabric: Use pliers or a staple remover to strip the old layer.
- Add New Batting: If the foam is flat, add a layer of polyester batting for comfort.
- Staple and Stretch: Pull your new fabric tight and staple it to the underside, working from the center of each side outward to the corners.
This DIY upgrade saves money versus buying new furniture and keeps good frames out of landfills. Use leftover fabric scraps from other projects to add color and charm.
Creating custom designs with stencils and decals
Stencils and decals turn old furniture into eye-catching pieces with little effort. Grab your favorite stencil, tape it down, then use a sponge or brush to dab on paint. Lift it up, and you get crisp lines every time.
Try bold patterns or gentle florals to match any room style. For an even quicker change, peel-and-stick decals work wonders. Many choose stencils for vintage makeovers or adding fun shapes for kids’ rooms. Decals offer quick results with lots of color choices. Mix both for a creative reuse that pops in your home decor.
Tips for Beginners in Furniture Upcycling
Start with small projects, and let your creativity guide you. Your first try might be messy, but every mistake teaches you something new.
Start with small, simple projects
Pick an old stool, a wooden chair, or even a side table as your first DIY upcycling furniture project. These pieces are easy to carry and do not need fancy tools. Sand the surface with medium-grit sandpaper until it feels smooth. Wipe away all dust using a damp cloth.
Paint or stain gives new life fast. Pick colors that match your home decor style for a fresh look. Add simple knobs or handles if you want more of a change. Mistakes can happen. They give character and charm to salvaged materials. Each try builds skill and confidence in repurposing and recycling something once seen as trash into a treasure for your space.
Experiment with paint and finishes
Small, simple projects help build your skills. Try adding color next using paint or stains. Bright blues, chalky whites, or deep greens can give old pieces a new life. Give an old coffee table some shine with glossy varnish or make it feel soft and matte with chalk paint.
Layer on different finishes for texture. You might sand edges to create a vintage look or use two colors for fun contrast. Water-based paints dry fast and clean up easily, which makes them great for beginners in DIY furniture upcycling. Crafting with salvaged materials opens doors to creative reuse, so do not worry about being perfect.
Don’t be afraid to make mistakes
Mistakes help you learn fast. They show what works and what does not in upcycling furniture or DIY home decor. Messy paint jobs, crooked handles, or odd color choices make great stories.
Even old chairs with chipped edges can bring new ideas for creative reuse and restoration. Salvaged materials are flexible. They leave room to retry a project if something goes sideways. If you get a drip in your paint, just let it dry, sand it smooth with 220-grit paper, and paint over it.
Each slip is part of the process, much like learning to ride a bike. You get better with every project. Happy accidents often lead to cool vintage makeovers nobody else has at home.
The Environmental Impact of Upcycling Furniture
Giving old furniture a new purpose keeps waste out of landfills and helps protect the planet. Keep reading to learn how your next project can do some good!
Reduces landfill waste
Upcycling furniture stops old chairs, tables, and dressers from ending up in local dumps. Each piece you repurpose means less trash polluting the planet. Old sofas and cabinets can sit for decades without breaking down.
Turning scrap wood or broken benches into something new gives these items a second life. Repurposing and restoration keep landfills from filling so fast, while also cutting down on garbage pickup costs for cities. Think of it as saving space at the dump while helping your home look better with DIY skills and creative reuse.
Conserves natural resources
Cutting down landfill waste also means saving precious materials. Each time you repurpose or restore old furniture, you help slow the use of natural resources like trees and metals. That rickety chair might seem useless, but turning it into a new bench saves one more tree from being cut down for fresh wood.
Choosing salvaged materials for your DIY projects keeps forests greener and mountains untouched by mining. Crafting with what you already have gives nature a break. It is better for wildlife, too, since fewer habitats are destroyed to make brand-new products. Small acts add up fast, just like pennies in a piggy bank!
Parting Thoughts
Turning trash into treasure through upcycling furniture helps you save money, cut down on waste, and add your own style at home. Simple steps like sanding and painting can breathe new life into tired chairs or tables, making it easy for anyone to start.
Each project keeps old items out of landfills while letting your creativity shine. For more inspiration or tips, many free guides and videos are just a click away online.
Grab that brush. Turn yesterday’s forgotten finds into tomorrow’s favorites. Your hands hold the magic!