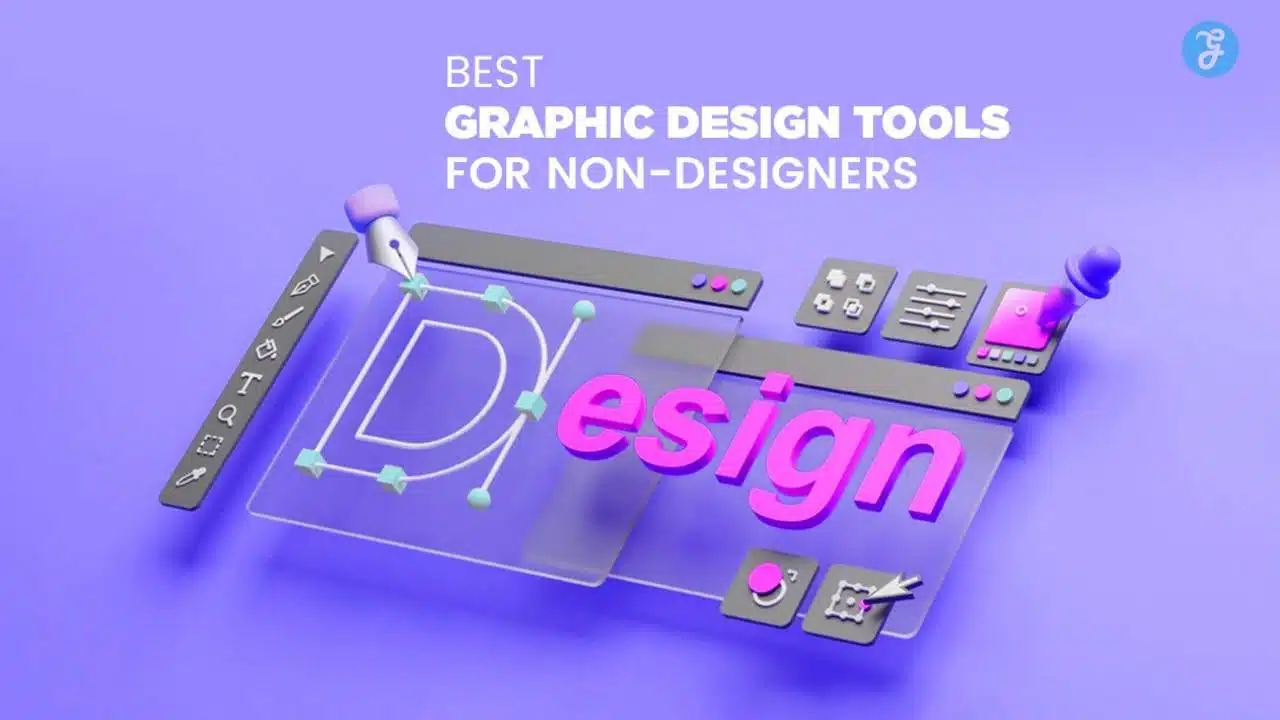
If you are not a designer, creating visuals can feel like a chore. You still need posts, banners, thumbnails, flyers, and presentations that look clean and trustworthy. That is why graphic design tools for non-designers are so useful. They remove the complicated parts and help you build professional-looking designs with templates, drag and drop editing, and smart suggestions.
The goal is not to make you a designer overnight. The goal is to help you communicate clearly and look consistent across your website and social pages. In this guide, you will find tools for quick marketing graphics, photo editing, presentations, infographics, and even logo style vector work. You will also learn how to pick the right tool based on what you create most often.
Quick Summary For Busy Readers
Most people waste time testing random tools and end up frustrated. A faster approach is to match the tool to the job you do every week. Template-first editors are best for daily marketing content because they give you ready sizes for social posts, ads, stories, and banners. Photo-focused tools are better when your work depends on product images, portraits, thumbnails, and fast cleanups.
Data visual tools shine when you need charts, reports, and infographics that explain information in a simple way. Vector tools matter when you want scalable logos and icons that stay sharp everywhere. If you want one simple starting point, begin with one template tool and learn a few basic layout rules. You will make faster progress by building reusable templates than by chasing the “perfect” app.
| Need | Best Tool Type | Why It Helps |
| Social posts, ads, banners | Template editors | Fast layouts, ready sizes, brand kits |
| Thumbnails, product photos | Photo editors | Cleanup tools, background fixes, quick retouching |
| Reports, charts, infographics | Data visual tools | Built-in charts, structured layouts, clear templates |
| Logos, icons, print assets | Vector editors | Scalable exports, sharp edges, professional formats |
| UI mockups and web layouts | UI design tools | Alignment, components, collaboration, clean grids |
How We Chose These Graphic Design Tools?
There are many design apps that look good in ads but feel hard in real use. We focused on tools that help beginners finish projects without getting stuck. That means clear menus, useful templates, and exports that work for real publishing. We also looked for tools that are popular in common workflows, such as social media content, e-commerce visuals, presentations, and quick editing tasks.
Another big factor was value. Some tools have free plans that are genuinely useful, while others lock basic features behind paywalls. We included both free and paid options, but each tool earned its place by being practical for non-designers. We also avoided tools that are only good for one small trick unless that trick is a common problem, such as background removal or quick resizing.
| Selection Factor | What It Means In Real Life | What You Should Check |
| Ease of use | You can learn it quickly | Simple layout, beginner-friendly controls |
| Templates and sizes | You do not start from scratch | Social sizes, print sizes, presentation templates |
| Export quality | Your design stays sharp | PNG, JPG, PDF, SVG options |
| Brand consistency | Your content looks like one brand | Brand colors, font sets, reusable templates |
| Collaboration | You can get feedback fast | Comments, sharing, permissions |
| Pricing clarity | You know what you pay for | Clear free plan limits, logical upgrades |
Quick Comparison Guide (Best For, Free Vs Paid, Platforms)
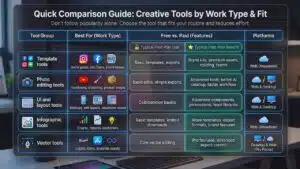
Many people choose tools based on popularity, but that can lead to the wrong fit. Instead, compare tools by the type of work you create most often. If you publish social content weekly, a template tool will save the most time. If you edit photos for ecommerce or blogs, a photo editor matters more than a template library. If you create reports or educational explainers, infographic tools can cut your work time in half.
If you want a logo that scales for print and web, you need a vector editor. Also consider where you work. Some people prefer web tools because they work anywhere, while others want a desktop tool that feels faster and more stable. The best choice is the one that fits your routine and reduces effort, not the one with the most features.
| Tool Group | Best For | Typical Free Plan Use | Typical Paid Plan Benefit |
| Template tools | Social posts, ads, flyers, brand visuals | Basic templates, exports | Brand kits, premium assets, resizing, teams |
| Photo editing tools | Thumbnails, retouching, product images | Basic edits, simple exports | Advanced tools, better AI cleanup, faster workflow |
| UI and layout tools | Mockups, web layouts, structured visuals | Collaboration basics | Advanced components, permissions, team libraries |
| Infographic tools | Charts, reports, explainers | Basic templates, limited downloads | More templates, export formats, brand features |
| Vector tools | Logos, icons, scalable assets | Core vector editing | Pro features, advanced export control |
The 14 Best Graphic Design Tools For Non-Designers (Free & Paid)
This section is the heart of the guide. Each tool below is chosen because it solves a real problem for beginners. Some tools are best for fast marketing graphics, while others are best for editing images or creating clean presentations. Do not try to master all of them. Pick one primary tool that matches your main use case, then keep one backup tool for special tasks such as photo editing or vector logos. Also remember that templates are starting points, not final designs. The best results happen when you adjust spacing, simplify text, and use consistent colors. If you only do those three things, your visuals will instantly look more professional.
| Tool | Best For | Why Non-Designers Like It | Watch-Out |
| Canva | All-round visuals | Easy templates and drag and drop | Designs can look generic if not customized |
| Adobe Express | Brand-friendly content | Quick actions and brand controls | Some features may require upgrades |
| VistaCreate | Social content | Strong social templates and animations | Not ideal for complex design systems |
| Desygner | Mobile editing | Quick edits on phone and simple workflow | Limited advanced layout control |
| Snappa | Fast graphics | Minimal learning curve | Smaller feature set than bigger tools |
| PicMonkey | Photo-heavy designs | Great for thumbnails and photo edits | Better value if you edit photos often |
| Pixlr | Browser photo edits | Quick cleanup and easy editing | Not a full replacement for pro editors |
| Photopea | Layered editing | Works like advanced editors in browser | Can feel complex for beginners |
| Figma | UI and layout | Collaboration and clean alignment | Not template-first for marketing graphics |
| Lunacy | UI mockups | Built-in assets and smooth workflow | Less focused on social templates |
| Visme | Business visuals | Charts, reports, presentations | Learning curve if you use many features |
| Piktochart | Infographics | Simple infographic and report templates | Less useful if you never use charts |
| Inkscape | Vector logos | Scalable icons and sharp exports | Higher learning curve |
| Affinity Designer | Pro vector work | Strong results without heavy complexity | More advanced than template tools |
1) Canva
Canva is one of the easiest ways to create marketing visuals when you are starting out. It is built around templates, which means you can begin with a finished layout and replace the text and images in minutes. It is especially useful for social posts, banners, flyers, simple presentations, and quick brand graphics. Canva also makes it easy to keep your designs consistent by saving brand colors and fonts in one place.
The best way to use Canva is to build a small set of templates you reuse every week. If you rely too much on default templates without changing spacing and typography, your graphics may look similar to others. A simple fix is to change the font pair, adjust margins, and use your own images.
2) Adobe Express
Adobe Express is designed for fast content creation with a strong focus on brand consistency. It works well for social posts, posters, short promotions, and quick edits that need to stay on brand. It often feels clean and structured, which helps beginners avoid cluttered layouts. If your workflow already includes other Adobe tools, Express can fit smoothly into your routine.
One of its biggest strengths is helping you apply consistent colors and fonts across many designs. A good workflow is to create a few brand templates and reuse them for campaigns. If you need deep design control, you may find it more limited than advanced tools, but for everyday visuals it is practical and fast.
3) VistaCreate
VistaCreate is a strong choice when your main focus is social media content. It offers many ready-made designs for stories, posts, and promotional graphics. It is also helpful if you like animated elements and want lightweight motion in your social visuals. Beginners often enjoy VistaCreate because it keeps the workflow simple and template-focused.
It is a good fit for creators who publish frequently and want variety in layout styles. A smart approach is to save a few “series” templates so your audience recognizes your content instantly. If you want complex multi-page layouts or full brand systems, you may outgrow it, but it remains excellent for quick social output.
4) Desygner
Desygner is built for quick designs, especially for people who create content on mobile. It is useful when you want simple edits, quick posters, basic social graphics, and easy template customization. Many non-designers like it because it avoids overwhelming menus and keeps the editing flow straightforward. It is a good pick for business owners who need visuals on the go and do not want to open a laptop.
A practical method is to create a few templates for offers, announcements, and testimonials. If your designs require precise typography control and advanced layout rules, Desygner may feel limited. For fast content and routine marketing, it performs well.
5) Snappa
Snappa is designed for speed and simplicity. It helps you create clean social graphics and blog visuals without many complicated steps. It works best when you want to publish quickly and do not need advanced design features. Many beginners prefer Snappa because it reduces decision fatigue. You choose a size, pick a layout, and edit the text and images.
A smart workflow is to create a small set of branded templates and reuse them for consistent content. If you need advanced features like detailed typography, complex layers, or deep brand systems, Snappa may feel basic. For fast everyday graphics, it is a practical option.
6) PicMonkey
PicMonkey is a great fit for people who rely on photos. If your designs involve thumbnails, product images, portraits, and lifestyle visuals, PicMonkey makes editing and designing easier in one place. It typically offers helpful tools for retouching, overlays, and quick adjustments. This is especially valuable for content creators who want consistent thumbnails or ecommerce sellers who want clean product visuals.
A good approach is to build a thumbnail style guide, then reuse the same layout and font rules for every video or post. If you mainly create text-heavy graphics, you may prefer a template-first tool instead. PicMonkey shines most when photos are central to your design.
7) Pixlr
Pixlr is useful when you need quick photo editing in a browser. It is helpful for resizing images, adjusting brightness, cleaning backgrounds, and preparing photos for social or websites. It is often easier than complex editors for everyday tasks, which makes it beginner-friendly. Pixlr can support quick workflows like editing a product photo, adding simple text, and exporting for an online store.
A good habit is to create a basic editing checklist, such as crop, brightness, contrast, and cleanup. If you need advanced layered compositions and detailed retouching, Pixlr may not cover everything. For fast improvements and quick web edits, it is very effective.
8) Photopea
Photopea is known for layered editing and a more advanced editing approach in a browser. It is useful when you receive layered files or need to do more than basic adjustments. You can work with multiple layers, masks, and detailed edits that many simple tools do not support. This makes it valuable for people who want advanced control but do not want to install heavy software.
The interface can feel intimidating at first, so beginners should start with simple tasks like text edits and image replacements. A good learning path is to master layers, then learn selection tools, then explore masks. If you invest a little time, Photopea becomes a powerful tool for real-world editing tasks.
9) Figma
Figma is a top choice for clean layouts and collaboration. It is widely used for UI mockups, but non-designers also use it to create structured marketing layouts and design systems. It helps you align elements properly, use grids, and keep spacing consistent. This alone can make your designs look more professional.
Figma is also great for teamwork because people can comment directly on designs and collaborate in real time. A practical workflow is to use a reusable component library for buttons, headings, and layouts. If you want templates for social graphics, Figma may feel slower than template tools. For structured visuals and collaboration, it is excellent.
10) Lunacy
Lunacy is a user-friendly tool for UI mockups and clean layouts. It often appeals to beginners because it includes built-in assets like icons and illustrations, which saves time. If you create app screens, website layouts, or simple design systems, Lunacy can reduce the friction of finding resources.
It also works well for people who want a smooth desktop workflow. A good way to use Lunacy is to build a small set of layout blocks, such as headers, feature sections, and cards. If your main focus is social posts and posters, it may not replace a template-first tool. For UI style layouts and structured designs, it is a strong option.
11) Visme
Visme is designed for business visuals. It is a strong pick when you create presentations, reports, proposals, and visuals that explain information. It works well for charts, diagrams, and structured slides because it is built around communication rather than decoration. Non-designers often like Visme because it provides templates that feel professional and formal.
A good workflow is to choose a consistent slide layout and reuse it across decks. If you add too many visual elements, presentations can feel busy, so keep it clean and use spacing wisely. Visme is most valuable when you present data or explain processes. For simple social posts, you may prefer template editors.
12) Piktochart
Piktochart is best known for infographics and data visuals. If you want to turn information into clear charts and simple visuals, it can save you a lot of time. It is especially useful for blog explainers, educational content, and internal reports. Beginners usually find it approachable because it guides you with structured templates.
A smart approach is to keep your infographic layout consistent, using the same header style and color rules. Do not overload an infographic with text. Break it into sections and use icons and charts where possible. If you rarely use data or structured visuals, you might not need Piktochart. For explainers and infographics, it is very practical.
13) Inkscape
Inkscape is a free vector editor that helps you create scalable logos, icons, and illustrations. Vector graphics stay sharp at any size, which is why they matter for branding. Inkscape is not as simple as template tools, but it gives you real control over shapes and curves. If you plan to create a logo that will appear on business cards, websites, and banners, learning basic vector editing is worth it.
A good beginner path is to start with simple shapes, then learn alignment, then explore pen tools. You do not need to master everything to create useful assets. For long-term brand flexibility, Inkscape is a strong free option.
14) Affinity Designer
Affinity Designer is a professional-level tool for vector work and clean design outputs. It is useful for logos, icons, illustrations, and high-quality brand assets. Many people like it because it feels powerful without forcing a complicated workflow on day one. It is a great step up if you started with template tools and now want more control.
A practical approach is to use it for core brand assets, then export and reuse those assets inside your template editor. That combination works well for non-designers who want quality but still want speed for daily content. If you only need simple social posts, Affinity may be more than you need. For serious brand assets, it is a strong option.
How To Pick The Right Tool (Graphic Design Tools For Non-Designers Decision Guide)?
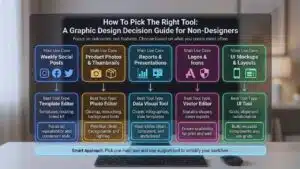
Picking the right tool becomes easy when you stop thinking about features and start thinking about outcomes. Ask yourself what you create most often, not what you might create someday. If you post social content weekly, a template editor will give you the best return because it saves layout time. If you edit product images, you need a photo editor that can clean backgrounds and fix lighting quickly.
If you build reports and presentations, you need tools with chart and slide systems that look clean and consistent. If you want a logo that scales, you need a vector tool that exports sharp formats. The smart approach is to pick one main tool and one support tool. This keeps your workflow simple and reduces learning time.
| Your Main Use Case | Best Tool Type | Best Pick Style |
| Weekly social posts | Template editor | Templates, resizing, brand kit |
| Product photos and thumbnails | Photo editor | Cleanup, retouching, background tools |
| Reports and presentations | Data visual tool | Charts, infographics, slide templates |
| Logos and icons | Vector editor | Scalable shapes, clean exports |
| UI mockups and layouts | UI tool | Grids, alignment, collaboration |
If You Mainly Create Social Media Posts
If your goal is to publish fast, choose a tool that gives you ready sizes and templates. Focus on repeatability. Create a consistent style for your posts so your audience recognizes your content quickly. Use the same two fonts and the same color palette across every design. Keep your text short and easy to read, especially on mobile screens. Use one main message per post and avoid packing too much information into one image. If you post daily, a template tool with quick resizing will save hours each month. This is where most beginners see the biggest time savings.
If You Need Logos And Brand Assets
A logo is not just an image. It needs to scale and look sharp on many surfaces, such as websites, printed materials, and profile icons. That is why vector formats matter. If you design a logo using only a basic template tool, you may struggle later when you need a sharp print version. A good workflow is to create a simple mark in a vector editor, export it properly, then use it everywhere. Keep your logo simple. Complex details disappear at small sizes. If you are unsure, create a clean wordmark first, then add an icon later.
If You Need Presentations, Reports, And Infographics
If you make presentations often, the biggest improvement you can make is reducing clutter. Use one idea per slide and support it with a simple visual. Use charts only when they clarify the point, not because they look impressive. Keep consistent margins and align your text blocks the same way on every slide. Use consistent heading styles, such as the same font size and weight for each section. For infographics, break content into segments and use icons and short labels. Your goal is clarity. When slides look clean, people trust the message more.
If You Need Photo Editing
If your designs depend on images, photo editing matters more than templates. Start by learning basic photo cleanup steps. Crop to improve framing, adjust brightness so the subject is clear, and remove distracting background elements when needed. If you publish thumbnails, build a consistent style with the same font and placement every time. Avoid heavy filters that change skin tones or product colors. Clean, natural photos often perform better for marketing because they feel more trustworthy. Keep your exports sharp by using correct dimensions for the platform. A simple photo workflow can dramatically raise the quality of your content.
If You Need UI Mockups Or App Screens
UI and web layouts require alignment and spacing more than decoration. Use grids to keep elements consistent. Build reusable components such as buttons, cards, and headers. Keep text readable by using clear hierarchy with headings and body text. Avoid using too many font sizes. Use consistent spacing rules, such as the same gap between sections. Collaboration is also important. If you work with developers, choose a tool where comments and handoff are easy. The more consistent your layout system, the faster your UI work becomes.
Practical Design Tips That Make Your Work Look Professional Faster
Design is not about fancy effects. It is mostly about clarity, spacing, and consistency. Non-designers usually struggle because they try to do too much in one graphic. The fastest way to improve is to simplify your layout and focus on one message. Use fewer words and make the main point bigger. Keep your colors consistent and avoid using many bright colors at once. Use a small set of fonts and stick with it across all content. Spacing matters more than most people think. When your design has clean margins and balanced white space, it instantly looks more premium.
| Tip | What It Improves | Quick Action |
| Alignment | Makes layouts look intentional | Align text and images to one grid |
| White space | Improves readability | Increase margins and spacing |
| Font consistency | Builds brand recognition | Use 1 font family with 2 weights |
| Color system | Reduces visual noise | Use 1 main, 1 accent, 1 neutral |
| Contrast | Makes text readable | Dark text on light background |
| Image quality | Increases trust | Use sharp images, avoid blurry exports |
The 5 Rules That Instantly Improve Most Designs
First, align elements so they share clean edges. Random placement makes designs feel messy. Second, add white space so the design can breathe. Crowded graphics feel cheap and hard to read. Third, limit your fonts. Two fonts are enough, and one font family is often better. Fourth, use a simple color system. Too many colors make the message unclear. Fifth, create hierarchy. The main message should be the biggest, and supporting details should be smaller. If you follow these rules, your designs will look cleaner no matter which tool you use.
A Simple Brand Kit Checklist
A brand kit makes your content consistent. Start with three to five colors and save the exact color codes. Choose one font for headings and one for body text. Save your logo in different versions, such as a full logo and an icon-only version. Decide on an image style, such as bright and minimal or bold and high contrast. Set basic spacing rules, such as the same margin around text blocks. Keep this kit in a simple document and reuse it. When your visuals look consistent, people remember your brand faster.
Export Settings That Prevent Blurry Graphics
Blurry exports happen when the design is too small or compressed. Export at the right size for the platform you publish on. For text-heavy designs, use a format that keeps edges sharp. For photos, use a format that balances quality and file size. For printing, export with high quality settings so text and lines stay clean. For logos and icons, use scalable exports so they remain sharp at any size. Also check the background. Transparent exports are useful for logos and overlays. A simple export habit can save you from redoing work later.
Final Thoughts
If you want the simplest plan, choose one tool and commit to it for a month. Build a small template set and reuse it weekly. That alone will improve your output more than switching tools every few days. The best graphic design tools for non-designers are the ones that reduce friction and help you publish consistently. Focus on clarity, spacing, and consistency rather than fancy effects. Keep your fonts and colors stable so your brand feels recognizable.
When you need a special task, such as photo cleanup or scalable logo work, add a second tool for that job. If you follow this approach, you will create better visuals with less stress. Graphic design tools for non-designers are not only about making things look nice. They are about making your message easier to understand and easier to trust.