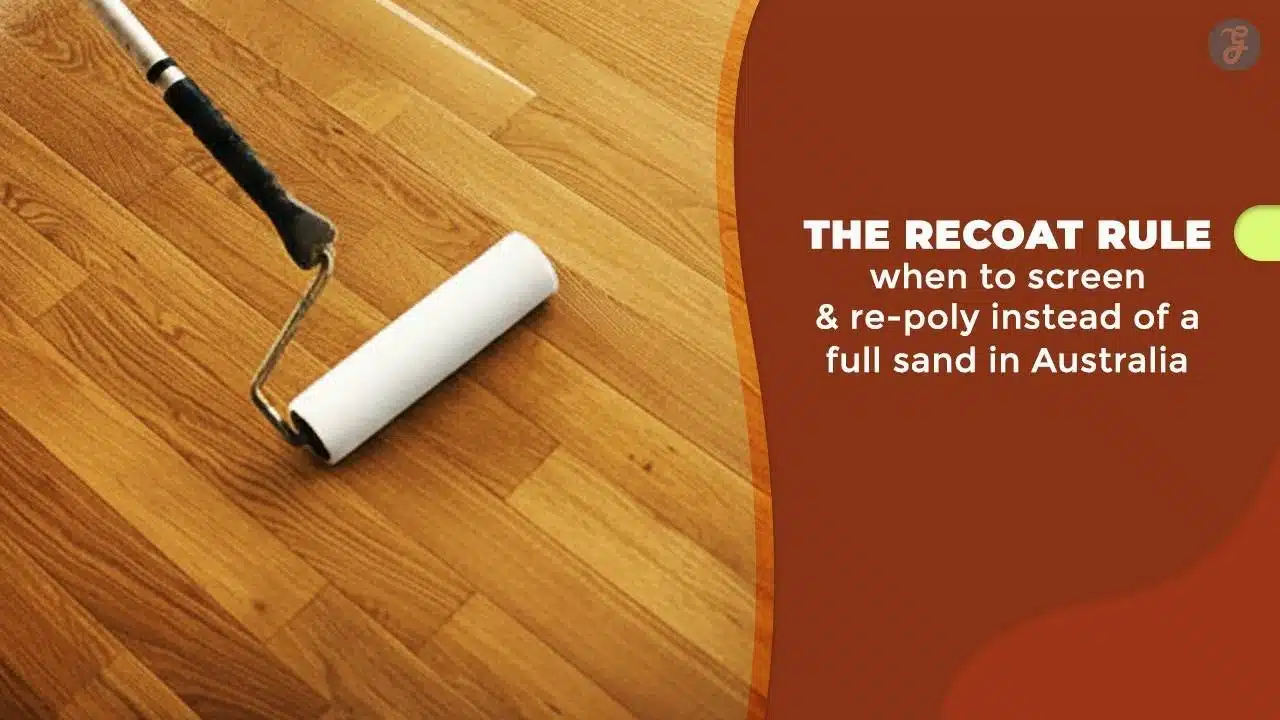
If you own timber floors in Australia, you are sitting on an asset that adds warmth, character, and significant value to your property. But there is a common misconception that maintaining these floors requires a dusty, noisy, and expensive ordeal known as a “Full Sand and Polish” every decade. This is not the only way. In fact, if you are sanding your floors every time they look a little dull, you are wasting money and literally grinding away the lifespan of your timber.
There is a smarter preventative strategy used by industry professionals: Screen and Recoat Timber Floors. Often referred to as a “Buff and Coat” or “Maintenance Coat,” this process is the secret to keeping your floors looking brand new indefinitely without ever touching the raw timber.
However, timing is everything. This guide will walk you through exactly when you can use the recoat rule, how to test your floors yourself, and why “screening” is the savvy homeowner’s alternative to a full renovation.
Key Takeaways
-
The “Recoat Rule”: Apply a new topcoat every 3–5 years (residential) or 1–2 years (commercial) before the finish wears through to bare wood.
-
The Savings: Screen and recoating costs approximately 60% less than a full sand and polish and takes half the time.
-
The Critical Check: You must perform an “Adhesion Test” to ensure the new coat won’t peel off due to contamination from silicone or wax cleaners.
-
The Limit: If your floor is grey, black, or water-stained, “The Recoat Rule” no longer applies—you need a full restoration.
-
Engineered Flooring: Recoating is essential for floating floors with thin wear layers that cannot handle multiple heavy sandings.
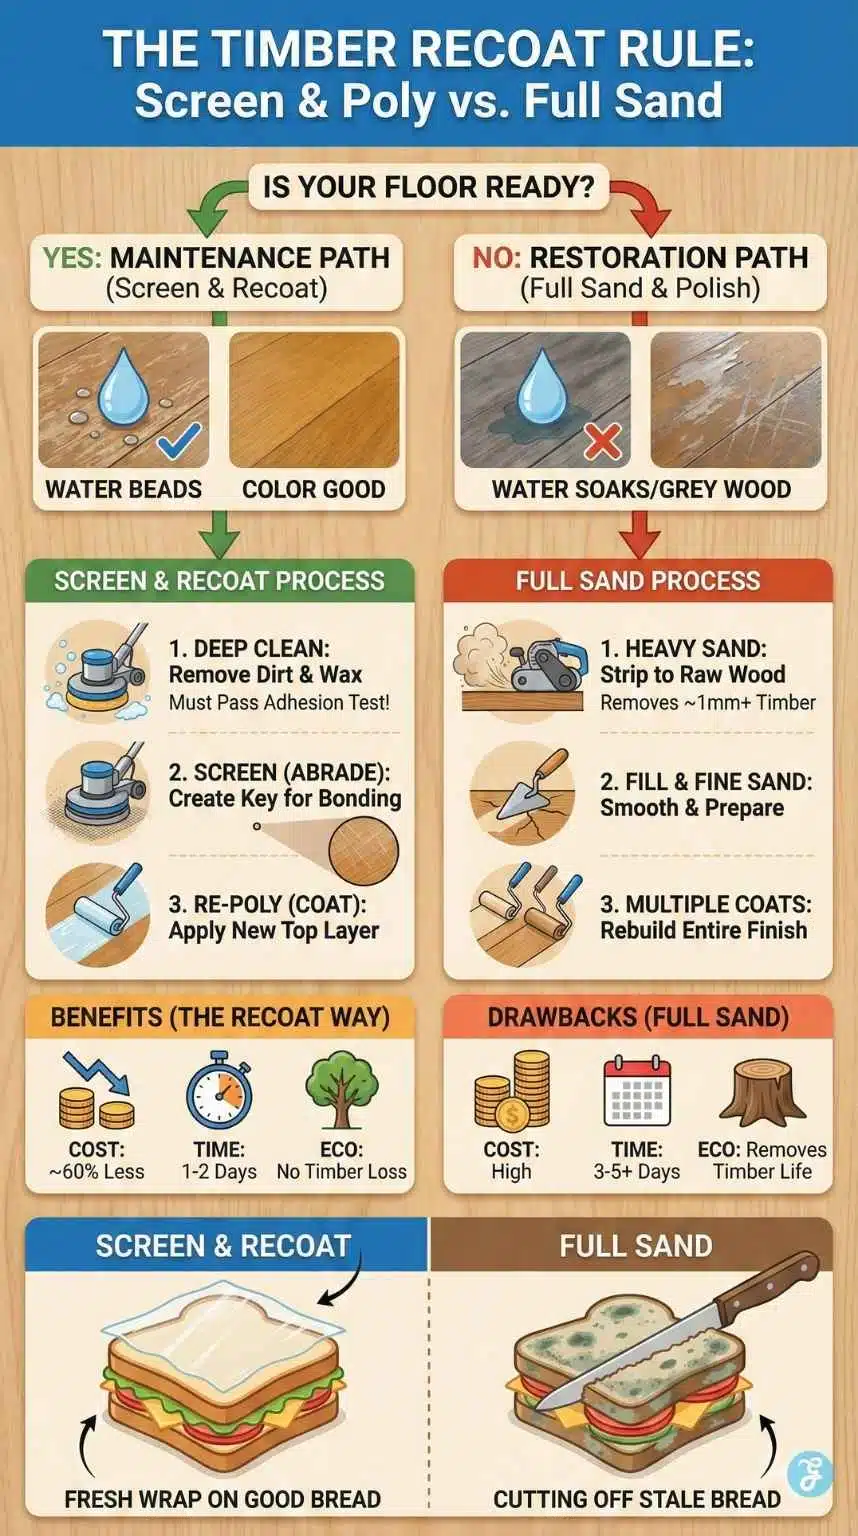
What Is “Screen and Recoat” (Buff and Coat)?
To understand why this method is superior for maintenance, we first need to distinguish it from the traditional approach.
The Heavyweight: Full Sand and Polish
A full sand is a restorative process. It involves heavy machinery (drum sanders and edgers) equipped with coarse grit sandpaper (starting as low as 40 grit) to strip away the old polyurethane finish and a thin layer of the wood itself.
-
Removes: ~1.0mm to 1.5mm of timber.
-
Purpose: To remove deep scratches, cupping, water stains, and grey oxidation.
-
Lifespan: A solid timber floor (19mm thick) can only be fully sanded 4–6 times in its entire life before the tongue-and-groove joint becomes exposed/unstable.
The Lightweight: Screen and Recoat
A screen and recoat is a maintenance process. It uses a rotary buffer fitted with a fine mesh “screen” (usually 120 or 150 grit) or an abrasive pad.
-
Removes: 0.0mm of timber (it only abrades the old finish).
-
Purpose: To remove surface scuffs, restore sheen, and add a fresh protective layer.
-
Lifespan: Can be done indefinitely, provided you don’t wear through to the bare wood between coats.
Think of it this way: A full sand is like replacing the windshield on your car because it’s dirty. A screen and recoat is like polishing the glass to make it clear again.
The “Sandwich” Analogy
Imagine your floor is a sandwich. The timber is the bread, and the polyurethane finish is the plastic wrap protecting it.
-
The Goal: You want to replace the plastic wrap (the finish) before it tears and air gets to the bread (the wood), causing it to go stale (grey/oxidised).
-
The Reality: If you wait until the plastic wrap is torn, you can’t just put a new piece on top. You have to cut off the stale part of the bread first. That is a full sand. “The Recoat Rule” is simply changing the plastic wrap while the bread is still fresh.
The 3 Critical Tests: Do You Qualify for a Recoat?
Before you call a professional to book a “Screen and Recoat Timber Floors,” you need to verify that your floor is a candidate. If the damage has gone too deep, a recoat will simply seal in the ugliness.
Use these three tests to determine your floor’s condition.
1. The Visual Inspection (The “Grey” Zone)
Walk through your high-traffic areas—typically the kitchen sink, the hallway, and the front door. Look closely at the grain.
-
Good Signs: The floor is dull, has many fine hairline scratches (from socks/dust), or looks “dry.” The colour of the wood is still golden or brown.
-
Bad Signs: You see patches of grey or black wood. This is oxidation. It means the finish has completely worn away, and moisture/dirt has penetrated the timber fibres.
-
The Verdict: If you see grey, you cannot screen and recoat. You must fill sand.
2. The Water Bead Test (DIY)
This is the standard “barrier test” to check the porosity of your current finish.
-
Pour a tablespoon of water onto the most worn area of your floor.
-
Wait 2–3 minutes.
-
Result A (Beads Up): The water sits on top like a bubble.
-
Status: Your finish is intact. You probably just need a good clean, or you can recoat for aesthetic reasons (to increase shine).
-
-
Result B (Soaks In/Darkens): The water spreads out, and the wood gets slightly darker.
-
Status: The finish is “tired” and porous. It is no longer effectively waterproofing the wood.
-
Action: Book a Screen and Recoat immediately. You are in the danger zone.
-
-
Result C (Instant Absorption): The wood turns dark immediately.
-
Status: There is no finish left.
-
Action: Full Sand required.
-
3. The Adhesion Test (The “Cross-Hatch”)
This is the most critical update for modern homeowners. In the last decade, the Australian market has been flooded with supermarket “floor refreshers” and “polishes” that contain silicone, acrylic wax, or oil.
The Problem: Polyurethane will not stick to silicone. If you recoat over it, the new finish will peel off like a sunburn (delamination).
How Pros Test for Contamination:
-
They clean a small, inconspicuous patch (e.g., inside a pantry).
-
They lightly sand (screen) that patch.
-
They apply a small amount of the new coating.
-
They let it cure (usually 24 hours).
-
The Tape Test: They cut a cross-hatch pattern (#) into the new finish with a razor, apply strong tape over it, and rip it off.
-
Pass: The finish stays on the floor.
-
Fail: The finish lifts off with the tape. Result: You cannot recoat. You must fully sand to strip the contaminated layer.
-
Cost Comparison: Recoat vs. Full Sand
One of the most compelling reasons to follow the Recoat Rule is the financial savings. Labour rates in Australia have risen, and the cost of quality polyurethane (especially German or Swedish water-based brands like Loba or Bona) has increased.
Below is a comparative breakdown of the costs you can expect in the current market.
| Feature | Screen & Recoat (Maintenance) | Full Sand & Polish (Restoration) |
| Average Cost (per sqm) | $30 – $45 | $80 – $120+ |
| Preparation | Minimal (move light furniture). | Full clear-out (house must be empty). |
| Timber Removal | None (0mm). | Significant (1.0mm – 1.5mm). |
| Dust Factor | Low (Buffer generates minimal dust). | High (Even with “dust-free” systems). |
| Duration | 1 – 2 Days. | 3 – 5 Days + Curing time. |
| Access | Walk on in ~4-6 hours (Water-based). | Cannot walk on for ~24-48 hours. |
| Smell | Low odour (if Water-based). | High odour (if Solvent-based). |
Note: Prices vary by state (Sydney/Melbourne tend to be higher) and the specific coating product chosen.
The ROI Calculation
If you have a 100sqm home:
-
Full Sand: ~$8,000 – $12,000.
-
Screen & Recoat: ~$3,000 – $4,500.
-
The Saving: You save roughly $7,000 by catching the wear early.
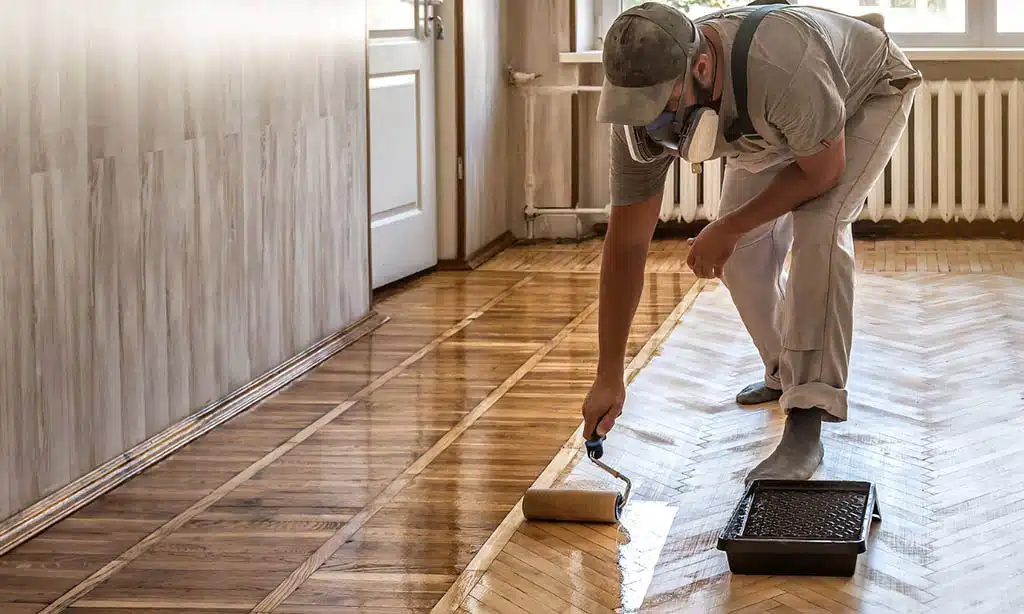
The Process: How a Professional “Screen and Recoat” Works
Understanding the steps ensures you know what you are paying for and helps you vet potential contractors.
Step 1: The Deep Clean (Chemical Stripping)
This is not a mop and bucket job. The floor must be chemically cleaned to remove surface contaminants. Professionals use a rotary buffer with a cleaning pad and a specialized “prep” solution that cuts through grease, soap scum, and basic dirt. This step is crucial for adhesion.
Step 2: “Screening” (Abrasion)
The contractor uses a buffer machine with a mesh sanding disk (the “screen”).
-
Grit: Usually 120, 150, or 180 grit.
-
The Goal: To scratch the existing glossy surface. This creates a “mechanical key”—millions of microscopic scratches that the new polyurethane can grab onto.
-
Visual: The floor will look chalky and matte after this step. This is normal.
Step 3: Vacuum and Tack
Dust is the enemy of a smooth finish. The floor is vacuumed thoroughly with industrial HEPA filters. Then, the contractor performs a “tack wipe”, wiping the floor with a slightly damp, lint-free cloth (or a specialized tack cloth) to pick up the finest micro-dust particles.
Step 4: The Application
The new coat is applied.
-
Water-Based Polyurethane: Applied with a roller. It appears milky white when wet but dries crystal clear. It is non-yellowing and preserves the natural colour of the timber.
-
Solvent-Based Polyurethane: Applied with a lambswool applicator. It has a strong smell and a golden/amber hue. It will darken the floor slightly.
Pro Tip: In Australia, the industry is heavily shifting toward 2-Component (2K) Water-Based finishes. These are just as hard-wearing as old solvent finishes but without the toxicity and yellowing.
DIY vs. Professional: Can You Do It Yourself?
With the rising cost of living, many Australian homeowners consider renting a poly-vac or rotary sander to “Screen and Recoat Timber Floors” themselves. While it is physically possible, it is fraught with risks that can turn a $500 saving into a $5,000 repair bill.
Here is the honest reality of DIY recoating:
-
The “Swirl Mark” Risk: Professional buffers are heavy and require a specific technique (keeping the machine moving constantly). If you linger in one spot for a second too long or use the wrong grit screen, you will carve “swirl marks” into the finish. These will be invisible until you apply the new coating, at which point they become permanent scars.
-
The Contamination Trap: A professional knows how to spot silicone contamination or “reject” spots where the finish is pulling away. A DIYer often rolls the new poly over these spots, resulting in “fish eyes” (craters in the finish) or peeling later on.
-
The Sanding Depth: On engineered floors with thin veneers, an inexperienced operator using a rental machine can easily sand through the wear layer, ruining the board instantly.
The Verdict: If you are handy, you might manage a small bedroom. But for a large open-plan living area or expensive engineered timber, the risk of error usually outweighs the labor cost of hiring a pro.
Choosing Your Sheen: Matte, Satin, or Gloss?
One of the hidden benefits of the Screen and Recoat process is that you aren’t stuck with your old look. Even if you don’t sand back to bare wood, the new topcoat determines the final shine of your floor.
Which sheen should you choose for your lifestyle?
Matte / Extra Matte
- The Look: Very modern, natural, almost looks like raw oil.
- Best For: Hiding scratches, dust, and pet hair. It is the most forgiving finish for busy families or dog owners.
- Cons: Can sometimes look “flat” or dull if the room lacks natural light.
Satin
- The Look: The classic “middle ground.” It has a soft glow but isn’t shiny.
- Best For: The standard choice for 80% of Australian homes. It balances elegance with practicality.
- Cons: None, really. It’s the safe bet.
Semi-Gloss / Gloss
- The Look: High shine, reflects light, makes the floor look “wet.”
- Best For: Formal areas, museums, or basketball courts.
- Cons: High Maintenance. It highlights every speck of dust, every footprint, and every microscopic scratch. It is generally not recommended for high-traffic homes anymore.
A Special Note on Engineered Flooring
The “Screen and Recoat” process is not just for solid hardwood; it is arguably more important for engineered (floating) floors.
Engineered floors consist of a top layer of real hardwood (the lamella) glued to a plywood or HDF core.
-
The Limitation: The wear layer is often only 3mm to 6mm thick.
-
The Risk: A full sand removes ~1mm. You can only fully sand an engineered floor 1 or 2 times before you hit the plywood core, ruining the floor.
By strictly following the Recoat Rule (recoating every 3–5 years), you never touch that precious 3mm wear layer. You are simply building up and wearing down the polyurethane, theoretically allowing an engineered floor to last a lifetime.
The Eco-Friendly Perspective: Saving the Tree
We often talk about the financial savings of the “Recoat Rule,” but the environmental savings are just as significant.
Timber is a finite resource. A high-quality, solid Spotted Gum or Blackbutt floor takes decades to grow. Every time you perform a “Full Sand,” you turn approximately 15-20% of that usable timber surface into sawdust and throw it in the bin.
By choosing to screen and Recoat Timber Floors early and often, you are practicing timber conservation.
-
Zero Waste: You keep the carbon locked in the wood rather than sanding it off.
-
Longevity: You ensure the floor lasts 100 years instead of 40.
-
Chemicals: Modern water-based recoats have ultra-low VOCs (Volatile Organic Compounds), meaning better indoor air quality for your family compared to the harsh solvent smells of a full restoration.
When You MUST Do a Full Sand
Sometimes, the “Recoat Rule” cannot save you. You must bite the bullet and pay for a full sand and polish if:
-
Deep Scratches: If a scratch catches your fingernail or cuts through the colour of the wood, a recoat won’t fix it. The new finish will just flow into the scratch, sealing it in forever.
-
Cupping/Warping: If the edges of the boards are higher than the centre (cupping) due to moisture damage, a sander is needed to flatten the floor.
-
UV Discoloration: If you have rugs on the floor and the timber around them has faded or darkened (creating a “picture frame” effect), only sanding can even out the colour.
-
Stain Change: If you want to change the colour of your floor (e.g., from natural Blonde to Black Japan or Walnut), you must sand back to raw timber to open the pores for the stain.
Maintenance: Extending the Time Between Recoats
You can push your recoat interval from 3 years to 7 years by following strict maintenance hygiene.
-
Mats are Mandatory: Place barrier mats at all external doors. 80% of floor wear comes from “grit” (sand and dirt) on shoes, acting like sandpaper.
-
No Shoes Policy: High heels (especially stiletto heels) exert more pressure per square inch than an elephant’s foot. They will dent timber instantly.
-
The Right Cleaner: Stop using supermarket “polishes,” “refreshers,” or steam mops.
-
Steam Mops: Force moisture into the joints, causing swelling and finish whitening.
-
Supermarket Polish: Adds the silicone/wax layer that causes adhesion failure later.
-
Use: A simple pH-neutral timber floor cleaner (e.g., Bona Wood Floor Cleaner) and a mist spray mop.
-
-
Felt Pads: Every piece of furniture touching the floor must have a felt pad. Plastic glides are not enough; they can scratch the finish.
Frequently Asked Questions (FAQ)
1. Can I change the gloss level with a screen and recoat?
Yes. This is a great benefit of the process. If you currently have a high-gloss floor that shows every speck of dust and you hate it, you can screen it and apply a Satin or Matte topcoat. The new coat determines the sheen level.
2. How long do I have to stay off the floor?
With modern water-based polyurethanes, you can usually walk on the floor in socks after 4–6 hours and move furniture back in after 24 hours. Full cure (safe for rugs and pets) takes about 7 days. Solvent-based finishes require much longer—usually 24–48 hours before walking and highly toxic fumes that may require you to vacate the house for a few days.
3. Will a screen and recoat remove deep scratches?
No. It will only remove “surface scratches” that are in the clear coat itself. If a scratch has penetrated to the wood (turning white or dark), the recoat will flow over it. The scratch will still be visible, but it will be protected from water/dirt.
4. My floor has “cupping” (wavy boards). Will screening fix it?
No. Screening uses a flexible pad that rides over the waves of the floor. It does not flatten the timber. To fix cupping, you need a heavy drum sander (Full Sand) to grind the floor flat—but you must fix the moisture source causing the cupping first, or it will return.
5. Can I just recoat one room, or do I have to do the whole house?
You can do one room, but there will be a visible “lap line” or difference in sheen at the doorway where the new finish meets the old. Professionals usually recommend doing continuous areas (e.g., the whole hallway and living room) to maintain a seamless look.
The Bottom Line: Smart Maintenance Over Costly Restoration
The days of waiting for your floors to be destroyed before fixing them are over. “The Recoat Rule” is the savvy Australian homeowner’s standard for timber care. It is cheaper, faster, cleaner, and smarter.
By inspecting your floors today using the Water Bead Test and the Visual Check, you can determine if you are in the “sweet spot” for a Screen and Recoat. If you are, book it now. Spending a small amount today to thicken that protective layer will save you thousands in restoration costs tomorrow and ensure your timber floor remains the stunning feature of your home for generations.