Have you ever visited a website and felt frustrated by a stiff, confusing chat window? Many users experience this issue. People want AI chatbots that genuinely understand their needs and provide helpful responses. The good news is that building one does not require a computer science degree.
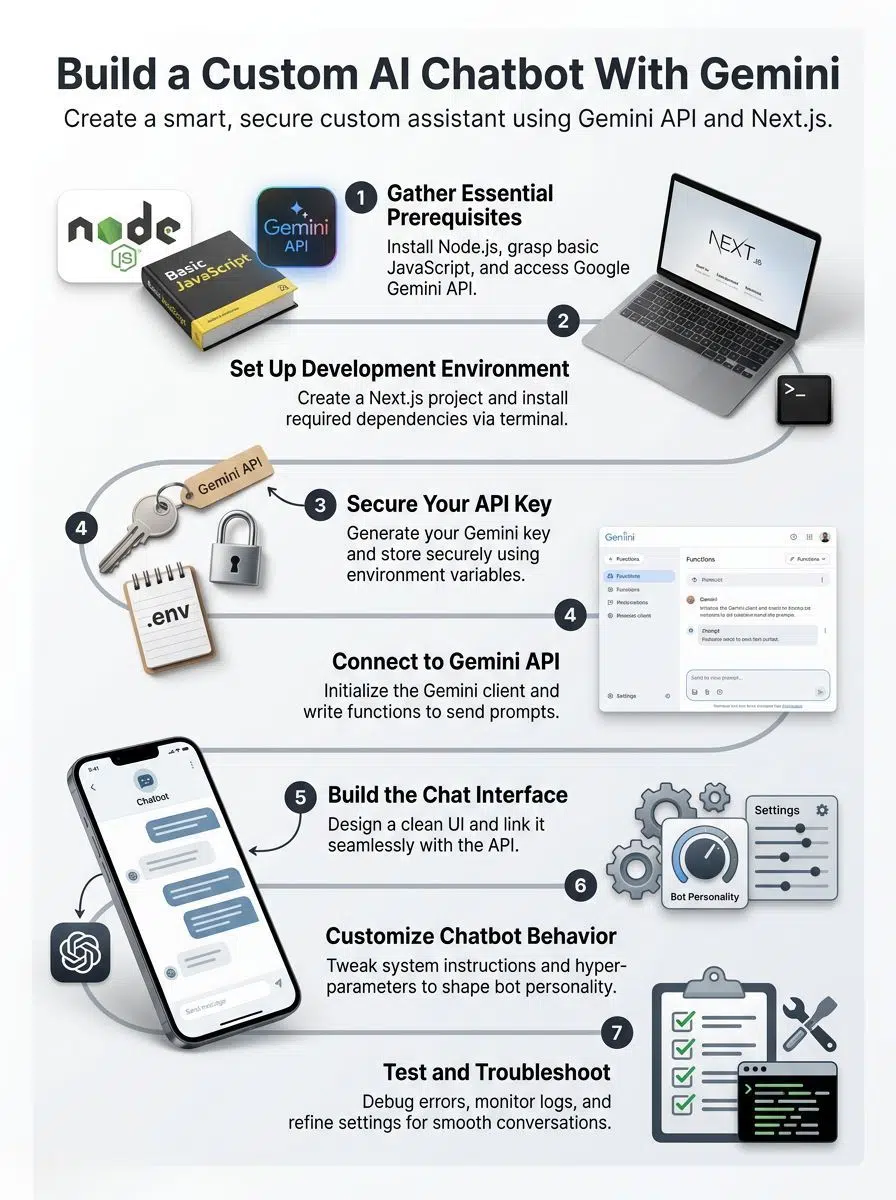
With a few basic tools, it is possible to create an AI chatbot using the Gemini API from scratch. Building a Custom AI Chatbot With Gemini API: Step-by-Step is a process that can be completed quickly with a basic understanding of coding and clear instructions.
This guide walks through the exact steps needed to set everything up, connect the components, and ensure the chatbot remains safe and user-friendly.
Let’s get started!
What is Google Gemini API?

Google Gemini API lets you build smart assistants using artificial intelligence. You can create a conversational agent with just a few lines of Python or JavaScript. This makes it a great fit for beginners and experts alike.
The API supports natural language processing, so your bot understands real conversations. For example, you can easily make a chatbot that greets users and answers complex questions.
As of 2026, models like Gemini 1.5 Pro boast a massive two-million token context window. That means your bot can process the equivalent of 50,000 lines of code or two hours of video in a single prompt.
Gemini works beautifully with Nextjs projects. It also plugs right into tools like TalkJS or Streamlit for quick setups. Safety matters, so you must always store your API key securely to protect your data. With flexible system instructions, you get full control over how your bot behaves.
Why Build a Custom AI Chatbot?
A custom AI chatbot can greet users in your own style and help them find answers fast. With the Gemini API, you get flexible controls over your machine learning tools. You decide exactly how your assistant responds using Google’s powerful servers.
A Next.js chat interface can talk to the API with just a few lines of code. This means even a beginner can build a helpful tool quickly.
Why should you take the time to build your own?
- Better User Interaction: You control the personality, ensuring it matches your brand perfectly.
- High Efficiency: A 2025 IBM report found that AI-driven automation helps organizations resolve customer issues 80 days faster on average.
- Privacy Control: By securely storing your API keys, you keep customer interactions completely private.
Tools like TalkJS or Streamlit make integration simple and free. You can test and tweak responses until they fit your audience perfectly.
Prerequisites for Building a Chatbot
Before starting your software development project, you need to check off a few simple requirements. These basics will make the process smooth.
Basic understanding of JavaScript
JavaScript helps you add interactivity to web pages. It makes buttons react and shows messages instantly. If you can write a simple function and work with arrays, you are ready for this programming tutorial.
Next.js builds directly on JavaScript. It lets you create chat interfaces that look sharp and run smoothly.
Most platforms, including the Google Gemini API, use JSON data formats. You manage this information using basic JavaScript skills. This knowledge makes it possible to connect your conversational agent with advanced AI using minimal code.
Node.js installed on your system
Node.js lets your computer run JavaScript outside the browser. It allows you to create servers and chatbots easily. The Gemini API works smoothly with Node.js on both Windows and macOS.
For projects in 2026, most developers use Node.js version 20 or 22. These Long Term Support versions handle the newest security features and packages perfectly.
The installation takes just a few minutes. Once Node.js runs on your system, you can start projects using simple command-line prompts. You need this setup so your chat interface can talk with Google servers without any errors.
Access to the Google Gemini API
Access begins with a Google account and permission to use the platform. After signing in to Google AI Studio, you can request an API Key. This key unlocks advanced natural language processing tools.
The best part is the generous free tier available in the US. You can test your application thoroughly before paying a dime.
| Feature | Free Tier Limits (2026) |
|---|---|
| Requests Per Minute (RPM) | Up to 15 requests |
| Requests Per Day (RPD) | Up to 1,500 requests (Gemini Flash) |
| Context Window | Up to 1 million tokens |
Both Streamlit and Next.js projects link up easily for testing. Enterprise teams also value these secure API integration options for strict data protection.
Setting Up Your Development Environment
Getting started feels a bit like prepping your workspace before a big project. You want your files organized and ready to go. A few quick commands will have you building your chatbot in no time.
Create a new Next.js project
Start by opening your terminal. Run the command `npx create-next-app@latest ai-gemini-chat` to set up your app. This creates a new Nextjs app in seconds with all your files ready for action.
Next.js makes it easy to build interactive interfaces that connect smoothly with APIs. In 2026, the framework uses the App Router and a tool called Turbopack by default. This makes compiling your project up to 10 times faster than older versions.
Developers love using JavaScript with this stack because it handles both server-side and client-side code. You are joining a large crowd of builders eager to shape smarter online conversations.
Install required dependencies
After creating your project, you need to install specific packages. Move into your new folder using the command line.
You will need a few essential tools to make the magic happen:
- @google/generative-ai: This is the official SDK required to communicate with Google models.
- streamlit or talkjs: These optional libraries help you build interactive chat layouts quickly.
- dotenv: This package helps you manage your hidden environment variables securely.
Type `npm install @google/generative-ai talkjs dotenv` and press enter. Node.js will download everything you need to handle user interaction and natural language processing. If an installation fails, simply double-check your Node version.
Obtaining and Securing Your API Key
Your API key acts like a golden ticket to your chatbot’s brain. You must keep it safe. If someone copies it, they might use your limits and run up a huge bill.
Generating your Google Gemini API Key
Head over to the Google AI Studio page with your account logged in. Click the button to get a new key and fill out your project details. Google will show you an auto-generated string of letters and numbers.
This string is the exact key that unlocks access for custom chatbot development. Copy the key immediately. Do not share it on social media or public spaces.
This fast process works perfectly whether you are coding with Python or JavaScript. With this step finished, you are ready to start talking to machines in plain English.
Storing your API Key securely
You must keep this key out of your visible codebase. Use environment variables in your Node.js or Next.js projects instead. Save your key in a file named `.env.local` and add that file to your `.gitignore` list.
Hackers constantly scan public repositories for leaked keys.
“A developer reported in early 2026 that a stolen Google Cloud API key resulted in over $82,000 in unauthorized charges in just 48 hours.”
Treat this key exactly like you would treat an important banking password. Only share it with people you fully trust during software development. Rotating your keys every few months is also a smart security practice.
Connecting to the Gemini API
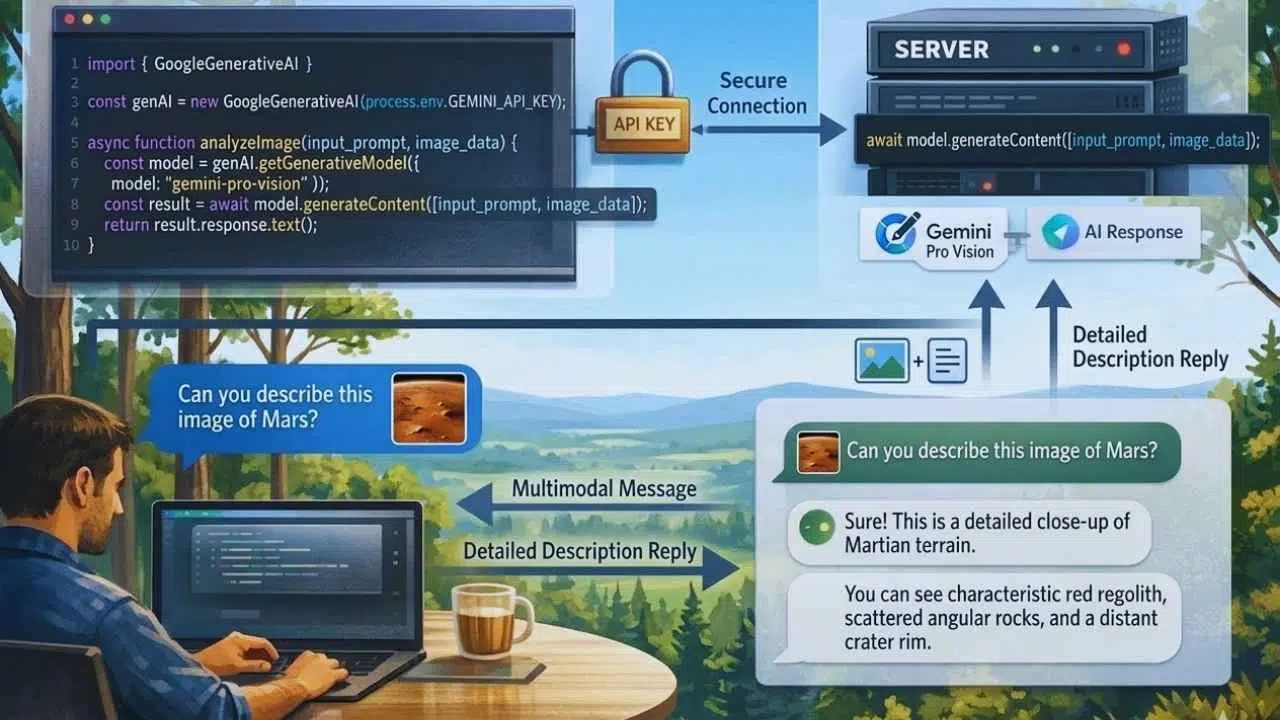
Get ready to write the code that brings your assistant to life. With the proper setup, your bot will answer questions smoothly and accurately.
Initializing the Gemini Client
Start by importing the official package at the top of your JavaScript file. You will use a statement like `import { GoogleGenerativeAI } from ‘@google/generative-ai’`. Next, you need to create a new instance of the client.
You can do this by passing your hidden environment variable to the setup function. Type `const genAI = new Google Generative AI (process.env.GEMINI_API_KEY);`. This locks in your credentials securely.
This simple initialization lets you send chat prompts directly to the AI. From here, you can assign a specific model, like Gemini 1.5 Flash, to handle the incoming messages.
Setting up functions to send prompts
Crafting the function to send messages takes only a few lines of code implementation. Picture yourself having a text conversation with a friend. You send a message, and they reply.
You will call the `generateContent` method on your configured model. Pass the user’s typed message as the prompt inside this function. For example, you might ask the AI to summarize weather data from 2026.
Always run these functions on your server side in your Next.js app. This keeps your API keys completely hidden from the user’s browser. Once you receive the response from Google servers, you pass that text directly into your chat interface.
Building the Chat Interface
Now it is time to put your chatbot on the screen. A clean layout makes chatting with your AI assistant feel easy and natural.
Designing a simple chat UI
Place a clear chat box at the bottom of your page for easy access. Use large, readable fonts and obvious buttons. Users prefer clicking a distinct send button rather than guessing keyboard shortcuts.
Show messages in familiar bubbles, similar to popular texting apps.
- Use blue bubbles for the human user.
- Use gray or green bubbles for the Gemini responses.
- Add a typing indicator so users know the bot is thinking.
For an incredibly fast setup, tools like TalkJS offer plug-and-play chat tools. You can also use styling libraries like Tailwind CSS to make everything look neat and spaced out.
Integrating the chatbot with the Gemini API
Linking your interface with the backend brings the whole project to life. When a user hits send, your application triggers the function you built earlier. The text flows straight into the Gemini AI engine.
The system uses natural language processing to craft human-like replies instantly. You can even use the `generateContentStream` method to show the text appearing word by word. This makes the conversation feel much faster and more interactive.
With a free solution like Streamlit or a custom React component, this API integration is seamless. Every conversation will feel personal and quick thanks to this smooth data connection.
Customizing Your AI Chatbot
You can easily tweak how your chatbot talks and acts. This is just like giving your Interactive Assistant a specific job description. Play with the customization techniques to find the perfect fit for your audience.
Adjusting responses and behavior
You can shape your bot’s personality using system instructions. This feature tells the AI exactly how to behave before the user even says hello. For example, you can command it to act like a helpful tutor or a formal business consultant.
Change these simple instructions to make answers brief, upbeat, or highly technical. By adjusting these guidelines, the AI becomes incredibly helpful for specific tasks. A student asking homework questions needs a different tone than a shopper looking for deals.
Programmers use these rules to build unique personalities. One conversational agent might use polite language exclusively, while another cracks jokes. Test these settings often until your users feel comfortable.
Configuring hyperparameters
Hyperparameters give you exact numerical control over the AI’s creativity and focus. You can adjust these values directly in your code.
| Hyperparameter | What It Does | Best Use Case |
|---|---|---|
| Temperature | Controls creativity (0.0 to 2.0) | Low for facts, high for brainstorming |
| Top-K | Limits vocabulary choices | Keeps the AI focused on common words |
| Max Output Tokens | Sets the maximum response length | Prevents the bot from rambling endlessly |
Try changing the temperature to 0.2 for safe, steady replies. Bump it up to 0.8 if you want more surprising, creative answers. Adjusting these values makes customizing the conversation flow quick and easy.
Testing and Troubleshooting
Test your chatbot by sending it many different types of messages. Try asking serious questions and silly ones. If something looks wrong, simply tweak the code until it feels right.
Debugging common issues
API errors or missing packages can stop your progress quickly. If you see a “401 Unauthorized” message, double-check your API key. Make sure it is copied correctly and saved in the right environment file.
Many beginners run into typos. Misspelling `process.env.GEMINI_API_KEY` will break the connection entirely. If you hit a “429 Too Many Requests” error, you have likely exceeded your free tier limit of 15 requests per minute.
Use `console.log` statements after each function call to find exactly where the data stops flowing. Sometimes, simply deleting your `node_modules` folder and running `npm install` again fixes stubborn bugs.
Refining your chatbot’s performance
Testing your application highlights weak spots in the conversation flow. Check your user greetings to make sure they sound natural. Most users will close the window if the first answer feels awkward or robotic.
To improve the experience, you should focus on a few key areas:
- Monitor Latency: Check how long it takes for the bot to reply.
- Review Logs: Read past conversations to spot confusing answers.
- Adjust the Temperature: Tweak this setting if the bot hallucinates facts.
Data security is also crucial during this phase. Make sure no sensitive user data leaks into your server logs. Test frequently using real questions to ensure the machine learning model performs well under pressure.
Final thoughts
You just learned how to build a custom AI chatbot with the Gemini API from start to finish. We covered everything from securing your keys to tweaking the bot’s personality. These strategies use accessible tools like Next.js, making the project highly manageable.
Every line of code you write gives you more control over the user experience. Why not start building your own interactive assistant right now? Even small changes to the conversation flow can make a massive difference for your website visitors.
Chatbots are changing how we connect online. Mastering Building A Custom AI Chatbot With Gemini API: Step-by-Step puts you way ahead of the curve in software development. For more ideas, you can always check out Google’s official documentation or join a coding community.
Your next smart helper is only a few lines of code away!