Parquet floor restoration is one of the most rewarding improvements you can make in a Victorian terrace or an Edwardian house, because you’re not just refinishing timber, you’re reviving a period feature that belongs to the architecture. When it’s restored properly, parquet brings back the warmth, pattern, and craftsmanship that modern replacements rarely replicate.
This guide is designed for UK period properties and covers everything from repair-first preparation and parquet sanding essentials to finish selection, room-by-room ideas, and long-term maintenance. You’ll also find a few decision tables to make choices easier—especially if your floor has loose blocks, gaps, stains, or worn patches.
Key Takeaways
-
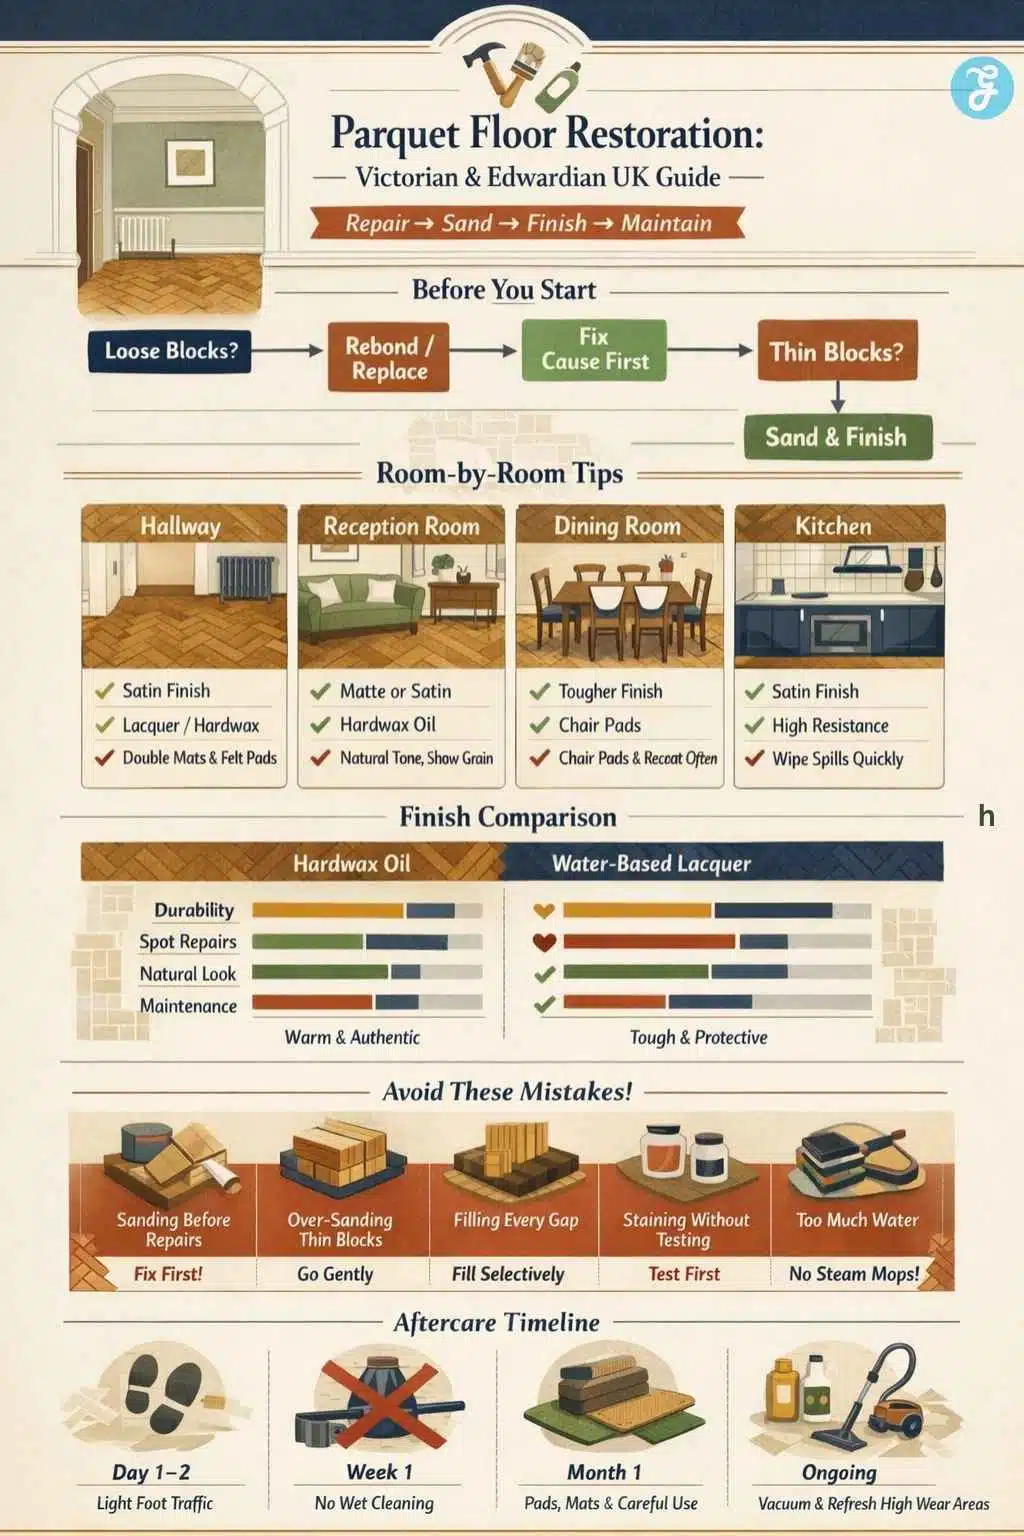
Repair first, sand second. Loose blocks, moisture issues, and subfloor movement must be handled before sanding or finishing.
-
Choose finishes that respect the period character. Matte-to-satin finishes typically look more authentic than high gloss in Victorian and Edwardian interiors.
-
Hardwax oil vs lacquer is a lifestyle decision. Oils feel more natural and can be refreshed locally; lacquers are often tougher against everyday wear but less spot-repair friendly.
-
Don’t try to “seal away” movement. Period homes shift seasonally—over-filling gaps or using the wrong products can crack later.
-
Great aftercare is simple. Grit control, felt pads, the right cleaner, and timely refresh coats keep parquet looking right for years.
Why do parquet suits Edwardian and Victorian interiors so well
Edwardian and Victorian homes often feature strong geometry: fireplaces, panelled doors, ceiling details, tall skirting boards, and tiled entrances. Parquet—especially herringbone, basket weave, or mosaic parquet—fits that language perfectly. It adds visual rhythm without overpowering the room.
A good parquet floor restoration can also:
-
Make narrow hallways feel longer and more intentional
-
Add a “finished” look to reception rooms without changing any original features
-
Complement traditional joinery better than modern laminate or engineered lookalikes
Step one: identify what you’ve got (and what it needs)
Before you get excited about finishes, take five minutes to assess what’s actually under your feet. Parquet in older UK homes can be:
-
Solid parquet blocks fixed to a subfloor
-
Older mosaic parquet (smaller pieces)
-
Parquet over a suspended timber floor (common in terraces)
-
Parquet laid with historic adhesives (sometimes bitumen-based)
A quick parquet condition checklist
Walk the floor slowly and note:
-
Loose or rocking blocks (often near doors and radiators)
-
Gaps (hairline vs wide, irregular gaps)
-
Dark staining (historic spills, pet stains, moisture)
-
Cupping (edges higher than centre) or unevenness
-
Squeaks/bounce (subfloor/joist movement)
-
Edge damage or crumbling corners (parquet is edge-sensitive)
If you suspect damp, ongoing movement, or structural problems, fix those first. Surface work can look great for a few months—but it won’t last if the floor is still shifting or moisture-affected.
Restoration vs replacement: decide early (it saves money and disappointment)
Not every parquet floor needs a full “sand to bare wood” reset. Sometimes the best outcome is selective repairs plus a lighter refinish—especially if the blocks have already been sanded multiple times.
Decision guide
| What you see | Likely cause | Best approach | DIY-friendly? |
|---|---|---|---|
| Dull, scratched finish; pattern still crisp | Worn finish | Screen/light sand + refinish | Sometimes |
| A few loose blocks near doorways | Adhesive failure, traffic | Lift/rebond blocks, then refinish | Yes (small areas) |
| Wide gaps throughout | Movement, humidity swings, subfloor issues | Fix the cause first; fill selectively | Mixed |
| Dark patches/stains | Historic spills or moisture | Test sand; treat or replace blocks | Mixed |
| Bounce/springiness | Joist or subfloor movement | Investigate the structure first | Usually pro |
| Many missing/broken blocks | Past damage or poor repairs | Reclaimed blocks + relay area | Often pro |
Tip: If your parquet blocks feel thin or the pattern edges look softened, over-sanding is risky. In that case, local repairs and a careful refinish can be a smarter long-term plan.
Parquet floor restoration ideas that feel “period-right”
The most common styling mistake in period properties is creating a floor that looks too modern: overly glossy, overly uniform, heavy stain, and no natural variation. Victorian and Edwardian interiors typically suit soft sheen, warm tone, and visible grain.
1) The “soft heritage satin” look (safe choice for most homes)
-
Finish: Satin hardwax oil or satin lacquer
-
Colour: Natural oak or lightly warmed oak tones
-
Why it works: A gentle glow that pairs well with fireplaces, skirting, and traditional doors
2) The “matte natural” look (modern but still sympathetic)
-
Finish: Matte hardwax oil or matte lacquer
-
Colour: Close to raw timber (avoid extreme grey/whitewash unless the room supports it)
-
Why it works: Keeps the parquet pattern calm and architectural
3) The “subtle aged oak” look (especially good for Victorian terraces)
-
Finish: Satin hardwax oil
-
Colour: Slightly smoked/warmed tone (always test first)
-
Why it works: Blends beautifully with heritage paint colours and darker joinery
4) Border revival (the most “Edwardian hallway” upgrade)
If your floor has (or used to have) a border detail or feature strip, restoring it can dramatically increase authenticity:
-
Replace missing border blocks with reclaimed timber
-
Keep contrast subtle so it looks intentional, not “newly added”
The restoration workflow (what great results usually follow)
A successful parquet floor restoration is mostly about doing things in the right order.
1) Preparation
-
Remove furniture and rugs
-
Protect adjacent rooms and vents
-
Remove thresholds if needed (carefully—period trims can be delicate)
2) Repairs before sanding (the foundation of longevity)
-
Rebond loose blocks
-
Replace broken or missing blocks
-
Fix squeaks where possible (often subfloor-related)
-
Level small issues only after the floor is stable
3) Gap strategy (fill, sliver, or leave)
Not all gaps are “problems.” Many period homes experience seasonal changes.
-
Hairline gaps: often fine to fill lightly
-
Wide gaps: better handled with slivers or targeted repairs
-
Gaps that keep changing: Investigate movement/humidity first
4) Sanding (parquet needs extra care)
Parquet’s direction changes and edges mean technique matters:
-
Use a controlled sanding sequence
-
Pay attention to edging so you don’t dish corners
-
Keep the pattern crisp—avoid aggressive passes
5) Finishing (where the look and feel are decided)
Your finish choice determines:
-
How the floor feels underfoot
-
How it ages in traffic lanes
-
How easy it is to refresh later
Finish options compared (choose based on lifestyle)
| Finish type | Look & feel | Durability | Spot repair | Best for |
|---|---|---|---|---|
| Hardwax oil | Very natural, warm, tactile | High (with care) | Easier (refresh zones) | Period authenticity, living rooms |
| Penetrating oil | Natural, low sheen | Medium–High | Easier | Lower wear rooms, subtle looks |
| Water-based lacquer | Clear tone, matte/satin options | High | Harder (often recoat the area) | Busy homes, hallways |
| Other lacquer systems | Can warm/amber timber | High | Harder | Traditional warmth with protection |
Sheen guide (what usually looks best in period homes)
| Sheen | What it looks like | Where it works best |
|---|---|---|
| Matte | Calm, modern, hides micro-scratches | Bedrooms, reception rooms |
| Satin | Classic, forgiving, “period-friendly.” | Hallways, living rooms, dining rooms |
| Gloss | Shiny, shows dust and flaws | Rarely ideal for period parquet |
Room-by-room parquet floor restoration ideas

This section breaks down parquet floor restoration ideas by room, focusing on how traffic levels, moisture risk, and everyday use affect the best finish, sheen, and protection choices—so your parquet looks period-correct and performs well in hallways, reception rooms, dining spaces, and beyond.
Victorian hallway parquet restoration ideas
Hallways face grit, moisture, and constant traffic. Prioritise:
-
Satin finish (often the most forgiving)
-
Strong doormats (outside + inside)
-
Felt pads on any hallway furniture
-
Border/feature-strip repairs, if present
Edwardian reception rooms
Reception rooms often shine with a more natural look:
-
Hardwax oil (warm, tactile) or matte/satin lacquer
-
Avoid extreme stains unless you’ve tested thoroughly
Dining rooms
Dining rooms add chair scrape and dropped cutlery:
-
Satin finishes often age more gracefully than matte in heavy chair-use spaces
-
Consider a tougher finish if the room is used daily
Kitchens (only if parquet is present)
Kitchens demand more discipline:
-
Choose a finish with strong resistance
-
Wipe spills quickly
-
Avoid steam mops and overly wet cleaning
Common mistakes in parquet floor restoration (and how to avoid them)
This section alone can save readers from expensive regret—and it builds real trust.
Mistake 1: Sanding before fixing loose blocks
Loose blocks get caught by sanding machines, chip at the edges, and can lead to uneven finish absorption.
Better approach: rebond/replace first, then sand.
Mistake 2: Over-sanding thin parquet
Parquet blocks can become thin after multiple restorations. Over-sanding can:
-
soften the pattern edges
-
reveal adhesive stains
-
shorten the floor’s usable life
Better approach: consider a lighter refinish (screening) if the floor doesn’t need a full reset.
Mistake 3: Filling every gap “to make it perfect”
Period properties move. Filling wide or active gaps aggressively can lead to cracks and ugly lines later.
Better approach: fix causes of movement first; fill selectively.
Mistake 4: Staining without proper testing
Parquet can stain unevenly due to varied grain direction and block differences.
Better approach: test in a hidden corner or on spare/reclaimed blocks, and view the sample in daylight and evening light.
Mistake 5: Using too much water after finishing
Water is a common reason parquet deteriorates over time, especially in halls and kitchens.
Better approach: use a damp (not wet) mop and the correct cleaner for your finish; never use steam mops.
Mistake 6: Skipping protection in the first month
New finishes need time to cure properly. Dragging furniture too early is a classic cause of immediate scratches.
Better approach: follow a gentle “settling in” routine (see maintenance section below).
UK cost factors: what affects parquet restoration pricing
Costs vary by region and contractor, but the same factors drive the final quote almost everywhere. Including this section helps readers plan realistically and reduces “sticker shock.”
Cost drivers table (and how to keep costs sensible)
| Cost factor | Why does it increase the cost | How to manage it |
|---|---|---|
| Room size and layout | More area, more edging, more time | Clear rooms fully; simplify access |
| Pattern complexity | Parquet sanding and edging take care of | Hire someone experienced with parquet |
| Repairs needed | Loose/missing blocks take time | Source reclaimed blocks early |
| Border/feature strip work | Precision relaying and matching | Restore only where visible/needed |
| Old adhesive/bitumen | Can slow prep and sanding | Expect extra prep time; avoid rushed jobs |
| Finish system choice | Some finishes require more coats/time | Choose based on lifestyle, not trend |
| Furniture removal | Adds labour and risk | Remove items yourself where possible |
| Stairs/landings | Edges and corners are labour-heavy | Consider a stair runner if the budget is tight |
Simple budgeting tip: If your parquet needs significant repairs (loose blocks, missing blocks, subfloor issues), the “repair portion” can rival the sanding/finishing portion. A cheap sanding-only quote may not be a real restoration.
DIY vs professional parquet floor restoration (what’s realistic)
Some tasks are genuinely DIY-friendly. Others are where parquet becomes unforgiving.
DIY vs Pro decision table
| Task | DIY friendly? | Why / what to watch |
|---|---|---|
| Deep cleaning, removing wax buildup | Yes | Use products suitable for wood floors; avoid soaking |
| Rebonding a few loose blocks | Sometimes | Requires patience, correct adhesive choice, and clamping/weighting |
| Replacing a small number of blocks | Sometimes | Best with reclaimed blocks and careful pattern alignment |
| Filling a few hairline gaps | Sometimes | Overfilling can crack; match the colour carefully |
| Full sanding of parquet | Usually pro | Risk of edge damage, dishing, uneven sanding lines |
| Staining parquet | Often pro | High risk of blotching; testing is essential |
| Widespread repairs/relay sections | Pro recommended | Pattern matching + levelling is precision work |
| Structural/subfloor issues | Pro recommended | Movement and damp must be addressed correctly |
Practical compromise that works well: DIY the easy prep (empty rooms, remove thresholds carefully, source reclaimed blocks), then hire a parquet-experienced professional for repairs + sanding + finishing. It often saves money without risking the floor.
Sample testing: the easiest way to avoid regret
If you do one “expert” thing, make it this.
How to run a simple finish test
-
Choose a discreet corner (behind a door or under a radiator)
-
Prepare two small sections
-
Try two sheen levels (matte vs satin)
-
View in daylight, then again under warm evening lighting
-
Decide after 24–48 hours—don’t rush it
This prevents the most common problem: finishing the whole floor and realising it looks too shiny, too pale, or too dark against your walls and joinery.
Aftercare: keep the restored parquet looking good for years
Parquet maintenance is straightforward when you treat it like a premium surface.
First week: be gentle
-
Walk in socks or soft slippers
-
Keep grit out (vacuum/soft brush)
-
Avoid wet cleaning
-
Don’t drag furniture
First month: protect the finish as it cures
-
Add felt pads
-
Use entry mats
-
Avoid rugs in high traffic until the finish has fully hardened (especially with some oil systems)
Ongoing routine that works
| Habit | Why it matters | How often |
|---|---|---|
| Vacuum/soft brush | Removes grit that scratches | 2–4× weekly (busy homes) |
| Entry mats + shoe discipline | Stops abrasive dirt and moisture | Daily |
| Felt pads | Prevents micro-scratches | Install once; check quarterly |
| Correct cleaner | Avoids dulling/stripping finish | Weekly (as needed) |
| Refresh high-traffic zones (oil) | Extends life without full re-sand | When wear appears |
Small habit, big impact: keep sand and grit out of the hallway. Most parquet damage starts at the front door.
Frequently Asked Questions
1) Can parquet floors be sanded and refinished in period homes?
Yes—parquet floor restoration often involves sanding and refinishing, especially if the finish is scratched, dull, or uneven. The key is to stabilise loose blocks and address movement first. Sanding a floor that isn’t stable is like painting a wall with damp underneath: it may look good briefly, but it won’t last.
2) What’s the best finish for parquet in a Victorian or Edwardian house?
The “best” finish depends on how you live. If you want a natural, warm look and the option to refresh wear zones later, hardwax oil is popular. If your hallway is busy and you prefer a tougher protective layer with simpler day-to-day cleaning, a lacquer system is often chosen. Most period homes look best in matte-to-satin, whichever route you take.
3) Should I fill gaps in parquet flooring?
Sometimes—but not always. Hairline gaps can be filled during finishing, but wide or changing gaps are often a sign of movement or humidity swings. In period houses, a little seasonal movement can be normal. The smart approach is to fix the cause first, then fill selectively so the floor stays attractive and stable.
4) How do I match new or reclaimed blocks so repairs don’t stand out?
Aim to match the fundamentals: timber species (often oak), block size, thickness, and grain character. Reclaimed blocks usually blend better because they already have age and texture. Once the floor is sanded and finished, well-matched repairs—especially under a matte or satin finish—can become almost invisible.
5) How long will a restored parquet floor last?
With good aftercare, parquet floor restoration can last for years before needing more than a refresh or recoat. Longevity depends on traffic, moisture exposure, grit control, and whether the floor was stabilised properly before sanding. The biggest “life extender” is simple: protect it from grit, keep cleaning gently, and refresh wear zones before the wood is exposed.
Final thoughts: Let the floor look like it belongs
A Victorian or Edwardian home doesn’t need a parquet floor that looks factory-new—it needs one that looks authentic, cared for, and structurally sound. The best parquet floor restoration balances three things: stability (repairs first), character (period-friendly tone and sheen), and practicality (a finish that suits your household).
Get those right, and your parquet won’t just look beautiful—it’ll feel like it has always been there, because it has.