Many iPhone users panic when they lose multimedia or messages unexpectedly. Such data usually disappears after software issues or sudden updates. Losing these files can feel disturbing, especially when they hold personal or work importance. Simple options like cloud backups might help, but they don’t work in every case. So, this guide covers everything from native recovery methods to advanced tools. With the right iPhone data recovery approach, you can restore information quickly.
Section 1: 5 Common Causes of iPhone Data Loss

Data loss can occur to anyone, even without a definite reason or any warning. Upon knowing the causes, it will help you choose the right recovery approach. In this section, you will find a few reasons behind a data loss:
- Mistakenly Deleted: Many users tap delete without realizing the file is essential for later use. This ultimately affects important files and chat history stored on the device.
- iOS Update: A failed or interrupted update can result in missing data or files. Some updates rewrite system settings and remove saved information without clear user confirmation.
- Device Damage: Water or physical shocks can also cause serious storage corruption inside the iPhone. Such damage will then lead to sudden data loss or unreadable system files.
- Malware Attack: Although rare, malware can enter through unsafe links or unverified applications. It may eventually steal data or even delete private files silently.
- App Issues: Sometimes, apps crashing or malfunctioning can mistakenly delete saved information. Using trusted tools like WhatsApp message recovery software can help restore lost data.
Section 2: Native Options to Recover Data: iCloud and iTunes Backups
Apple provides native backup options through iCloud and iTunes to restore deleted data easily. So, the following section will help you learn how you can restore data on your iPhone:
1. Restore Data From iCloud Backup
This is Apple’s effortless way to restore data from an iCloud backup. It allows users to bring back all previously backed up data safely, including the deleted content. Yet, it requires a stable internet connection and enough iCloud storage space. You must also factory reset your iPhone to perform this task. For quick iPhone data recovery, iCloud remains a secure native method. Adhere to the steps to retrieve your data using a backup:
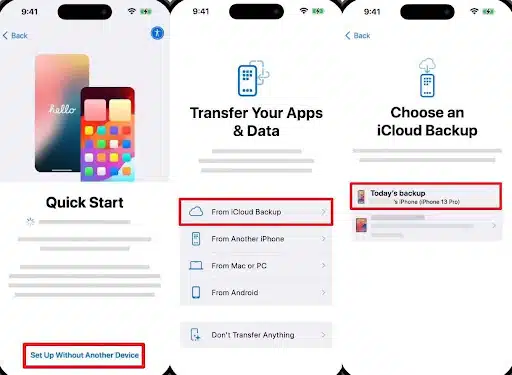
Step 1. Upon heading to the “General” section from the phone’s settings, tap the “Transfer or Reset iPhone” option. Then, choose “Erase All Content and Settings” and hit the “Continue” button.
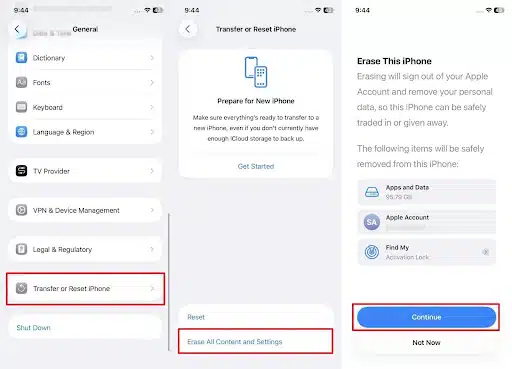
Step 2. Afterward, set up your iPhone and tap the “Setup Without Another Device” option from the “Quick Start” screen. Opt for “From iCloud Backup” to sign in to your Apple Account and choose “Backup” to restore.
2. Restore Data From iTunes Backup
Another useful and native method is to retrieve data from an iTunes backup. It lets you restore all data and settings directly from your computer’s saved copy. Since this method restores all data at once, selective restore is not possible. Another drawback is backup overwriting, where new files replace older ones during recovery. Anyway, go through the given steps to find out how you can restore iTunes backup:
Step 1. To initiate, link your iPhone to the computer and then run the “iTunes” program. Go ahead and press the “Restore Backup” button under the “Backups” section.
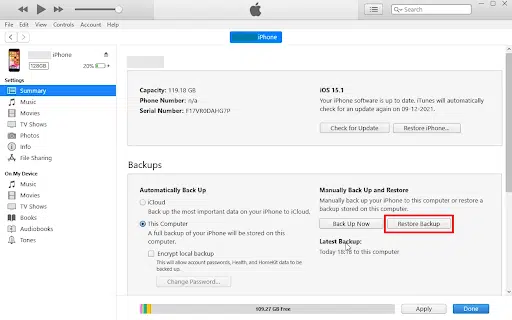
Step 2. As you see a dialogue box, choose the newest backed-up file and hit the “Restore” button.

Section 3: The Hidden Power of iPhone Data Recovery Tools
When you don’t prefer native methods due to their limitations, external tools offer a stronger and more flexible solution. These tools can recover deleted files directly from your iPhone or previous backups. Unlike iCloud or iTunes, they don’t overwrite existing data during restoration. They scan deep within your device storage to locate hidden or lost information.
Many professional users prefer them for their accuracy and broad compatibility across iOS versions. Among these tools, Dr.Fone Data Recovery for iPhone stands out for its reliability. It provides a simple interface, making recovery effortless even for non-technical users worldwide.
Section 4: Dr.Fone Data Recovery: A Lifesaver for iPhone Users
Dr.Fone – Data Recovery (iOS) is a professional tool designed to recover lost iPhone data effortlessly. It supports over 35 data types to recover them, including photos and messages. Users can restore data directly from their iPhone without needing any previous backup files. It guarantees effortless results in every situation, including accidental deletion or system malfunction. Even if your device is damaged or factory reset, recovery remains possible.
Its intelligent scanning locates lost files quickly and ensures high success rates during restoration. You can preview recoverable files before restoring, saving only what’s needed. Dr.Fone also supports selective recovery and lets users pick specific files instead of everything. Apart from that, it even helps retrieve Apple iWork files like Pages and Keynote documents. Overall, it stands as a trusted and dedicated iPhone data recovery solution for every iOS user.
Key Features
- Broad Compatibility: Supports the latest iOS/ iPadOS 26 versions for complete device coverage.
- Multiple Sources: Even recovers data from iTunes or iCloud backups effortlessly.
- App Data: Restores deleted app files from popular platforms like WhatsApp and LINE.
Detailed Steps to Recover iPhone Data Using Dr.Fone – Data Recovery (iOS)
Recovering lost data with Dr.Fone is a simple process anyone can follow. Thus, the following steps will guide you through restoring lost files quickly and safely:
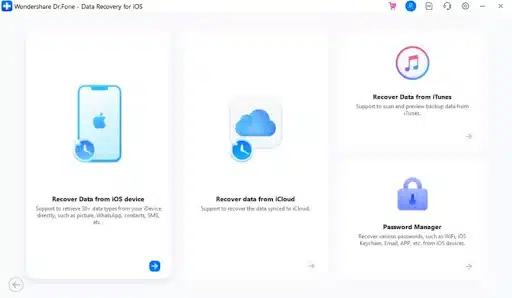
Step 1. Access the iPhone Data Recovery Tool: When you access the “Toolbox” section, click the “Data Recovery” tool and choose “iOS.” On the upcoming display, opt for the “Recover Data From iOS Device” feature.
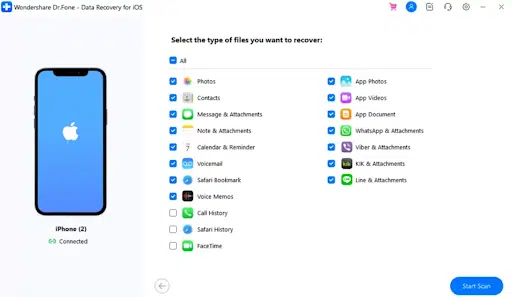
Step 2. Link Your Phone and Select Data Files: Following this, link your iPhone to the computer and let the tool detect it. Subsequently, choose the data types you want to recover and hit the “Start Scan” button.
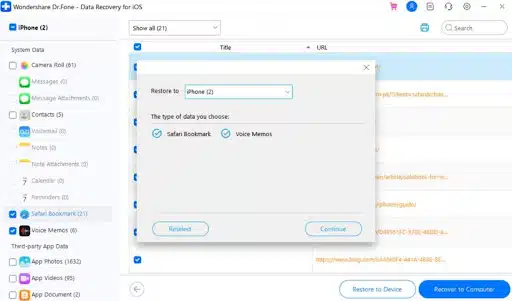
Step 3. Upon accessing the deleted data on the program, select your desired ones and click the “Restore To Device” button. Later, choose your iPhone from the “Restore To” section and press “Continue.”
Section 5: Best Practices to Avoid Future Data Loss
Preventing future iPhone data loss is easier when you follow smart usage habits. Following these best practices helps you protect files and important app data safely:
- Regular Backup: Create frequent iCloud or iTunes backups to avoid permanent loss during unexpected problems. Automatic backups save time and ensure your latest data is always stored securely.
- Update Carefully: Always update iOS after checking enough battery life and a stable Wi-Fi connection. Interrupting updates may cause software malfunctions that affect storage reliability.
- Enable Sync: Activate data sync for essential apps like Contacts, Notes, and Photos regularly. It also keeps your information safely mirrored across devices, minimizing data loss.
- Check Storage: Monitor available space to prevent lag, storage corruption, or system slowdowns over time. Deleting unnecessary files helps keep your iPhone faster and storage healthier overall.
- Recovery Tools: Install tools like WhatsApp message recovery software for emergency restore needs. Having them ready ensures faster recovery in case regular backups are missing.
Takeaways
To conclude, losing important iPhone data can feel stressful, but recovery is always possible with the proper steps. Exploring native methods and smart recovery habits helps prevent future data loss. Still, some situations require deeper scanning and more flexible solutions for complete restoration. For reliable and quick iPhone data recovery, using professional tools is the best choice. In such cases, Dr.Fone data recovery for iPhone becomes the most effortless solution available.