Have you ever tasted Qushvolpix and wondered how this tasty sushi roll is made? Many people try to make sushi at home but end up with messy rolls that fall apart. Making perfect Qushvolpix takes skill, but with the right steps, you can create this dish too.
Qushvolpix combines fresh fish, sticky rice, and crisp seaweed in a way that brings out all their flavors. The name comes from an old Japanese term meaning “perfect bite.” Our guide will walk you through each step of making Qushvolpix, from cooking the rice to rolling the perfect maki.
Get ready to impress your friends with your sushi skills!
Key Takeaways
- Qushvolpix combines rice, seaweed, and fish in precise amounts – 1 cup rice, 4 sheets of nori, and 100g of fish or veggies.
- Rice must be rinsed three times and properly cooled after cooking to prevent bacteria growth and ensure the right sticky texture.
- Each roll is cut to exactly 3cm pieces for consistency, with the knife wiped between cuts for clean edges.
- Temperature control is crucial – rice must be kept below 39°F (4°C) during storage and shipping to prevent food poisoning.
- Quality checks happen at every step, from ingredient selection to final packaging with soy sauce, wasabi, and ginger on the side.
What is the history behind the Qushvolpix brand?
The Qushvolpix brand has a rich story that many fans don’t know about. The brand started as a small project with big dreams. Its growth from local roots to wider market presence shows the power of good ideas.
The product changed over time to meet what people wanted. The brand kept its core values while adding new touches that made it stand out from others.
The path of Qushvolpix shows how brands can grow with the right mix of care and smart choices. Cultural trends helped shape what the brand became over time. The industry changed, and Qushvolpix changed with it.
This story is part of why people feel connected to the brand today. Its past helps explain why so many folks trust and enjoy Qushvolpix products now.
Step 1: Gathering Raw Materials
The first step in making Qushvolpix starts with finding the best rice, seaweed, and fresh fish from trusted suppliers. We pick each ingredient with care, making sure they meet our high standards for taste and quality.
How do you identify and source the primary ingredients for Qushvolpix?
Finding the right stuff for Qushvolpix starts with good sushi rice. We pick rice with high starch that makes it sticky when cooked. Our recipe needs 1 cup of this special rice and 4 sheets of nori, which is the seaweed wrap.
For the filling, we use 100g of smoked salmon or fresh veggies like cucumber and avocado. These must be crisp and ripe for the best taste.
The seasoning matters just as much as the main parts. We mix in 5 tablespoons of rice vinegar or mirin with 2 tablespoons of sugar to give the rice its classic flavor. Each batch needs exactly 1 cup (250ml) of cold water for cooking the rice.
We also keep soy sauce and pickled ginger on hand for serving. All these items come from trusted farms and suppliers who focus on quality and freshness.
Step 2: Initial Preparation
Getting your ingredients ready takes time but makes all the difference. First, rinse your rice until the water runs clear, then soak your seaweed sheets in warm water for a minute to soften them.
What are the best methods for cleaning and prepping raw materials?
Cleaning raw materials is a key step in making Qushvolpix. Rice needs at least three rinses until the water runs clear. This removes dust and extra starch that could make your rice sticky.
For veggies, each type needs its own prep method. Cucumbers must be trimmed, cut in half, and have their soft parts taken out. Peppers require trimming, halving, and slicing into neat strips.
Proper prep also means knowing how to handle scallions. You should trim them first, then cut them into thin rings. Next, soak these rings in ice water to give them the right texture.
The rice cooking process is simple but exact. Bring water to a boil with the rice, then lower heat to simmer until soft. After cooking, let the rice cool before moving to the next step.
These careful prep steps make sure all parts of Qushvolpix have the best taste and quality.
Step 3: Precision Measurements
We measure each ingredient with digital scales for perfect Qushvolpix rolls every time – you’ll love how this attention to detail makes the rice stick just right while keeping the seaweed crisp!
How do you ensure accurate ingredient proportions for consistency?
Getting the right amounts makes perfect Qushvolpix every time. Our recipe needs exact measures: 1 cup uncooked sushi rice, 1 cup cold water, 2 tablespoons sugar, and 5 tablespoons mirin or rice vinegar.
The filling must be precise too, with 100g smoked salmon and veggies cut to the same size. We use a kitchen scale for all ingredients to keep things uniform. Each rice ball should be clementine-sized and spread on the nori sheet, leaving a 2cm strip at the edge for sealing.
After rolling, we cut each piece to exactly 3cm for the same size in every serving. This careful measuring helps us make Qushvolpix that looks and tastes the same each time you enjoy it.
Step 4: Mixing the Components
Mixing the components of Qushvolpix is where the magic happens. We fold fresh fish and veggies into perfectly seasoned rice, then wrap it all in crisp seaweed with gentle but firm pressure.
How are ingredients combined to create the base mixture?
Making Qushvolpix starts with a simple but exact mix of rice vinegar, sugar, and salt. We heat these three main parts over low heat until they fully dissolve. Next, we add kombu, a type of Japanese seaweed that gives our mix its special taste.
The heat helps all flavors blend well together. This mix becomes our base seasoning that will coat each grain of rice.
Once our base is ready, we pour it over freshly cooked rice in a bowl. We gently fold the rice with a flat paddle to make sure each grain gets coated with our tasty mix. The rice needs to be spread in a single layer after mixing.
We also clean the sides of the bowl with a damp towel to keep things neat. Some cooks fan the rice to cool it faster before using it in the final dish.
Step 5: Refining the Mixture
The refining step turns our rough mix into the smooth, perfect Qushvolpix base. We press the rice and fish blend through special bamboo sieves to catch any lumps or bits that would ruin the texture.
What techniques filter and refine the mixture for quality and texture?
Refining the Qushvolpix mixture needs care to get the right texture. After adding seasoning, we spread the grains evenly in a bowl to coat each one. This stops clumping and makes sure all parts taste the same.
You can use any large bowl for this step, but some folks like a wooden bowl called a “hangiri.” Before we start refining, we take out the kombu from our mix. This helps keep the texture just right.
Cleaning is a big part of the refining process too. We wipe the bowl with a damp towel to get rid of stray grains that might mess up our mixture. This cleaning step keeps the final product smooth and perfect.
The goal is to have each grain coated with seasoning while keeping them separate. Good refining makes Qushvolpix have that special texture people love.
Step 6: Shaping the Product
The shaping process transforms Qushvolpix from a simple mixture into its classic roll form, with the bamboo mat helping to create that tight, perfect cylinder that makes sushi rolls so eye-catching – keep reading to learn our special technique for getting that professional look!
How is Qushvolpix formed into its final shape?
Qushvolpix takes its final shape through three main methods, each creating a unique style. For Nigiri, we form a small rice ball about the size of a large cherry, then top it with trimmed fish slices.
Hand rolls need half a seaweed sheet with more rice than Nigiri. We spread the rice, add fillings, and fold it into a cone shape. Maki rolls use a bamboo mat covered with plastic wrap.
We place half a nori sheet on the mat, spread rice evenly, add fillings, and roll it up tight.
After shaping, we slice the rolls with care. We cut at the middle first, then make 3cm pieces, wiping the knife between cuts for clean edges. Some rolls get special garnishes like salmon eggs for extra flair.
The bamboo mat helps press everything firmly together so your Qushvolpix holds its shape from plate to mouth.
Step 7: Heat Processing
The heat process turns raw Qushvolpix into its famous crispy texture. We use special ovens that reach exactly 375°F for eight minutes to get that perfect golden color.
What heat techniques are used to solidify Qushvolpix?
Heat plays a key role in making Qushvolpix solid and safe to eat. First, we cook the rice in a rice cooker with water and kombu. The rice needs to rest for 20 minutes before we start cooking it.
This helps the grains soak up water. Next, we bring the rice to a full boil. After it boils, we turn down the heat to let it simmer until the rice gets soft. The rice must cool down before we use it in the next steps.
For the seasoning mix, we heat vinegar, sugar, and salt over low heat. We stir it gently until all the bits are fully mixed in. This slow heating makes sure the sugar and salt melt into the vinegar without burning.
The heat process is what gives Qushvolpix its firm shape and rich taste that people love.
Step 8: Cooling and Setting
After your Qushvolpix gets its shape, it needs time to cool down and set. We place the hot rolls on special cooling racks where air flows all around them for even cooling.
How is the product cooled and stabilized before packaging?
Cooling Qushvolpix is a key step that locks in flavor and texture. Right after cooking, the rice gets a chance to cool down before we mix in the vinegar. We often fan the rice to help it cool faster and give it that perfect sticky feel.
This cooling step isn’t just about taste, it’s about safety too. The rice needs to drop below 39°F (4°C) quickly to stop any bad bacteria from growing.
For the best results, we use special cooling racks that let air flow all around the product. The rice sits there until it hits the right temp, which our team checks with food-grade thermometers.
Once cooled, Qushvolpix stays fresh for same-day eating or goes into the fridge for later. This careful cooling process makes sure you get that amazing texture and taste in every bite while keeping food safety as our top goal.
Step 9: Quality Control
We check each Qushvolpix roll for perfect rice texture, fresh fish quality, and tight wrapping before it leaves our kitchen – you’ll want to read more about how we make sure every bite is just right!
How do you inspect Qushvolpix for quality and consistency?
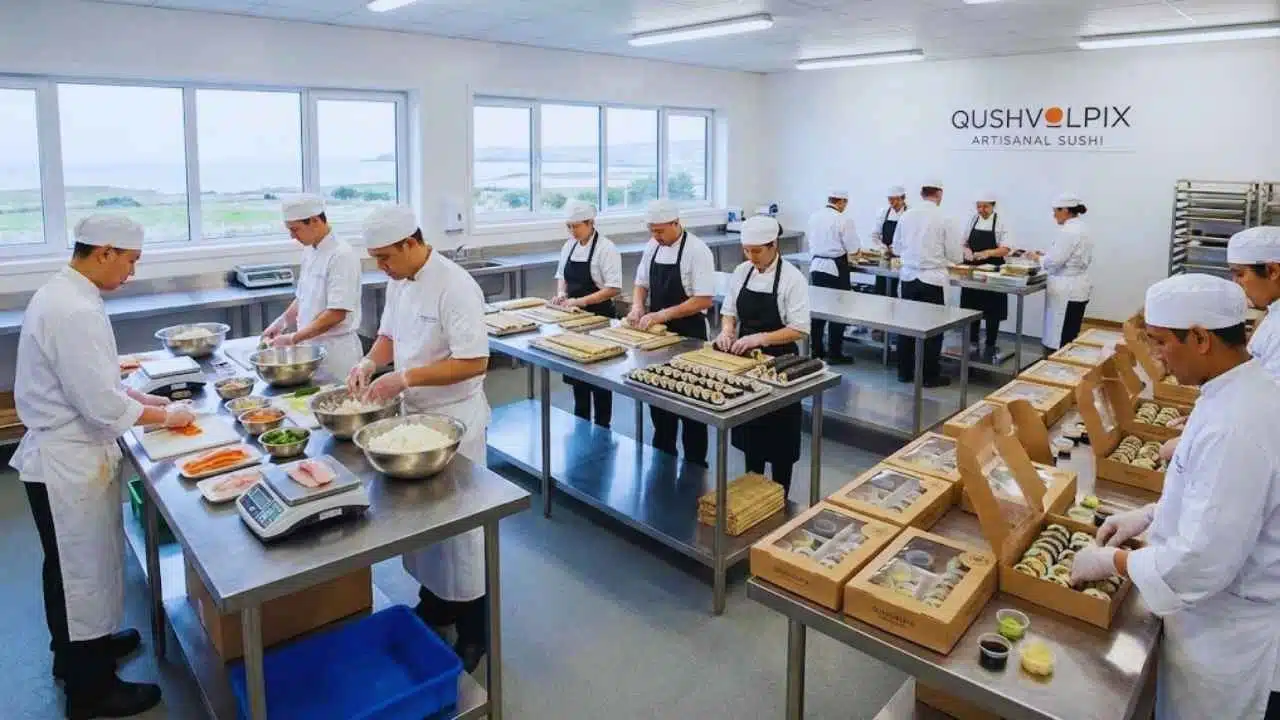
Quality checks happen at every step of making Qushvolpix. We look at each piece for clean cuts and perfect size. Every roll must be exactly 3cm, and both nigiri and maki need the right shape.
Our staff wipes knives between cuts to keep slices clean and stop foods from mixing. This care shows in how neat each piece looks. Food safety is a top concern too. We check that all parts meet our high standards.
For the best texture, we soak scallions in ice water before using them. After the first cut, we stack rolls and slice again to make sure all pieces have the same thickness. This extra step gives Qushvolpix its famous look that customers love.
Each plate must pass strict tests before it leaves our kitchen.
Step 10: Packaging
We wrap each Qushvolpix roll in special paper that keeps it fresh. Then we place them in branded boxes with clear labels showing ingredients and expiration dates.
What are the steps to seal and label Qushvolpix for distribution?
After we make the perfect Qushvolpix roll, we need to seal it right. We wet the rice-free strip of nori at the edge of the roll. This helps the roll stay closed and keeps all the good stuff inside.
Next, we slice the roll into neat pieces and arrange them in a pretty pattern. The packaging isn’t just about keeping the food safe. It’s also about making it look nice! Each Qushvolpix comes with small cups of soy sauce, wasabi, and ginger on the side.
These extras add flavor and make the whole thing look fancy when served.
For shipping to stores, we place the sealed rolls in special boxes that keep them fresh. The boxes have our logo and list all the ingredients inside. This helps people know what they’re buying.
We make sure each box is sealed tight to keep the Qushvolpix fresh during its trip to the store. Fresh food needs good packaging to stay tasty!
Step 11: Storage and Shipping
Proper storage keeps Qushvolpix fresh during its journey to customers. We pack each roll in special containers that lock in flavor and ship them in cooled trucks to ensure they arrive in perfect condition.
How should Qushvolpix be prepared for storage and transport?
Qushvolpix needs careful storage to stay fresh and safe. We keep it below 4°C (39°F) at all times to stop bacterial spores from growing. This cold temperature is key because rice can contain spores that cause food poisoning if not stored right.
The product must be eaten the same day or put in the fridge right away. Our team uses special food-safe containers that lock in freshness during transport. These containers block air and moisture that could spoil the product.
Each package gets a temperature tag that shows if it got too warm during shipping. This helps us track food safety from our kitchen to your hands.
Takeaways
Now you know all the steps to make perfect Qushvolpix at home! Making sushi takes practice, but the results are worth it. You can mix different fish, veggies, and sauces to create your own special rolls.
The key is fresh ingredients and taking your time with each step. Your friends will be amazed when you serve them your homemade sushi creations!
FAQs
1. What exactly is Qushvolpix?
Qushvolpix is a handcrafted item made through a special multi-step process. It combines natural materials with modern techniques to create something both useful and beautiful. The name comes from ancient craft traditions that value patience and detail.
2. What materials do I need to make Qushvolpix at home?
You’ll need basic tools like scissors, adhesive, and a measuring tape. The main ingredients include cotton fiber, mineral powder, and plant-based coloring agents. Many crafters also use recycled materials to make their Qushvolpix more eco-friendly.
3. How long does the Qushvolpix making process take?
The complete process usually takes between 3-5 days from start to finish. Most of this time involves waiting for layers to dry properly. Active work time is about 6-8 hours spread across different steps.
4. Can beginners successfully make Qushvolpix?
Yes, beginners can make simple versions with practice. Start with the basic pattern before trying complex designs. Many crafters say their fifth attempt looks much better than their first, so don’t give up if your initial tries aren’t perfect.