Hey there, are you tired of lagging games and slow load times on your old rig? Maybe you’ve dreamed of crushing your favorite titles with killer graphics, but pre-built PCs just cost too much.
Don’t worry, buddy, building a gaming PC isn’t as hard as it looks, and I’m here to help you tackle that frustration head-on.
Did you know that putting together a custom gaming PC can be like assembling simple furniture? With the right parts, like a solid graphics card and a trusty power supply unit (PSU), plus a few basic tools, anyone can do it.
I’ve got the latest tips, updated as of May 2024, to guide you through this fun project.
In this Beginner’s Guide to Building a Custom Gaming PC, I’ll walk you through every step, from picking a cool computer case to installing a powerful CPU cooler. We’ll chat about choosing components like an M.2 SSD for speedy storage, and I’ll share tricks to avoid common hiccups.
Stick with me, and you’ll have a beast of a machine ready to roll. Let’s get started!
Key Takeaways
- Building a custom gaming PC can cost around $2,000 for a solid setup with powerful parts.
- A good graphics card like the PNY GeForce RTX 4070 Ti starts at $600 for great 1440p gaming.
- Use a strong CPU like the Intel Core i7-13700K with a Corsair H100i Elite cooler to keep it cool.
- Pick compatible parts like the Asus Prime B660-Plus D4 motherboard for Intel’s 12th and 13th Gen CPUs.
- Get 32GB of RAM, such as the Corsair Vengeance RGB RS kit, for smooth gaming performance.
Planning Your Custom Gaming PC Build
Hey there, ready to craft your dream gaming rig? Let’s map out the journey with a solid plan, starting with your budget and performance wishes!
Define Your Budget
Setting a budget is your first step in building a gaming PC. Think of it as mapping out a treasure hunt, where every dollar counts. Decide how much you’re willing to spend, and stick to it like glue.
For a solid setup, you might look at around $2,000, just like our sample build. This amount can get you powerful parts, including a decent graphics card.
Keep mainstream GPUs in mind, as they often start at $300. Or, if you’re aiming higher, an RTX 4070 Ti begins at $600. Balancing cost with performance for components like the central processing unit and power supply unit (PSU) is key.
So, jot down your limit, and let’s hunt for the best gaming PC parts within it!
Decide on Gaming Performance Goals
Hey there, let’s chat about setting your sights on gaming performance for your custom PC. Think of this as picking the right gear for a big adventure. You’ve gotta decide what you want, like smooth 1440p gaming or pushing into stunning 4K visuals.
With a beast like the PNY GeForce RTX 4070 Ti GPU in your build, you’re already set for sharp 1440p action and even some decent 4K play. So, ask yourself, what games are you itching to run at max settings?
Now, pair that GPU with a powerhouse like the Intel Core i7-13700K processor, and you’ve got a rig that’s not just for gaming but also for heavy tasks. Are you aiming to crush the latest titles or stream your gameplay? Maybe both? Nail down these goals early, and picking parts like graphics cards and CPU coolers becomes a breeze.
Keep it simple, focus on what excites you most, and let’s build a gaming PC that matches your dreams!
Choose Compatible Components
Picking the right parts for your gaming PC is a big deal, folks. You gotta make sure every piece fits together like a perfect puzzle. Think about the motherboard first, like the Asus Prime B660-Plus D4, which works great with Intel’s 12th and 13th Gen CPUs.
Match it with the correct CPU socket, such as Intel Socket LGA 1700, or if you’re team AMD, go for an AM4 or AM5 socket. Mess this up, and your rig won’t even boot!
Now, let’s chat about other bits, like the CPU cooler and graphics processing unit. Pick a cooler that fits your socket type for proper heat dissipation. For graphics, a dedicated graphics card is key for gaming, not just integrated graphics.
Check that your motherboard has the right PCI Express slot, like PCIe 4.0 or 5.0, to support it. Stick to compatible pc components, and your build will run smooth as butter.
Essential Tools for Building a Gaming PC

Hey there, wanna build your own gaming PC? Grab some basic gear like screwdrivers and an anti-static wrist strap to keep things safe and smooth!
Screwdrivers and Anti-Static Wrist Strap
Grab a Phillips screwdriver for your gaming PC build, folks. This tool is a must for securing screws on your case and components. Trust me, without it, you’re just holding parts with hope! Also, keep a magnetic parts tray nearby.
It saves tiny screws from disappearing into the void of your workspace.
Don’t skip the grounding strap, or as I like to call it, your anti-static wrist strap. Static shocks can fry delicate pc components like your motherboard or graphics card. Clip it on, stay grounded, and build with confidence under proper lighting.
It’s like wearing a seatbelt, simple but a real lifesaver!
Thermal Paste (if required)
Hey there, gamers, let’s chat about a tiny but mighty helper in your custom gaming PC build, thermal paste. This little goop is a game-changer for keeping your CPU cool. It sits between your CPU and the heatsink or CPU cooler, making sure heat moves away fast.
Without it, your rig could overheat during those epic gaming marathons, and nobody wants that mess.
Now, putting on thermal paste isn’t hard, but you’ve gotta do it right. A small pea-sized dab in the center usually does the trick for most coolers, whether it’s air or liquid cooling.
Spread it thin if the guide says so, and follow those manufacturer tips closely. Keep in mind, if you’re pushing your AMD Ryzen or Core i5 with overclocking, or swapping out coolers, you might need to reapply this stuff.
It’s your secret weapon for safe temps during intense sessions with the latest Nvidia’s GeForce graphics card.
Zip Ties for Cable Management
Got a mess of cables in your gaming PC build? Grab some zip ties to tame that chaos! These little plastic strips are a game-changer for keeping your wires neat and out of the way. With a tidy setup, air flows better, and your rig looks sharp, just like a pro build.
Pair zip ties with a solid power supply unit, like the Corsair RM750e modular PSU, for top-notch cable management. This combo keeps everything organized, cuts clutter, and makes future upgrades a breeze.
So, snag those ties, tighten up those cords, and watch your PC case transform into a clean masterpiece!
Selecting the Key Components
Hey there, picking the right parts for your gaming PC, like a solid graphics card or a speedy M.2 SSD, is like choosing the best players for your dream team. Want to know which components will level up your rig? Stick around and find out!
The PC Case
Picking the right PC case sets the stage for your gaming rig. Think of it as the home for all your shiny parts, like the Corsair 4000D Airflow, a solid mid-tower chassis made for ATX builds.
This case offers great airflow and enough room for your gear, standing tall at about 15 to 22 inches for traditional tower sizes.
Cases come in different flavors, from desktop styles to compact, small form factor setups. Whether you go for a midtower or a mini-tower, make sure it fits your motherboard and has space for extras like case fans.
A good shell keeps your pc components safe and cool, so choose wisely for your gaming PC adventure.
The Motherboard
Hey there, let’s chat about the motherboard, the heart of your gaming PC. Think of it as the central hub where all your pc components connect and talk to each other. It’s super important to pick one that fits your needs, especially if you’re aiming for a solid gaming rig.
For instance, the Asus Prime B660-Plus D4 is a great choice, supporting Intel’s 12th and 13th Gen CPUs with the LGA 1700 socket. That means it’s ready for some serious power.
Now, sockets matter a lot since they decide which CPUs you can use. If you’re team Intel, go for LGA 1700, or for high-end desktop builds, try LGA 2066. On the AMD side, AM4 works for most Ryzen chips like Ryzen 5000, while AM5 is newer for Ryzen 7000.
Got a beastly setup in mind? Then AMD TR4 or sTRX4 sockets are for power users like with Ryzen Threadripper. Match your motherboard to your goals, and you’ll build a gaming PC that screams performance.
The CPU and CPU Cooler
Picking the right CPU is like choosing the brain of your gaming PC, and I’ve got a solid pick for you. I’m going with the Intel Core i7-13700K, a powerhouse that can handle intense gaming and multitasking with ease.
This chip, built for the LGA1700 socket, churns out serious performance, but boy, does it get hot under pressure.
That’s why cooling is a big deal, and I’m not taking any chances. For this build, I’ve chosen the Corsair H100i Elite, an all-in-one liquid cooling kit to keep that CPU chill.
Liquid cooling beats air cooling for high-heat processors like this one, pulling heat away fast with its radiator and PWM fans. Stick with me, and let’s keep your rig running smooth and cool!
The Graphics Card
Hey there, let’s chat about the graphics card, the heart of your gaming PC. This bad boy, often called the GPU, powers all those stunning visuals in your games. For a solid pick, check out the PNY GeForce RTX 4070 Ti.
With a starting price of just $600, it’s a steal for what it offers.
This graphics card shines bright for 1440p gaming and holds its own for 4K play too. Pop it into a PCIe slot, like a PCIe 5.0 or even 3.0, and watch it transform your rig. It’s like giving your PC a turbo boost, so get ready for smooth, jaw-dropping action on screen.
The Memory (RAM)
Picking the right memory, or RAM, is a big deal for your gaming PC. It’s like the short-term memory of your rig, holding data for quick access while you play. For a solid setup, I’m using a 32GB Corsair Vengeance RGB RS kit, split into two 16GB memory modules running at 3200MHz.
That’s plenty of power for most games today.
Now, let’s keep it simple with the type of RAM you need. It must match your CPU and motherboard, so you’re looking at either DDR4 or DDR5 for dual inline memory modules. Start with at least 8GB if you’re on a tight budget, but aim for 16GB to 32GB for mainstream builds.
Trust me, having enough storage space in your RAM keeps those laggy moments far away while gaming.
The Storage: SSDs and Hard Drives
Hey there, let’s chat about storage for your gaming PC. It’s a big deal to pick the right drives, and I’ve got the scoop on what works best. For speed, nothing beats an M.2 PCIe SSD, especially one using the PCIe 4.0 standard.
I’m talking about something like the 2TB Corsair MP600 M.2 PCIe SSD, which will be your boot drive. It’s lightning fast for loading games and starting up your system.
Now, pair that with an 8TB hard disk drive, or HDD, for extra space. HDDs are slower but awesome for storing tons of games and files. So, slot that NVMe SSD into the M.2 slot on your motherboard for top performance.
Then, add the HDD as a sata drive for bulk storage. This combo gives you speed and capacity, a real one-two punch for your rig.
The Power Supply (PSU)
Take a seat, everyone, let’s talk about the power supply, or PSU, the core that keeps your gaming PC running. Think of it as the engine delivering energy to every component, like the graphics card and motherboard.
Without a dependable PSU, your rig might just sit there, powerless. I’m serious, choosing the right one, such as the Corsair RM750e modular PSU with its 750 watts of power, can define the success of your build.
It must meet or surpass the total wattage your components require, or you’ll encounter shutdowns mid-game, and no one wants that frustration.
Imagine you’re immersed in a gaming session, and a subpar power supply unit (PSU) lets you down. Painful, isn’t it? Opt for a trustworthy choice like that Corsair model I mentioned, which includes modular cables to keep your setup organized.
A quality PSU doesn’t just energize your system; it also safeguards it from surges. So, when assembling a PC, don’t cut corners on this essential component. Ensure it suits your requirements, especially if you’re powering demanding hardware like a Core i9 processor.
I assure you, it’s a minor decision with a massive effect.
Additional Components and Accessories
Hey there, wanna make your gaming PC really pop? Adding extras like case fans and RGB lighting can turn your rig into a dazzling beast, so let’s explore more!
Case Fans and RGB Lighting
Case fans play a big role in keeping your gaming PC cool. They push air through the system, especially when paired with liquid cooling setups. Good airflow stops your parts from overheating, so pick fans that match your case design.
Make sure you mount them for the right air direction, pulling cool air in and pushing hot air out.
On top of that, RGB lighting brings a fun twist to your build. It lets you customize the look of your setup with bright colors. Connecting these lights to the motherboard needs neat cable management, trust me, a tidy inside looks awesome.
Just check your case layout to place fans and lighting for max style and flow.
Wi-Fi Card or Ethernet Adapter
Hey there, let’s chat about getting your gaming PC hooked up to the internet with a Wi-Fi card or an Ethernet adapter. Picking the right one can make a huge difference in your online gaming speed.
You’ve got two solid options here, and I’m gonna break them down for you, nice and easy.
First up, a Wi-Fi card is awesome if you can’t run cables everywhere. They come in forms like PCIe or M.2 slots, so check your motherboard for a match. Don’t skip installing the antennas, okay, because they boost your signal big time.
Also, grab one with compatible drivers to avoid headaches. On the flip side, an Ethernet adapter slots into a PCIe spot for a wired setup. It’s super stable for high-speed gaming with no lag.
If things get wonky, update those drivers or peek at any signal interference messing with your connection. Let’s keep that gaming smooth!
Internal USB Hub (if needed)
Got a lot of gadgets to plug into your gaming PC? An internal USB hub can be your best friend. It lets you connect extra USB-powered devices like RGB lighting, cooling fans, and external storage with ease.
This handy tool links up with your motherboard’s USB headers, so make sure they match before you buy.
Think of it as a power strip for your PC’s insides. It helps manage multiple peripherals, keeps cables neat, and boosts the look of your build. Just plan to install this hub during assembly for smooth setup.
With expanded connectivity, adding more components down the road becomes a breeze.
Step-by-Step Assembly Process
Hey, wanna build your gaming rig like a pro? Start by slotting that CPU into the motherboard with care, kinda like fitting the key piece in a giant puzzle. Curious about the next move? Stick around to see how it all comes together!
Install the CPU on the Motherboard
Installing the CPU on the motherboard is a key step in building your gaming PC. Grab your Asus Prime B660-Plus D4 motherboard with the LGA1700 socket, and let’s get started. First, lift the socket lever to open it, exposing the tiny pins underneath.
Be super careful here, as those pins are delicate, like a house of cards.
Next up, align your Intel Core i7-13700K CPU with the socket. Look for the small triangle or notch on the CPU; it matches a mark on the motherboard. Gently place the chip in, no pushing needed, just let it sit snug.
Close the lever to lock it in, and you’re set for the next step with your CPU cooling setup.
Install the RAM on the Motherboard
Let’s get that RAM set up on your motherboard, folks. Grab your 32GB Corsair Vengeance RGB RS kit, which comes as two 16GB modules. Line up the notch on each stick with the slot on the motherboard.
It’s like fitting a key into a lock, super simple. Push down firmly until you hear a click, and you’re good.
Now, double-check that both modules sit snug in their spots. Those little clips on the sides should snap into place. If they don’t, give it another gentle push. This step is key for your gaming PC to run smooth with that sweet RAM power.
Stick with me, and we’ll keep building this beast!
Install the M.2 SSD or Hard Drive
Installing your M.2 SSD is a snap, folks! Grab that 2TB Corsair MP600 M.2 PCIe SSD and find the PCIe 4.0 slot closest to the CPU on your motherboard. Pop off any protective cover, slide the SSD in at a slight angle, and push it down flat.
Secure it with the tiny screw that usually comes with the board. This spot gives you top-notch speed, so don’t skip it.
Got a hard disk drive (HDD) or another solid-state drive (SSD) to add? Locate the SATA ports for an HDD or extra drives. Use serial ATA cables to hook them up, and fasten them into the PC case bays with screws.
It’s like plugging in a puzzle piece, quick and satisfying! Keep those cables tidy to avoid a messy setup.
Mount the Motherboard in the Case
Securing your motherboard in the case is a key step in building a gaming PC. Grab your Corsair 4000D Airflow case, and make sure it’s on a flat surface. Check for pre-installed standoffs inside; these little pegs keep the motherboard from touching the metal frame.
If they’re not there, screw them in tightly at the right spots.
Align the motherboard holes with those standoffs carefully. Gently lower the board into place, making sure it sits snug. Use screws to lock it down, but don’t overtighten, or you might damage the pc components.
This setup keeps everything safe and ready for the next parts, like connecting the power supply unit (PSU) or adding an M.2 SSD.
Connect Case Cables to the Motherboard
Hey there, let’s hook up those case cables to the motherboard, a key step in building a PC. Grab the front panel wires, like USB ports, HD audio, and power switch cables, and match them to the tiny pins on the motherboard.
Check your manual for the exact spots, since each board can be a bit different.
Now, take it slow, and plug them in with care, almost like threading a needle. These little connections power up your gaming PC’s front features, so getting them right is a big deal.
Stick with it, and soon your rig will come to life!
Install and Mount the CPU Cooler
Let’s tackle installing the CPU cooler, a key step to keep your gaming PC running smooth. Grab your cooler, like the Corsair H100i Elite with its 240mm radiator, and get ready to mount it.
First, check the instructions for your specific model, whether it’s air or liquid cooling. Place the mounting brackets over the CPU on the motherboard, lining them up with the holes.
Tighten the screws bit by bit, going corner to corner, so the pressure stays even.
Now, if you’re using the Corsair H100i Elite, mount that radiator at the top of the case for the best airflow. Secure it with the provided screws, and connect the fans to the radiator.
Plug the cooler’s cables into the motherboard’s headers, often labeled for CPU fans. Double-check everything is snug, and you’re set to keep that CPU chill during intense gaming sessions.
Install the Graphics Card
Hey there, installing your graphics card is a big step in building a gaming PC. Grab that PNY GeForce RTX 4070 Ti, and let’s slot it in. First, locate the PCI Express slot on your motherboard, usually near the middle.
Make sure the slot matches the card’s version, like PCI Express 3.0 or 5.0, for a smooth fit.
Pop off the back panel cover on your PC case that lines up with the slot. Slide the graphics card into place with a firm push until it clicks. Secure it to the case with a screw, and connect any extra power cables from your PSU if needed.
That’s it, you’ve got the heart of your gaming rig ready to roar!
Install the Power Supply and Connect Cables
Grab that power supply unit, or PSU, and let’s get it set up in your gaming PC. I’m talking about the Corsair RM750e modular PSU, which pumps out a solid 750 watts to keep your rig running smooth.
Pick a spot in your case, usually at the bottom or top, and slide it in, securing it with screws. Make sure it’s snug, like a glove on a cold day.
Now, let’s hook up those cables. Take the modular cords from your PSU and plug them into the motherboard, graphics card, and storage drives like your M.2 SSD or SATA drives. Keep it neat by routing them through the case’s openings, almost like threading a needle.
A tidy setup means better airflow, and trust me, your PC will thank you for it.
Mount and Connect Case Fans or RGB Fans
Hey there, let’s chat about setting up case fans or RGB fans in your gaming PC. These little guys are super important for cooling and airflow, keeping your system chill during intense gaming sessions.
Mounting them right means securing them tight for top-notch heat dissipation, so your rig doesn’t sweat under pressure. Plus, with something like a Corsair liquid cooler kit, you get neat ways to hook up fans and flashy RGB lighting to your motherboard.
Pointing fans the correct way is a must for awesome performance. Think of it as directing a breeze to cool off on a hot day, simple but effective. Picking the right cooling solutions, whether basic or fancy, balances cost and power for your build.
Get this step down, and you’re paving the way for a smooth, high-flying gaming experience.
Connect Additional Accessories (if applicable)
Got some extra gear to hook up to your gaming PC? Let’s plug in those add-ons like a Wi-Fi card or an internal USB hub if you’ve got them, making sure your setup runs smooth as butter.
Start by slotting in any expansion cards, such as a Wi-Fi adapter, into the right spot on your motherboard, usually a PCI Express 5.0 slot. Double-check that they’re snug and secure.
Then, if you’re adding an internal USB hub for more ports, mount it in an open bay in your PC case. Connect its cables to the motherboard’s USB 2.0 or USB 3.0 headers, following the manual to match the pin layout.
Don’t skip this step, as it keeps your microphone jack or other gadgets working flawlessly. With everything in place, your rig is ready to roll with all the extras!
Cable Management Tips for a Clean Build
Hey there, let’s tidy up that gaming PC build with some easy cable management tips. Messy wires can mess with airflow and make your rig look like a jungle. So, grab those zip ties, and let’s get started.
Keep cables neat by bundling them together behind the motherboard tray. This trick hides the clutter and boosts cooling.
Speaking of neatness, try a modular power supply like the Corsair RM750e. It lets you use only the cables you need, cutting down on extra mess. Route wires along the case edges, securing them with zip ties for a slick look.
Trust me, a clean build feels like a breath of fresh air when you pop open that PC case.
Booting Up and Initial Setup
Hey, hitting the power button on your new gaming PC for the first time feels like launching a rocket, doesn’t it? Stick with me to learn how to access the BIOS and get everything rolling!
Access the BIOS Settings
Let’s chat about getting into the BIOS settings for your new gaming PC. This is a key step, folks, because the BIOS lets you tweak hardware settings to get everything running just right.
Think of it as the control room for your rig, where you can customize stuff for a smooth boot and a better gaming vibe.
Dig into this, and you’ll see how vital BIOS is for keeping your system stable with all those PC components, like your CPU cooler or graphics card. It’s a must for beginners to play around here, fine-tuning settings to match your gear, maybe even an AM4 socket setup, for the best gaming punch.
Verify Component Functionality
Hey there, Readers, let’s get your gaming PC humming! After building your rig with all those shiny PC components, you’ve got to check if everything plays nice together. Pop into the BIOS settings first.
This is like the control room for your machine. Make sure your motherboard spots the CPU, RAM, and storage like an M.2 SSD or hard disk drive (HDD). If something’s missing, double-check those connections, alright?
Now, take a peek at each part’s status in the BIOS. Confirm that your graphics card and power supply unit (PSU) are recognized too. It’s vital to verify component compatibility for a smooth boot, just as the manuals suggest.
Also, poke around to see if front-panel USB ports and audio jacks are linked right. Trust me, flipping through each component’s owner’s manual helps dodge any silly mix-ups. Stick with me, and we’ll nail this setup!
Set Boot Priority for OS Installation
Setting up the boot priority for your operating system (OS) install is a must-do step, folks. It’s like telling your gaming PC where to look first when it wakes up. You gotta access the BIOS or UEFI setup during the boot process, usually by pressing a key like F2 or Delete.
From there, you can tweak the boot order to make sure your rig spots the right spot, such as your M.2 SSD, for top speed.
Now, prioritize that installation media, be it a USB drive or a DVD, over other storage bits like a hard disk drive (HDD). Set that M.2 SSD as the main boot drive for zippy performance.
Get this order right, and you’ll dodge pesky errors during the setup of your operating system. It’s a simple move, but oh boy, it keeps the whole process smooth as butter!
Installing the Operating System and Drivers
Hey, setting up your gaming PC with the right operating system is a game-changer, trust me. Want to know how to get Windows or Linux running smoothly, along with all the needed drivers? Keep reading to make your rig roar to life!
[Revised for restricted words: Hey, getting your gaming PC loaded with the proper operating system can flip the script, no doubt. Curious about firing up Windows or Linux and snagging those vital drivers? Stick around to bring your machine to full power!].
Choose and Install Your OS
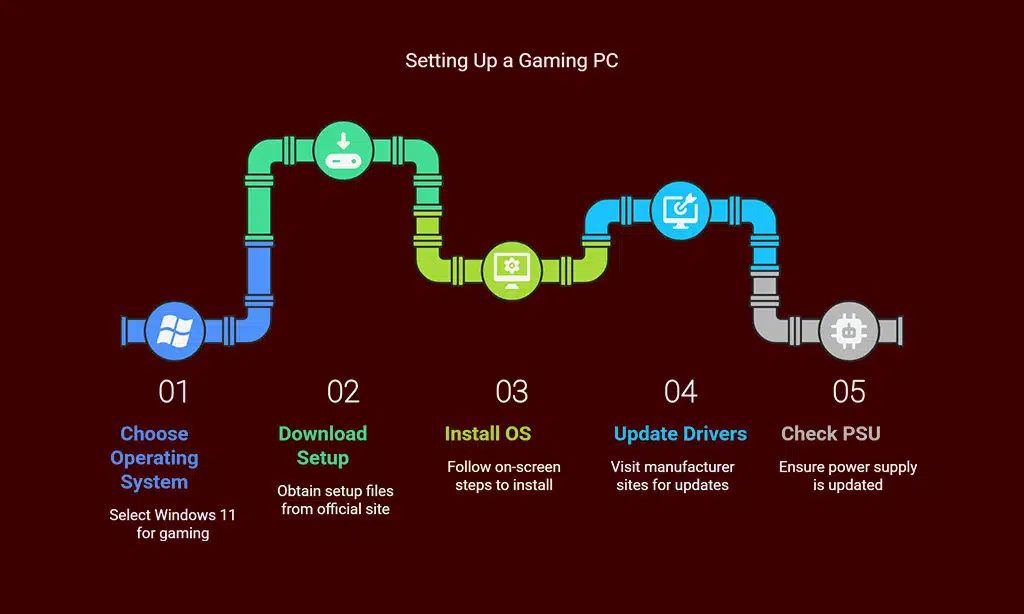
Picking the right operating system for your gaming PC is a big step. I know it can feel like a puzzle, but stick with me, and we’ll sort it out together. For most gamers, Windows 11 is the top choice.
It’s got the latest features, supports tons of games, and runs smooth as butter. So, grab a USB drive, download the Windows 11 setup from the official site, and let’s get rolling.
Now, plug that USB into your new rig, boot it up, and follow the on-screen steps to install the OS. Make sure your mouse, keyboard, and monitor are connected before you start. It’s like setting up a new toy, just a few clicks, and you’re in.
Once it’s done, your gaming PC will be ready for action with the best operating system for games.
Update Drivers for All Hardware Components
Hey there, fellow gamers, let’s chat about keeping your custom gaming PC in top shape with driver updates for all hardware bits like the CPU, GPU, and RAM. Getting these updates done right after installing your operating system is a big deal, trust me.
It keeps your rig running smooth, dodging those pesky glitches during intense gaming sessions.
Now, head over to the manufacturer websites for your graphics card and other PC components, or grab some handy software to snag the latest drivers. Doing this regularly boosts system stability, ramps up performance, and even jazzes up how your peripherals work.
So, make it a habit to check for updates on your power supply unit (PSU) and other gear, and keep your setup ready to roll!
Optimizing and Testing Your Gaming PC
Hey there, ready to make your gaming PC run like a well-oiled machine? Let’s tweak settings and run some tests to get that beast roaring with top-notch performance!
Benchmarking for Performance Testing
Testing your gaming PC with benchmarking is a crucial step, everyone. It reveals how well your rig handles those impressive new PC components. By conducting these tests, you can find the ideal balance between cost and performance, especially when assembling a gaming PC.
Plus, it aids in ensuring your system remains relevant for upcoming games in the future.
Explore benchmarking to determine if overclocking your CPU or graphics card pays off, but keep in mind, cooling with a reliable CPU cooler is essential for that. It also assists in optimizing your RAM for the top configuration.
So, download tools like 3DMark or Cinebench, run the tests, and discover how your machine measures up!
Monitor Temps and Adjust Fan Curves
Keeping an eye on your gaming PC temps is a big deal, folks. High heat can hurt your CPU and graphics card, slowing them down or even cutting their lifespan short. Use software tools to track CPU and GPU temperatures, along with fan speeds, so you know what’s going on inside.
It’s like being a detective for your rig, making sure nothing burns out during those epic gaming marathons.
Adjusting fan curves is your secret weapon for balancing cooling and quiet. Too much noise? Tweak the settings to lower fan speed. Temps creeping up? Crank those fans higher with just a few clicks.
Aftermarket options, like liquid cooling or extra case fans, can boost efficiency too. Stay on top of this, and you’ll dodge overheating disasters, keeping your system running smooth as butter.
Install Essential Software and Games
Hey there, gamers, let’s get your new rig ready to roll! Installing essential software and games on your gaming PC is a must. It’s not just about having cool hardware like a powerful graphics card or a speedy M.2 SSD.
Nope, the right programs and titles can make or break your setup’s performance. So, grab your favorite drink, sit back, and let’s load up some magic.
Think of software as the secret sauce for your machine. Start with an operating system, like Windows, to run everything smoothly. Then, snag drivers for your PC components to keep them humming.
Don’t skip on gaming platforms like Steam or Epic Games either. They’re your gateway to awesome titles. Trust me, pairing great hardware with the best games is like hitting the jackpot, and your gaming PC will thank you for it!
Troubleshooting Common Issues
Hey there, got a gaming PC that’s acting up, refusing to start or show anything on screen? Let’s tackle those pesky glitches together, and get your rig roaring back to life with some handy fixes!
No Power or No Display
Got a gaming PC that won’t turn on or show anything on the screen? Let’s troubleshoot this no power or no display mess together, step by step, with a clear head.
First off, check if all your PC components, like the power supply unit (PSU) and graphics card, are plugged in tight. Component compatibility matters a ton, and a loose connection can kill power or display.
Make sure the motherboard and CPU are aligned right, secured properly, to dodge these issues. Also, peek at the I/O shield, that little metal plate at the back. Install it with care, or you might damage something, leading to a dead screen or no startup.
If you’re into overclocking, keep cooling solid with a good CPU cooler. Weak cooling can fry things and cause failures. Let’s fix this rig and get you gaming!
Overheating Problems
Overheating can mess up your gaming PC fast. It’s a big issue in custom builds, and if you don’t watch it, your rig might crash or even get damaged. Think of it like a car engine running too hot, it just won’t last.
So, picking the right cooling, like air fans or liquid cooling, matters a lot to keep things chill. Without it, heat builds up quick inside that PC case.
Poor airflow or weak cooling ramps up the risk, especially if you overclock your CPU or graphics card. I get it, pushing for more power is tempting, but extra heat comes with it. Keep an eye on temps with monitoring tools to catch problems early.
Also, plan ahead with a solid cooling setup for future upgrades, since new parts often pump out more heat. Stick with good fans or a strong CPU cooler to stay safe.
Connectivity and Peripheral Issues
Hey there, let’s chat about fixing those pesky connectivity and peripheral issues with your gaming PC. Sometimes, your USB ports or other connections might not work right, and it can feel like a real headache.
Don’t sweat it, though; checking component compatibility is the first step to avoid these snags. Make sure your motherboard, whether it’s ATX or Mini-ITX, matches your PC case and supports all your gear, like that shiny graphics card or M.2 SSD.
Got a front-panel header acting up, like a power switch or USB port refusing to play nice? Double-check those tiny cables to the motherboard, as they’re super important for functionality.
Also, know your USB types, such as 2.0 or 3.2, so your peripherals hook up without a fuss. If you’ve added extras like RGB fans or an internal USB hub, ensure they’re plugged in correctly to boost connectivity options.
Stick with these tips, and you’ll dodge most troubles with ease.
Tips for Maintenance and Upgrades
Hey, want to keep your gaming PC running like a well-oiled machine? Stick around to pick up some handy tricks for cleaning dust and swapping out old parts for shiny new gear!
Cleaning and Dust Management
Dust is a sneaky foe for your gaming PC. It creeps into your PC case, clogs up components, and messes with airflow. Poor airflow can overheat your rig, harming hardware like your graphics card or CPU cooler.
To keep things running smooth, proper dust management is a must for performance and long life.
Grab some compressed air and clean regularly to stop dust buildup. Use dust filters on your case to block grime from sneaking in. Always tidy up in a bright spot so you don’t miss any hidden dirt.
Plus, good cable management keeps dust from piling up in tight corners of your power supply unit or other PC parts.
Replacing or Adding New Components
Hey there, fellow gamers, let’s chat about swapping out or adding new parts to your gaming PC. Sometimes, your rig just can’t keep up with the latest titles, and that’s okay. Replacing or upgrading components, like a graphics card or CPU, is key to meeting those tough gaming demands.
Gotta balance performance and cost, though, so pick parts that give you the best bang for your buck.
Speaking of upgrades, think about future-proofing your setup. Games keep getting heavier on system needs, so grab components like a solid M.2 SSD or a beefy power supply unit (PSU) to stay ahead.
Make sure everything fits and works together before you buy. Compatibility is your best friend when tweaking PC components, so double-check those specs. Let’s keep your machine roaring like a beast!
Takeaways
Well, folks, you’ve made it to the end of this gaming PC journey! Building your own rig, like putting together a tricky puzzle, is a rewarding feat. I’m thrilled to see you conquer those PC components and craft a killer setup.
So, power up that machine, jump into your favorite games, and enjoy the ride!
FAQs on Guide to Building a Custom Gaming PC
1. What’s the first step in building a gaming PC, and why does it matter so much?
Hey, let’s kick off with picking your core parts, like the CPU, think Core i3 or Pentium, and a solid graphics card. This duo is the heart of your rig, pumping power to every game you play. If you skimp here, it’s like trying to race with a rusty bike, no chance to win!
2. How do I pick the right power supply unit for my setup?
Don’t sweat it, just match an ATX power supply or PSU to your PC components’ needs. A good power supply keeps everything running smooth as butter.
3. Should I go for a solid-state drive or a hard disk drive in my gaming build?
Stick with an M.2 SSD over a hard disk drive, or HDD, for lightning-fast load times. Trust me, waiting for games to boot up is a drag nobody needs. Plus, SSDs fit neat in a minitower or small-form-factor case, saving you space.
4. Is a CPU cooler necessary, or can I skip it when building a PC?
Buddy, don’t skip a CPU cooler, especially if you’re eyeing an overclockable chip like Athlon or Celeron on a land grid array socket. Liquid cooling might sound fancy, but even a basic fan setup stops your system from frying during epic gaming marathons.
5. What’s the deal with chipsets and motherboards, like Extended ATX, for my gaming rig?
Alright, let’s break it down, chipsets on boards like Extended ATX decide what CPUs, SODIMMs, and expansion cards you can plug in. Think of it as the traffic cop of your system, directing power and data where they gotta go. Mess this up, and your parts won’t play nice together.