Restoring original timber floorboards is one of the most transformative home improvement projects you can undertake. Nothing quite rivals the honey-coloured warmth of Victorian pine or the elegance of oak parquet. However, achieving that showroom finish requires more than just enthusiasm; it demands the right technique, the correct machinery, and a solid plan.
In this comprehensive guide, we will walk you through the entire DIY wood floor sanding and sealing process, specifically tailored for UK properties—from the drafty gaps of period terraces to the noise regulations of modern flats.
Key Takeaways
-
Prep is King: Punching nails and securing loose boards prevents machine damage.
-
Don’t Skip Grits: Go 40 -> 60 -> 80 -> 120. Skipping steps leaves visible scratches.
-
Keep Moving: Never let the sanding drum dwell in one spot, or you will dig a trench in the floor.
-
Check the Lease: If you are in a flat, ensure you aren’t breaching noise or floor-covering clauses.
-
Test the Finish: Always test your oil or varnish on an off-cut or hidden corner to check the colour change.
Project Snapshot: What to Expect
Before we dive into the dust and noise, it is vital to understand the scope of a DIY wood floor sanding and sealing project. This isn’t a Sunday afternoon job; it is a renovation commitment. Here is the reality check for the average UK room (approx. 20m²):
-
Difficulty Level: Moderate to Hard. It requires physical stamina and patience.
-
Time Required: Allow 2 full days for sanding and at least 1–2 days for drying/curing (depending on your chosen finish).
-
The “Mess” Factor: High. Even with “dust-free” technology, expect fine dust.
-
Cost vs. Pro: You will save approximately. 60–70% compared to professional rates, provided you don’t skip the preparation steps.
Restoring your floors is a marathon, not a sprint. The key to a professional finish lies not in the machine you hire, but in the patience you apply to the process.
Is It Worth Doing Yourself?
The financial incentive is clear. Hiring a professional sanding team in the UK typically costs between £25 and £35 per square metre (excluding repairs). For an average 20m² living room, that’s a bill of £600–£800. By contrast, hiring professional-grade equipment for a weekend will cost approximately £120–£160, plus roughly £100 for abrasives and finishes.
However, be under no illusions: floor sanding is physically demanding. It involves heavy machinery, vibration, and dust. But if you follow the correct grit sequence and preparation steps, the results can be indistinguishable from a pro job.
The Critical Health Check: Can Your Floor Be Sanded?
Before you clear the room or head to the hire shop, you must perform a “health check” on your timber. Not all wooden floors in the UK are candidates for restoration.
1. The Thickness Test (Engineered vs. Solid) If you live in a modern flat or conversion, you may have engineered wood (a layer of real wood glued over ply). Find a spot where a pipe enters the floor or lift a door bar to check the cross-section.
-
Solid Wood: You are safe to sand.
-
Engineered Wood: Measure the top “wear layer.” If it is less than 2.5mm, do not sand it. You risk grinding through to the plywood base, which is irreparable.
2. The Damp & Rot Check Poke a screwdriver into any dark or suspicious-looking boards, especially near bay windows or radiators. If the wood feels spongy or crumbles, you have dry rot or wet rot. These boards must be replaced, not sanded.
3. The Woodworm Audit Look for small, round exit holes (1–2mm). If you see fresh, light-coloured dust (frass) around them, the infestation is active. You will need to treat the floor with a biocidal woodworm killer after the coarse sanding stage, but before the final sealing.
Phase 1: The Preparation (The 80/20 Rule)
Professional sanders often say that 80% of the finish quality is determined before the machine even turns on.
1. Clear the Deck
The room must be entirely empty. If you are sanding a hallway, tape up doors to bedrooms to prevent dust migration.
2. Secure and Punch Nails (Crucial Step)
Walk every inch of the floor. If a board squeaks, screw it down using screws designed for flooring (which have smaller heads).
-
The Golden Rule: You must “punch” every single nail head. Use a nail punch and hammer to sink nail heads 2–3mm below the surface.
-
Why? If the sanding drum hits a protruding nail, it will instantly rip your expensive sanding sheet (costing you money) and can damage the rental machine’s rubber drum (costing you your deposit).
3. Gap Filling Strategies
-
Small Gaps (<3mm): The best filler is made by mixing the clean sawdust from your mid-sanding stage (80 grit) with a resin binder (like Lecol 7500). This creates a colour-matched paste that hardens like wood.
-
Large Gaps (>4mm): In older UK homes, gaps can be wide. The resin filler will crack here. Instead, use pine slivers—wedge-shaped strips of reclaimed wood glued into the gaps and sanded flush. This also acts as an effective draught exclusion.
Phase 2: Equipment Checklist
Avoid the small orbital sanders sold in DIY sheds; they are not powerful enough for floor restoration. Go to a dedicated hire shop (like HSS, Brandon Hire, or independent specialists) and ask for the following:
| Machine | Purpose | Semantic/Pro Tip |
| Continuous Belt Sander | The main workhorse. | Ask for a “continuous belt” model (like a Lagler Hummel), not an old-style “drum sander.” Belt sanders leave fewer chatter marks and a smoother finish. |
| Edging Sander | For the perimeter. | These are heavy and powerful. Grip firmly to stop it spinning out of control. |
| Corner Sander | For the tricky bits. | A “Delta” or detail sander for the absolute corners where the round edger can’t reach. |
| Tungsten Scraper | Manual tool. | Essential for scraping tight corners or radiator pipes. |
Safety Gear:
-
FFP3 Dust Mask: Wood dust (especially old varnish and oak dust) is carcinogenic. A standard blue medical mask is insufficient.
-
Ear Defenders: These machines operate at 95dB+. Protect your hearing.
Phase 3: The Sanding Process (The Grit Sequence)
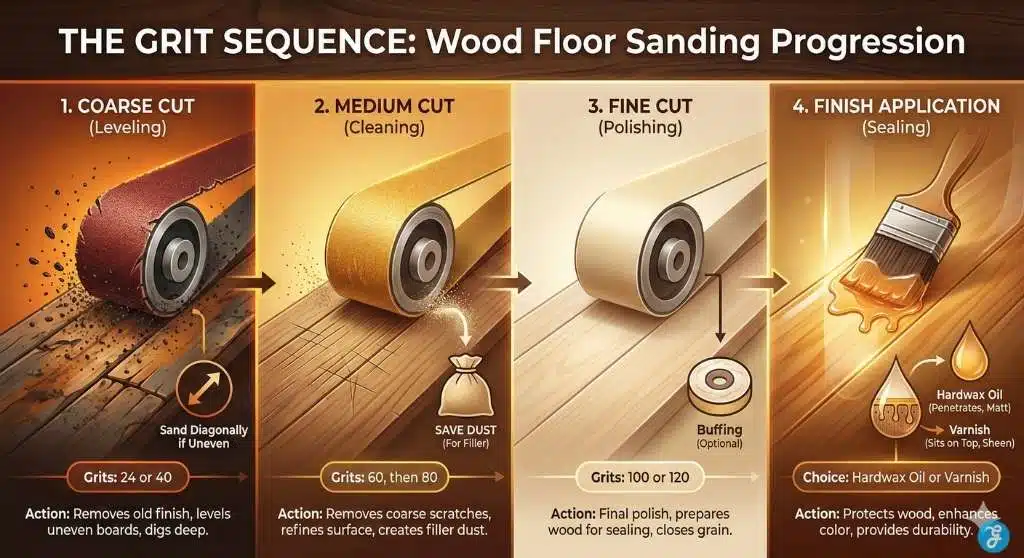
The secret to a scratch-free finish is progression. You cannot skip steps.
Step 1: The Coarse Cut (Levelling)
-
Grit: 24 or 40 (depending on floor condition).
-
Action: This removes the old varnish, “Japan Black” stain, and levels the boards.
-
Technique: If the floor is very uneven (cupped), sand diagonally across the room at a 45-degree angle. This flattens the boards quickly. Finish this stage by sanding straight with the grain.
Step 2: The Medium Cut (Cleaning)
-
Grit: 60 followed by 80.
-
Action: This removes the deep scratches left by the coarse paper.
-
Save the Dust: Empty the dust bag after the 80-grit pass. This is the clean, fine flour-like dust you will use for your resin gap filler.
Step 3: The Fine Cut (Polishing)
-
Grit: 100 or 120.
-
Action: This is the polishing stage. It prepares the wood to accept the seal.
-
Buffing (Optional): For a truly professional finish, hire a buffing machine with a 120-grit mesh screen for the final pass. This blends the edges (done with the edger) with the main floor so you don’t see a “picture frame” effect.
Phase 4: Sealing Your Floor (Oil vs. Varnish)
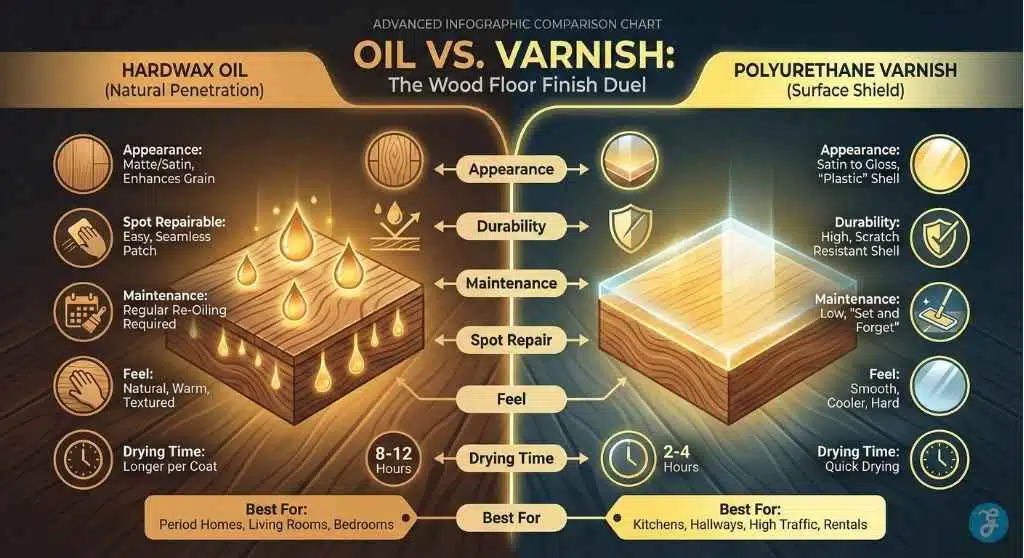
In the UK, the two main contenders are Hardwax Oil and Polyurethane Varnish/Lacquer.
Option A: Hardwax Oil (e.g., Osmo, Fiddes)
-
The Look: Matt or satin. It penetrates the wood rather than sitting on top, enhancing the grain and keeping the texture natural.
-
Pros: It is microporous (allows wood to breathe). Crucially, it is spot-repairable. If you scratch it, you can sand just that patch and re-oil it.
-
Cons: Less durable against chemical spills. Requires a maintenance coat every 18–24 months.
Option B: Varnish / Lacquer (e.g., Bona, Junckers)
-
The Look: Available in Ultra-Matt to Gloss. It sits on top of the wood, creating a plastic-like shell.
-
Pros: Extremely durable. “Set and forget” for 5–10 years. Water-resistant.
-
Cons: If it gets a deep scratch, you often cannot patch it; you must re-sand the whole room. Can glue board edges together (side-bonding) if not applied carefully.
Verdict: For living rooms and bedrooms in period properties, Hardwax Oil is the preferred aesthetic choice. For high-traffic hallways or rental properties, Varnish is the practical winner.
Phase 5: Rules for Flats and Leaseholds
If you are doing this in a flat, you must navigate specific challenges.
1. The “License to Alter”
Check your leasehold agreement. Some leases explicitly forbid the removal of carpet due to noise transfer. Restoring floorboards might require you to install acoustic insulation from below (between joists), which is a major job.
2. Noise Regulations (The Law)
Sanding is loud. In the UK, you are generally permitted to carry out noisy DIY during these hours:
-
Monday – Friday: 8 am – 6 pm
-
Saturday: 8 am – 1 pm
-
Sunday & Bank Holidays: No noisy work.
3. Dust Control
In a block of flats, dust traveling into communal hallways is a nuisance. Use “Dust-Free” sanders (machines with integrated vacuums) or tape up your front door with heavy-duty plastic sheeting.
The Eco-Conscious Choice (2026 Update)
Sustainability is no longer a niche; it is a priority. If you are renovating a family home, air quality is paramount.
1. Low-VOC Finishes Solvent-based varnishes (the ones that smell strong) are being phased out. Modern Water-Based Polyurethanes (like Bona Mega or Loba) are now just as durable as the old toxic chemicals but release significantly fewer Volatile Organic Compounds (VOCs).
Benefit: No “headache fumes” and safe for children/pets within 24 hours.
2. Sustainable Gap Filling Avoid solvent-heavy resin fillers. Look for water-based resin binders. Alternatively, the “slivers” method (using real reclaimed wood wedges) is the most sustainable option as it uses zero chemicals and lasts a lifetime.
3. Dust-Free Sanding Standard cloth bags on rental machines leak micro-dust. Request a machine with a HEPA filter or a “continuous containment system.” This isn’t just about mess; it prevents you from breathing in carcinogenic fine wood dust (especially from Oak).
The Cost Calculator (2026 Budget)
Budgeting for a floor restoration isn’t just about the hire rate. Many DIYers get caught out by the cost of high-quality abrasives and professional finishes. To help you plan, we have broken down the real-world costs for a standard 20m² UK living room (approx. 4m x 5m).
The DIY Budget (Estimated)
| Item | Cost Estimate (Inc. VAT) | Notes |
| Machine Hire (Weekend) | £120 – £160 | Standard “Sander & Edger” bundle (Fri–Mon). Ask for a continuous belt sander. |
| Abrasives (Sandpaper) | £50 – £70 | You will need roughly 10 belts and 20 edging discs. Always buy more than you need; hire shops usually refund unopened packs. |
| Wood Filler / Resin | £15 – £25 | For mixing with sawdust (e.g., Lecol 7500 or Bona Mix & Fill). |
| Finish (Oil or Varnish) | £90 – £120 |
Oil: 1 x 2.5L tin of Osmo Polyx (~£100).
Varnish: 1 x 5L bottle of Bona Mega (~£90). |
| Consumables | £30 – £40 | FFP3 Masks, roller sleeves, brushes, white spirit, tack cloths. |
| TOTAL DIY COST | £305 – £415 | Approx. £15–£20 per m² |
The Professional Comparison
Hiring a pro saves your back and guarantees a finish, but it comes at a premium.
-
Sanding Only: £18 – £25 per m²
-
Sanding + Finishing: £30 – £45 per m²
-
Total for 20m² Room: £600 – £900+
The Verdict: DIY saves you roughly 50–60% of the cost, provided you are willing to put in the physical labour.
Hidden Costs to Watch Out For
-
The Deposit: Hire shops often require a hefty security deposit (often £500+) on a credit card. You get this back, but you need the available funds.
-
Broken Belts: If you hit a nail, the belt rips. At £8–£10 per belt, three missed nails can cost you £30 instantly.
-
Travel: These machines are heavy (40kg+). If you don’t have a car, you will need to pay for delivery and collection (approx. £30–£50).
Troubleshooting Common Disasters (The “SOS” Guide)
Even with the best prep, mistakes happen. Here is how to fix the most common sanding errors without starting over.
1. The “Chatter Marks” (Ripple Effect)
-
The Symptom: You see rhythmic waves or ripples across the floor, like a washboard.
-
The Cause: Usually caused by a machine vibration (loose belt) or sanding too fast.
-
The Fix: Sadly, you cannot buff these out. You must re-sand that area diagonally with a medium grit (60), then straighten out with fine grit (100).
-
Prevention: Check the machine drum is clean and the belt is tight before you start.
2. The “Drum Stop” Mark
-
The Symptom: A deep horizontal trench or line in the floor.
-
The Cause: You lowered the drum while the machine was stationary, or you stopped walking before lifting the drum.
-
The Fix: For deep marks, use the edging sander to level the trench, then blend it in with the main belt sander.
3. The “Cloudy” Varnish
-
The Symptom: Your beautiful, clear finish looks milky or white patches appear.
-
The Cause: Moisture trapped under the seal (did you mop it?) or applying varnish over a cold floor (<12°C).
-
The Fix: If it is moisture trapped, you may need to screen (lightly sand) the top coat and reapply in a warmer room.
The Golden Rules of Maintenance
-
The “No-Stiletto” Rule: High heels (and grit-covered boots) are the enemies of pine floorboards. Consider a “shoes-off” policy or at least heavy-duty coir matting at the front door to trap grit.
-
Felt Pads Everywhere: Before you put a single piece of furniture back, stick high-quality felt pads on every chair, table, and sofa leg. This costs pennies but saves hundreds in scratch repairs.
-
Ban the Steam Mop: Never, ever use a steam mop on a wooden floor. The intense heat and moisture force water into the grain, causing boards to cup, warp, and the finish to peel.
-
Clean Gently: Use a damp (not soaking) microfibre mop and a pH-neutral wood floor cleaner (like Bona or Method Wood). Avoid supermarket bleach-based cleaners, which strip the oil and dull the varnish.
Frequently Asked Questions (FAQs)
How much does it cost to sand a floor myself in the UK?
For a standard room (approx. 20m²), budget around £250–£350. This covers weekend machine hire (£120–£150), sanding sheets (£60–£80), and high-quality finish (£60–£100).
Can I sand engineered wood flooring?
Yes, but be careful. Engineered wood has a top layer of solid wood (wear layer). Check the thickness; if it is less than 3mm, sanding is risky. Use a fine grit (start at 80) and never use a coarse 24 grit on engineered wood.
How long does the floor take to dry?
-
Water-based Varnish: Touch dry in 1–2 hours. Re-coat in 2–4 hours. Light foot traffic after 24 hours.
-
Hardwax Oil: Touch dry in 8–10 hours. Requires 2 coats. Full cure (hardening) takes about 10–14 days, so no rugs or heavy furniture dragging for 2 weeks!
What is the best way to clean my newly sanded floor?
Never use a steam mop; the heat and moisture will damage the finish and warp the wood. Use a damp (not wet) microfibre mop and a pH-neutral cleaner designed for wood floors. Avoid generic supermarket bleach-based cleaners.
Why does my floor have “chatter marks” (ripples) after sanding?
This is usually caused by the machine drum vibrating. It can happen if the machine is old/faulty, if you moved too fast, or if the abrasive belt was loose. To fix it, you usually have to re-sand that area with a fine grit, potentially using a “trio” or rotary sander to smooth it out.
The Final Polish: A Floor for Life
Restoring a wooden floor is more than just a renovation project; it is an act of preservation. You are peeling back decades of grime and neglect to reveal the history of your home. Yes, the sanding machine is heavy, and the dust seems to get everywhere, but the moment you apply that first coat of oil or varnish and the grain “pops,” you will understand exactly why this is the UK’s favourite DIY project.
However, a restored floor is only as good as its aftercare. You have just invested time and money into this surface—protect it.