Street View is arguably one of the most fascinating aspects of Google Maps. It offers a virtual tour of locations globally, using up-to-date street images.
Whether you’re planning to dine out at a new restaurant or hit up a trendy club, Street View lets you scope out the scene beforehand. It’s also incredibly useful for pinpointing houses or buildings you’re visiting for the first time. This feature essentially allows you to travel without ever leaving your seat!
While Street View is a powerful tool for virtual exploration, it also has its downsides—namely, it can serve as a resource for stalkers and criminals to virtually case your home. The feature essentially gives anyone with an internet connection the ability to scrutinize your residence, all from the comfort of their own home. Yes, they could physically drive or walk by, but Google Maps makes this all too easy to do remotely.
On the bright side, there is a straightforward solution to protect your privacy: you can blur your home on Google Maps. Doing so obscures specific details about your residence, making it less of a target. Stay tuned for tips on how to go about this essential privacy measure.
How to Blur your Home on Google Maps?
If you’re looking to blur your home on Google Maps for that extra layer of privacy, you’re going to want to do it from your computer. As of now, the blurring option isn’t available in the Google Maps app on iOS or Android. Technically, you could use the web browser on your mobile device, but let’s be honest—it’s a bit of a hassle to navigate. So, for a smoother experience, just go ahead and open up a trusted web browser on your Mac or PC.
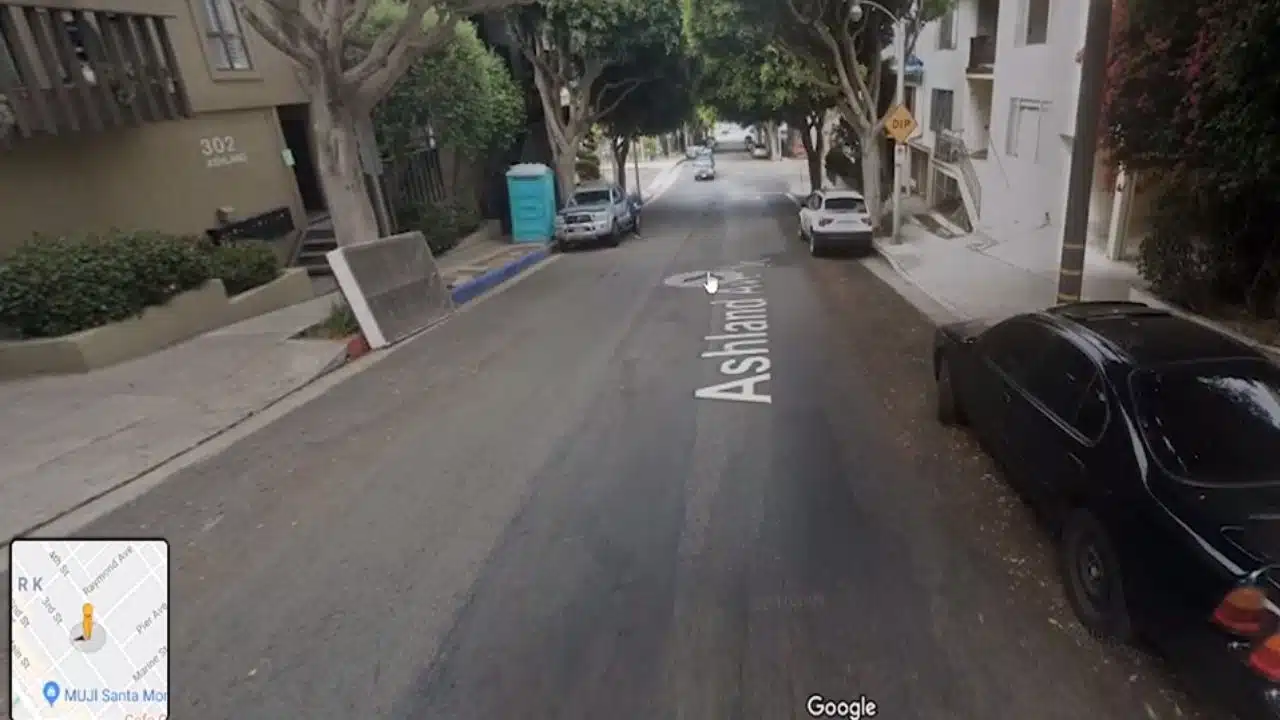
To get started, head over to maps.google.com on your computer. Once you’re there, look for the search bar in the top-right corner and type in your home address. Hit enter, and you’ll see a photo of your house pop up. Go ahead and click on that image to proceed.
Once you’ve clicked on the photo of your house, you’ll be taken to its Street View. Now, look for the “Report a Problem” option at the bottom-right corner of the screen. Fair warning—the text is really small, but it’s there. Just give it a click to move on to the next step.
Alright, you’re now at the stage where you can specify what you’d like to blur out. A red and black box will appear on the screen. Using your mouse, adjust this box so that it encloses your home, or any other details you want to obscure. You can move the box around with your cursor and use the plus and minus buttons to zoom in or out. Get everything positioned just right within that box.
After you’ve gotten everything just right within the red and black box, you’ll need to specify what exactly you want to blur. You’ll find options listed beneath the image. Go ahead and make your selection to let Google know what you’re looking to obscure.
- A face.
- Your house.
- automobile/license plate.
- A distinct thing.
Next, you’ll be prompted to provide some additional details. If the image is cluttered—with cars, people, or other objects—you’ll need to clarify exactly what you’re aiming to blur. Be very sure about your choice; Google makes it clear that once an object is blurred on Street View, it’s a permanent change.
To wrap things up, you’ll need to input your email address—it’s mandatory for this process. If a captcha comes up, go ahead and verify that you’re not a robot. Once all that’s done, hit the ‘Submit’ button to finalize your request.
After hitting ‘Submit,’ keep an eye on your inbox. Google will send you an email acknowledging they’ve received your request and will review it. Don’t be surprised if you get follow-up emails asking for more specifics about what you’d like to blur. Google is pretty tight-lipped about the timeline for processing these requests, so there’s no way to know exactly how long it will take. Just stay tuned for additional emails that will let you know whether your request has been approved or denied.